In the previous article you have seen how to add company details and company tax details for India payroll compliance. Now let us see how to add employees and their compliance details using Deskera People.
Following are the below steps to add employees in the system
- Click on the Employees option located on the left side of the main dashboard,
2. Then, click on the ‘+Add Employee’ button, a screen will appear, where the user/admin can add the required information.
3. Under Employee Section fill in the following fields,
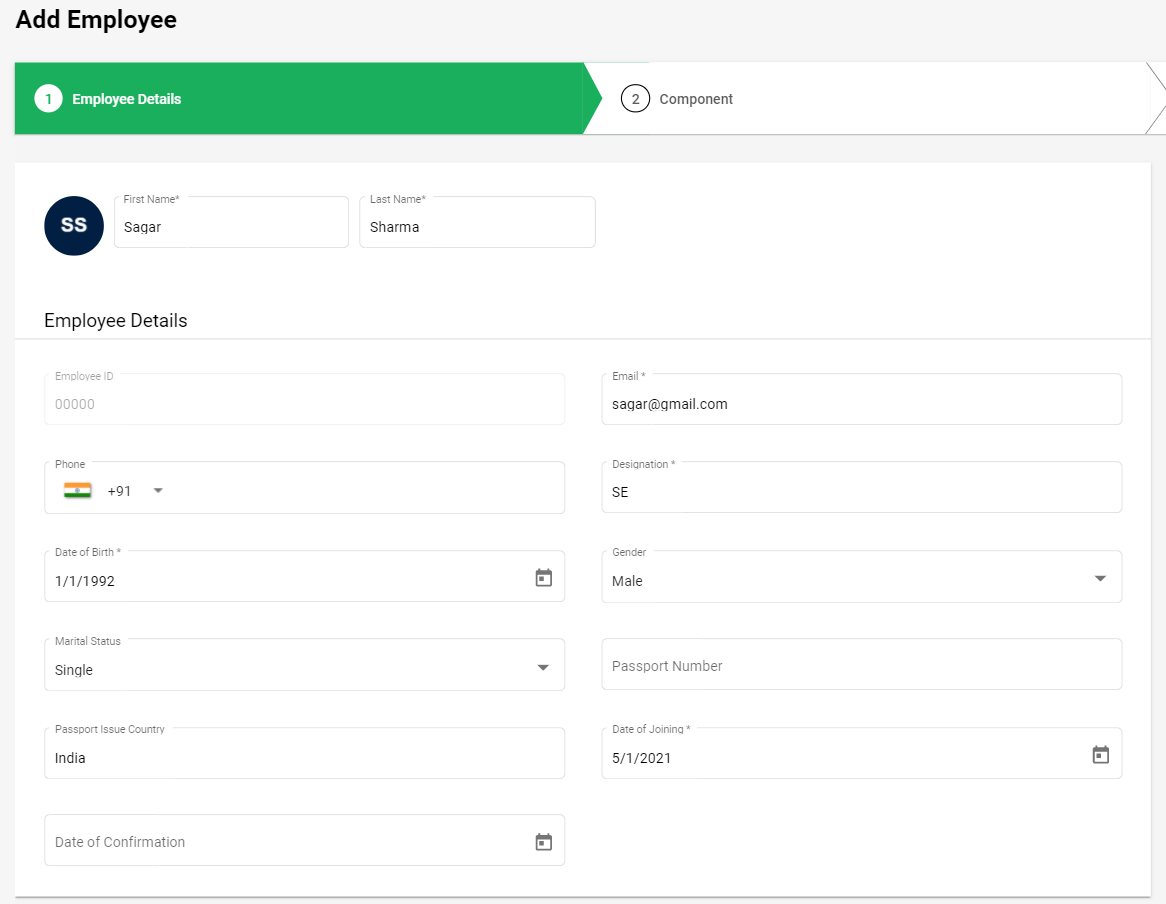
Enter the details in below mandatory fields,
- Name - Enter First Name and Last Name
- Employee ID- Auto-populated
- Designation - Employee Designation
- Email id - Employee Email ID
- Date of birth - Employee DOB
- Date of Joining - Select employee DOJ form the calendar
Contact Details Section:
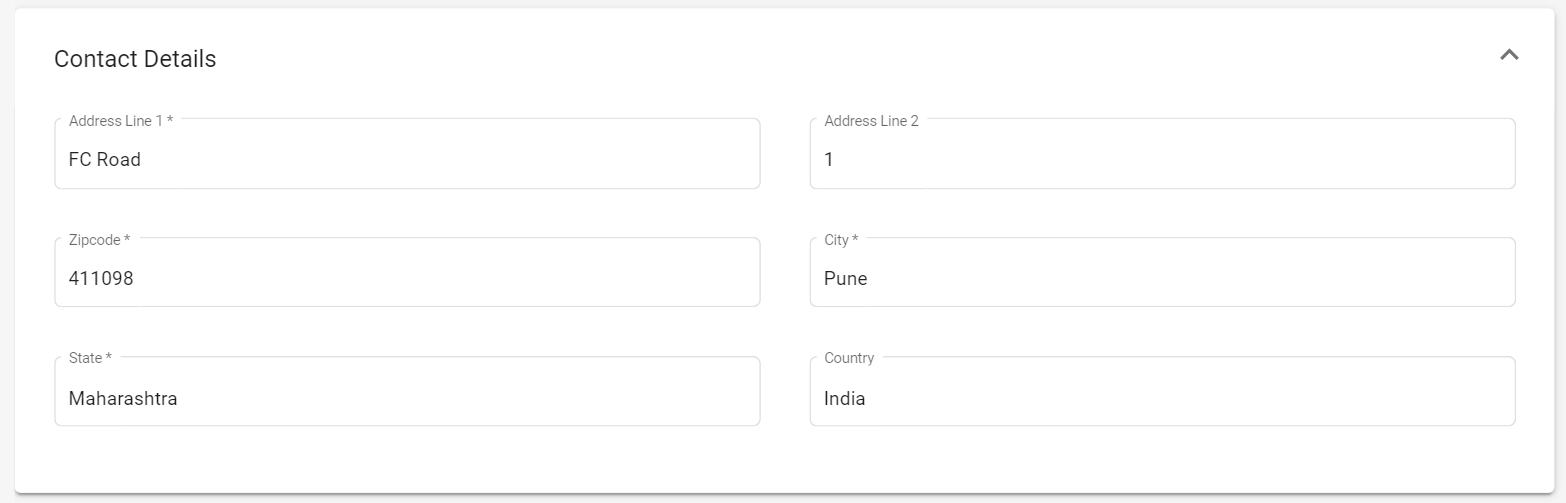
Enter these details,
- Address
- Zipcode
- City
- State
- Country
Compensation Details Section:
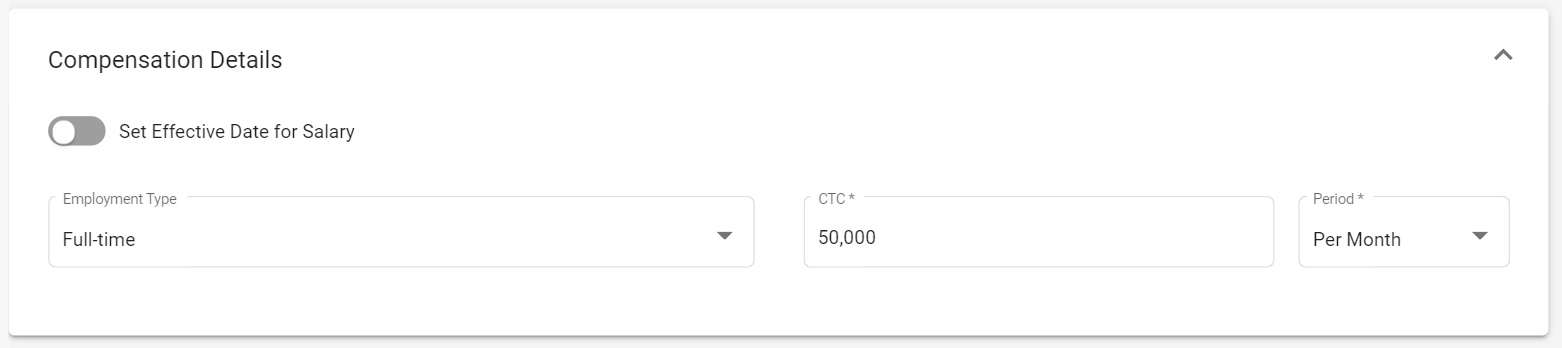
- Employment type - Select the option from the drop-down menu
- CTC - Enter the employee CTC (Cost to Company)
- Period- Select period (Per year/Per month) from the drop-down menu
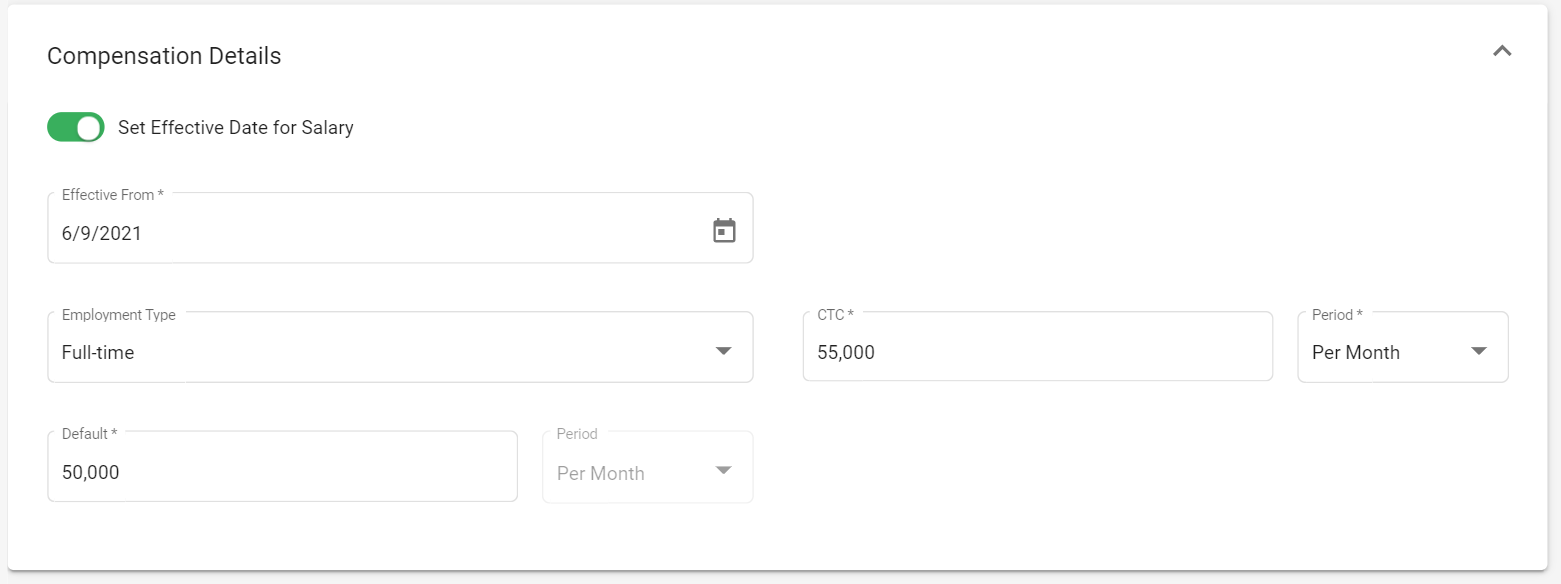
- Set Effective Date for Salary
If you enable the Set Effective Date for Salary toggle button, then as an admin you can set the effective date for salary, when the salary will be changed for a specific employee based on the time period so as to define the salary change for the employee.
- After the toggle button is enable you need to fill in the below details ,
1. Effective From - Select the date from the calendar, as when the changed salary will be with effect from.
2. CTC - Enter the changed salary under CTC.
3. Default - This default value will only be utilized outside of the effective from date.
- If you choose the effective from date, then the system will calculate the payroll based on that salary form that particular month onwards.
Payment Details Section:
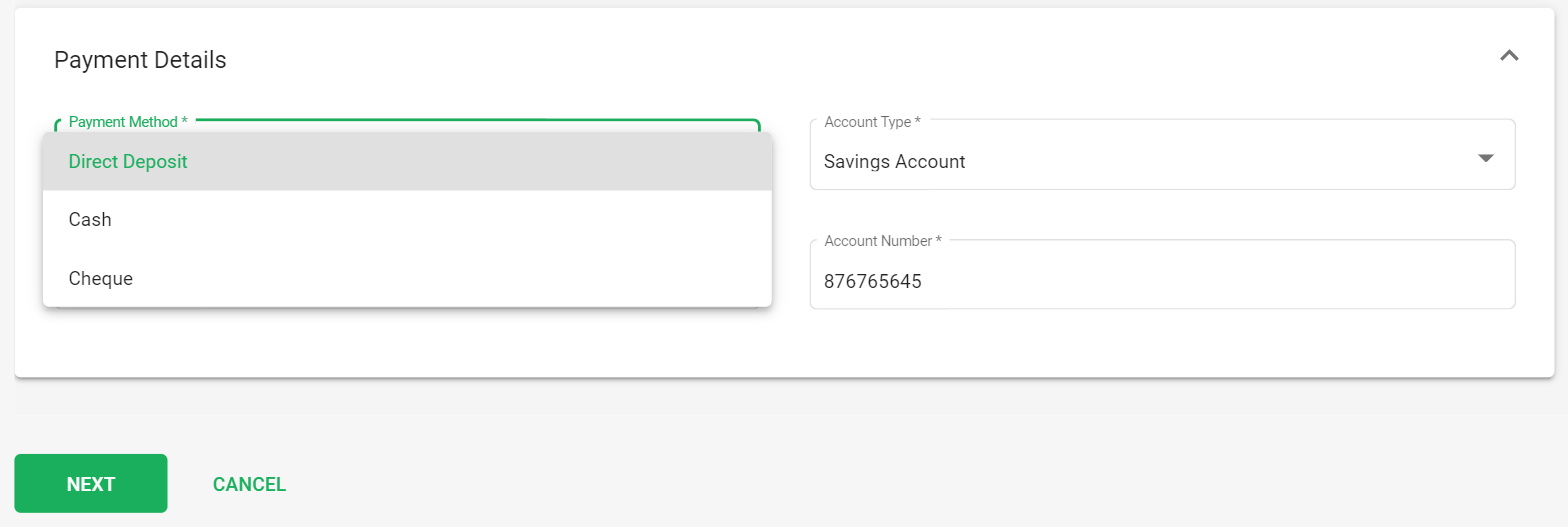
- Payment Method- Select the payment option from the drop-down menu (Cash, Cheque and Direct Deposit)
- If selected Direct Deposit enter - Mention Account type, Swift Code/Routing and Account Number
- If Selected Cheque - Mention Employee Bank Account Number
Once all these employee details are correctly filled, click on the Next button which will take you to the next screen of Components,
4. Under Fixed Component Section:
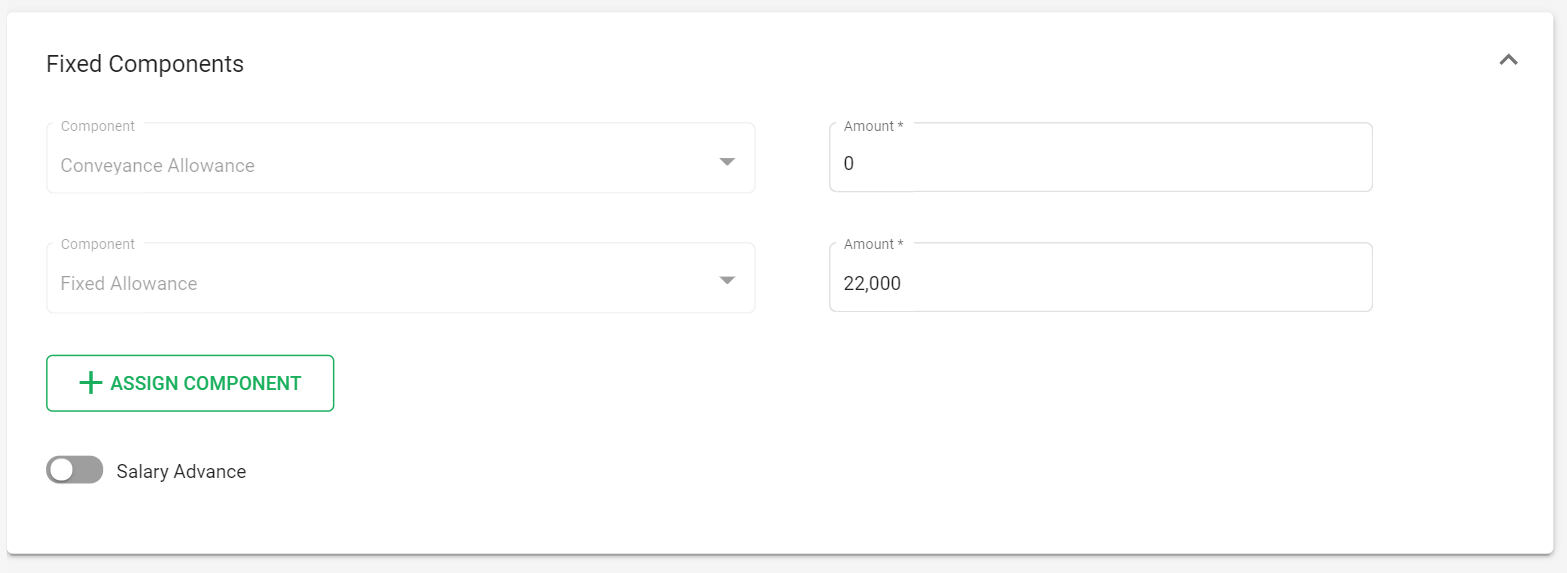
- Under the fixed components section, you can view the default fixed earning payroll components set in the component module.
- If you want, you can edit the amount of these components. you can do it under the amount field.
- These components cannot be deleted.
- Incase, you need to add a new fixed component, you can do it by clicking on the +Assign Component button. The details in this, will be captured from the Fixed component added under the component module.
- - For the newly added components, you can view the Payment Frequency and also have an option to change the frequency, by clicking on the Edit icon.
- - Edit frequency pop up will appear, from here you can change the Frequency. Once updated click on the save button and same will be updated under the Employee Fixed Component section.
- - If any component is not applicable, you have an option to delete it by clicking on the Bin icon.
Next, under Variable Components Section:
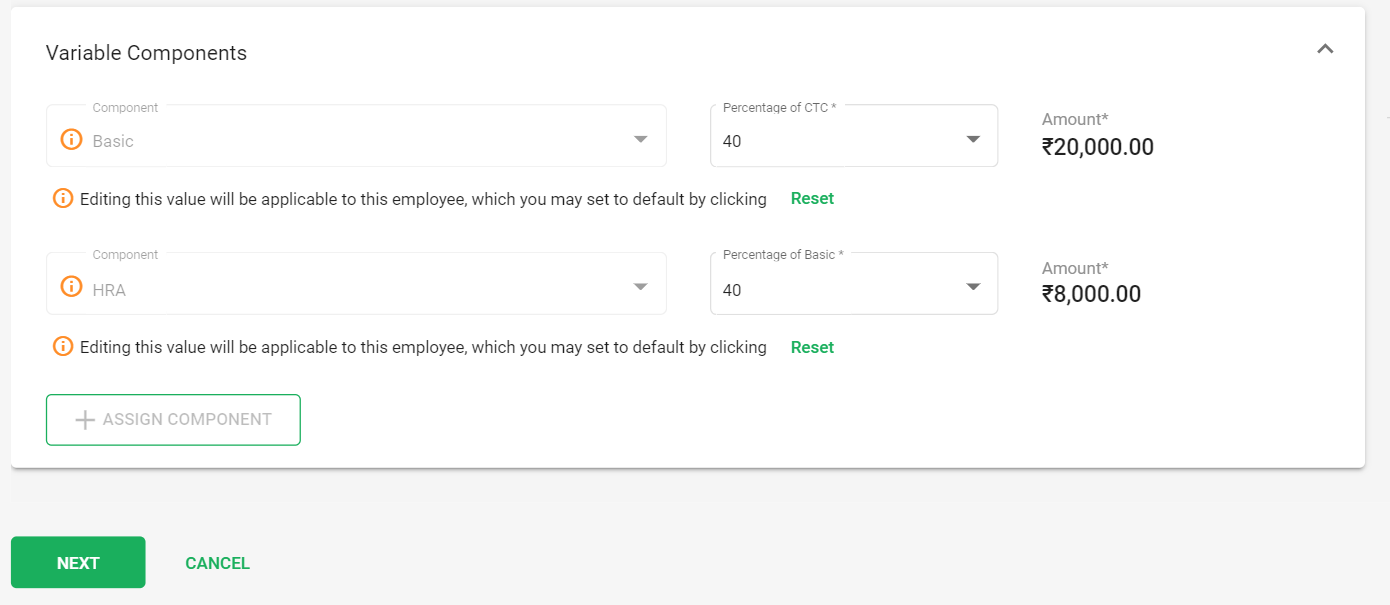
- Under the variable components section, you can view the default Variable earning payroll components set in the component module.
- For Basic Component, you can edit the Percentage of CTC to 40% or 50% which will calculate the percentage selected of CTC and also the HRA component value will affect if there is a change in the basic percentage and will be calculate on the basic value derived.
- If you only change the HRA Percentage to 40% or 50 %, it will calculate the value on the percentage selected of Basic.
- After this, percentage of Basic/HRA Component value is edited, you need to click on the reset button, where the value will be auto-calculate the amount in the system as per the percentage.
- Incase, you need to add a new Variable component, you can do it by clicking on the +Assign Component button. The details in this, will be captured from the Variable component added under the component module.
- - For the newly added Variable components, you can view the Payment Frequency and also have an option to change the frequency, by clicking on the Edit icon.
- - Edit frequency pop up will appear, from here you can change the Frequency. Once updated click on the save button and same will be updated under the Employee Variable Component section.
- - If any component is not applicable, you have an option to delete it by clicking on the Bin icon.
After entering the Employee Details and Components, click on the Next button which will take you to the next screen of Compliance Details.
Under Compliance Details,

- PAN* - Enter Employee PAN number
PAN, or permanent account number, is a unique 10-digit alphanumeric identity allotted to each taxpayer by the Income Tax Department under the supervision of the Central Board of Direct Taxes. It also serves as an identity proof. - UAN number - Enter employee UAN number
UAN stands for Universal Account Number to be allotted by EPFO. ... The idea is to link multiple Member Identification Numbers (Member Id) allotted to a single member under single Universal Account Number. This will help the member to view details of all the Member Identification Numbers (Member Id) linked to it. - PF Account Number - Enter employee PF account number
Employee PF Account Number. The Employees' Provident Fund Account Number is an account number that can be used by employees to check the status of their EPF, the balance in the EPF account, etc. The number is mandatory for withdrawals from EPF. - Employees Provident Fund - Tick on the check box if you are applicable for EPF
Employees’ Provident Fund or EPF is a popular savings scheme that has been introduced by the EPFO under the supervision of the Government of India. The EPF contribution rate for employees is fixed at 12%. - Professional Tax - Tick on the check box if you are applicable for PT
The maximum amount of professional tax that can be levied by a state is Rs 2,500. It is usually deducted by the employer and deposited with the state government. In your income tax return, professional tax is allowed as a deduction from your salary income. - Exempt employees from tax calculation - Tick on the check box if for any employee tax calculation need not to be made.
After all these compliance details are filed in, click on the save button to calculate the tax during the payrun.
Import and Export Employees with compliance Details
Now you have an option to Bulk Import and Export Employees for India along with their compliance details.
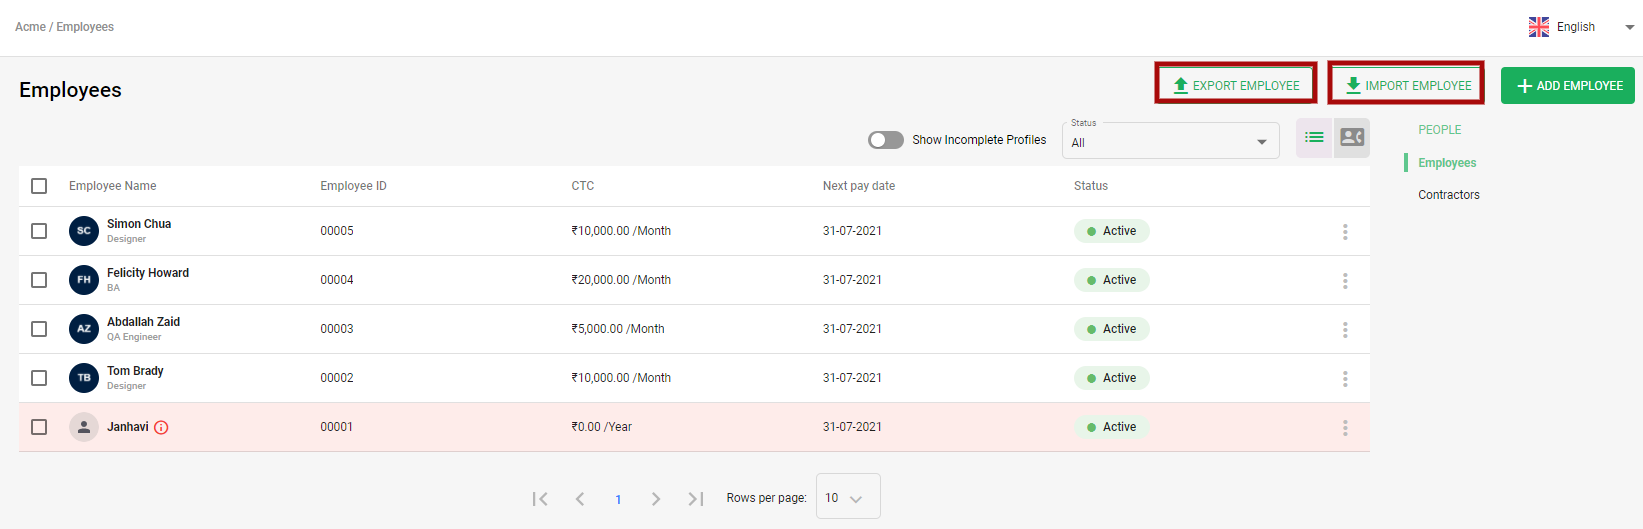
To export employees, you can simply do it by downloading the sample excel spreadsheet, fill in the details and upload this file. With this import function it will help you save your time.
By clicking on the Import Employees button, you can fetch all the employees information along with their compliance details in excel sheet.
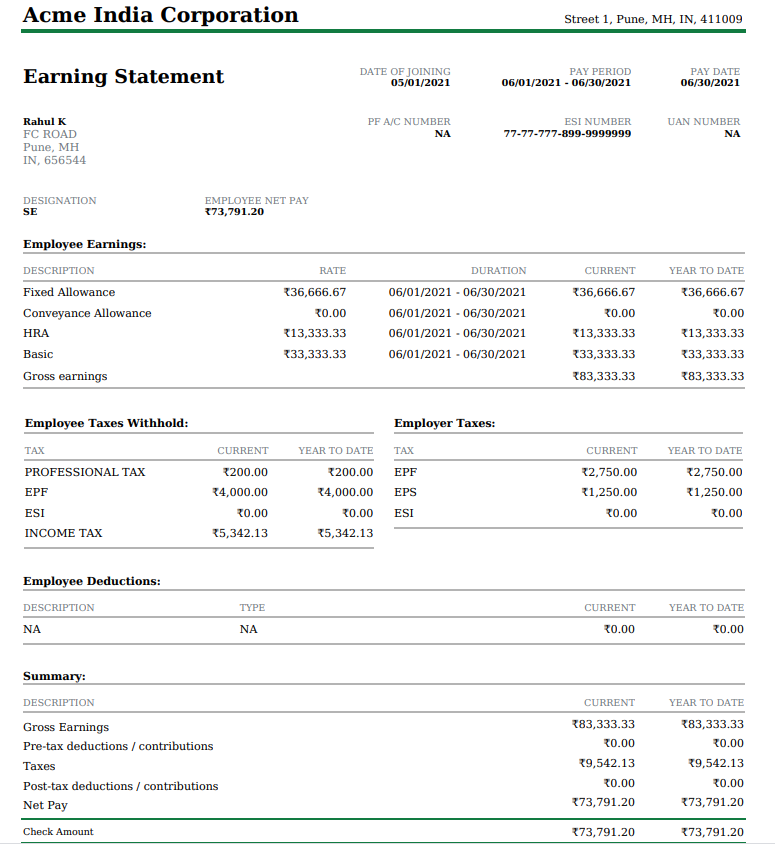
Generate Payslips
After the Payroll is processes, employees can generate their own payslips with the below simple steps,
- Go to Employees>> Employee List>> click on the employee name>> below screen will appear,
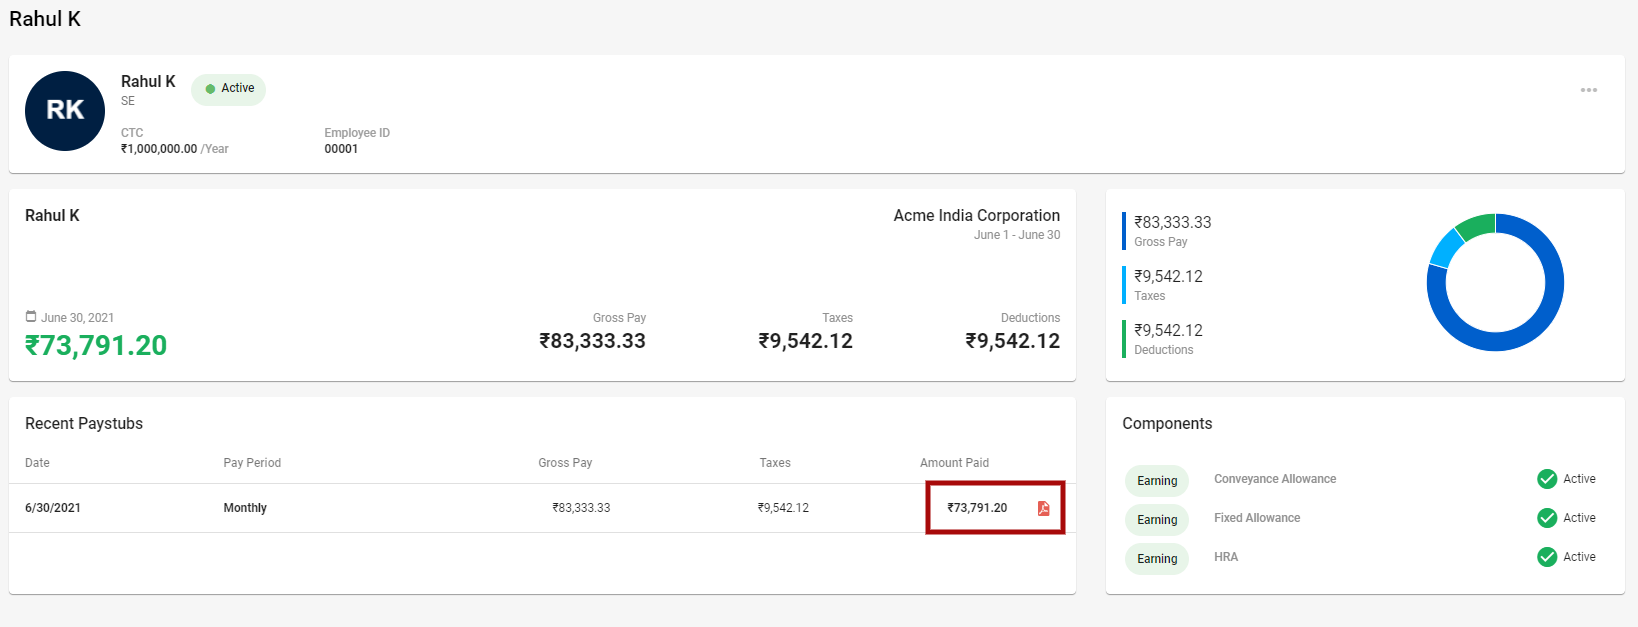
2. Click on the PDF icon, and below payslip will be generate from the system, with all earning, deductions, withhold taxes, employer taxes
Sample Payslip from the system,