

We have finally rolled-out Saudi Arabia compliance in Deskera Books.
And, if you are business owners in Saudi Arabia and currently looking for an accounting software that comply with Saudi Arabia tax regulations, look no further. Deskera Books have your covered.
Read more below as we cover the step-by-step guide to setup your organization in Saudi Arabia.
Let's begin
How do I set up my company details?
- Login to your Deskera Books account. If you do not have an account with us, you can sign-up for a new account here.
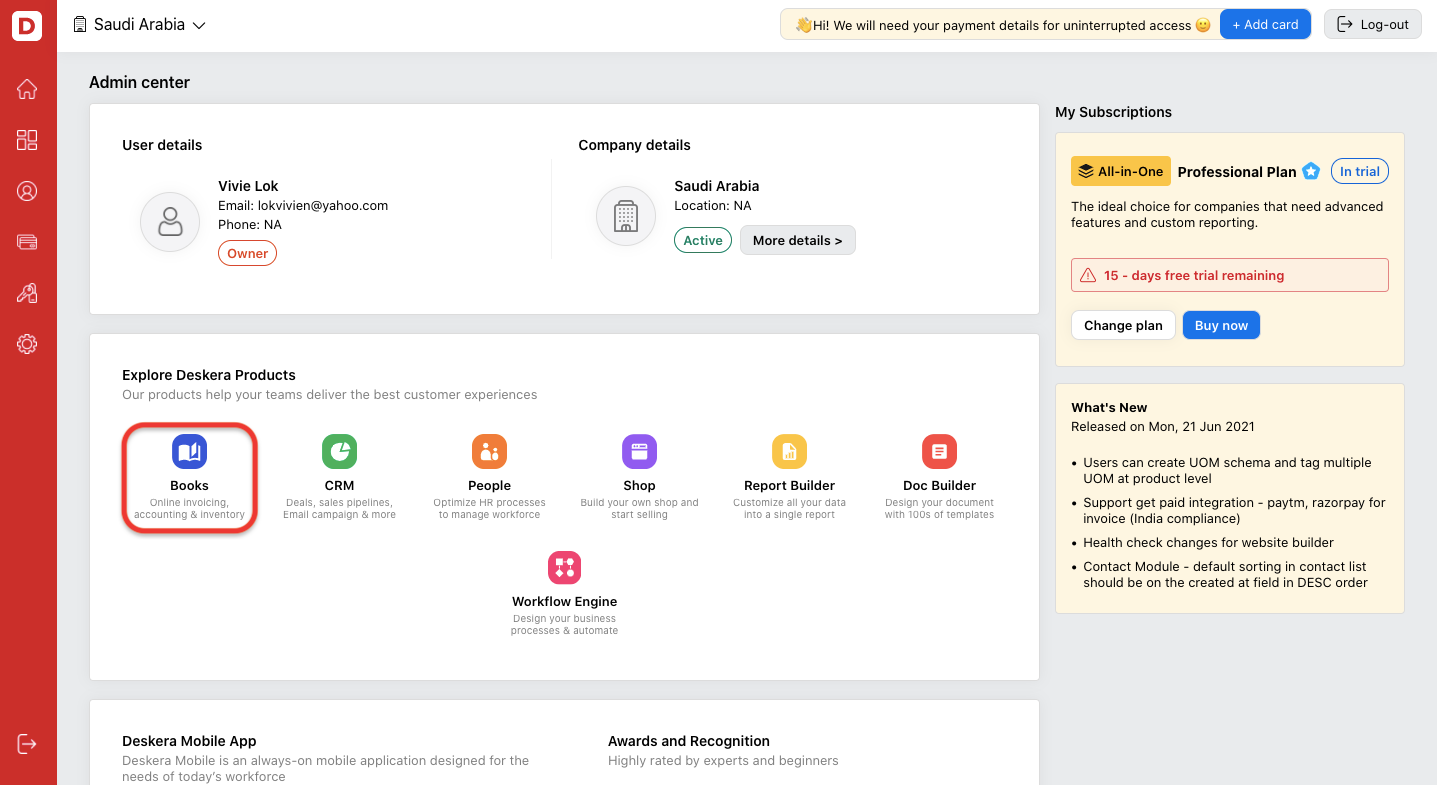
2. In Deskera Console, click on Books. The system will redirect you to the Deskera Books Main Dashboard.
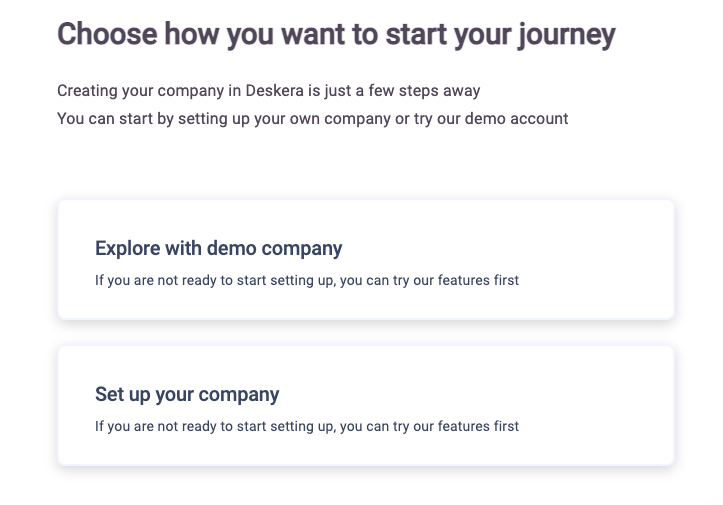
3. A pop-up will appear. Choose to set-up your company here. Fill in the following information:
- Your organization name - This is populated based on the organization name you have filled when signing up for your Deskera account.
- The financial year start date
- The book beginning date - To understand more about these dates, please click here.
- Tax Residency - Select the country your business is registered. You can select Saudi Arabia.
- Reporting Currency - This would be auto-populated based on the currency of the country you have selected. In this case, it will be Saudi Arabian Riyal (SAR). If you need to choose other reporting currency, you can do that as well.
*Please note that after saving the fields here, you cannot change the dates, tax residency and reporting currency again.
4. Click on the Next button.
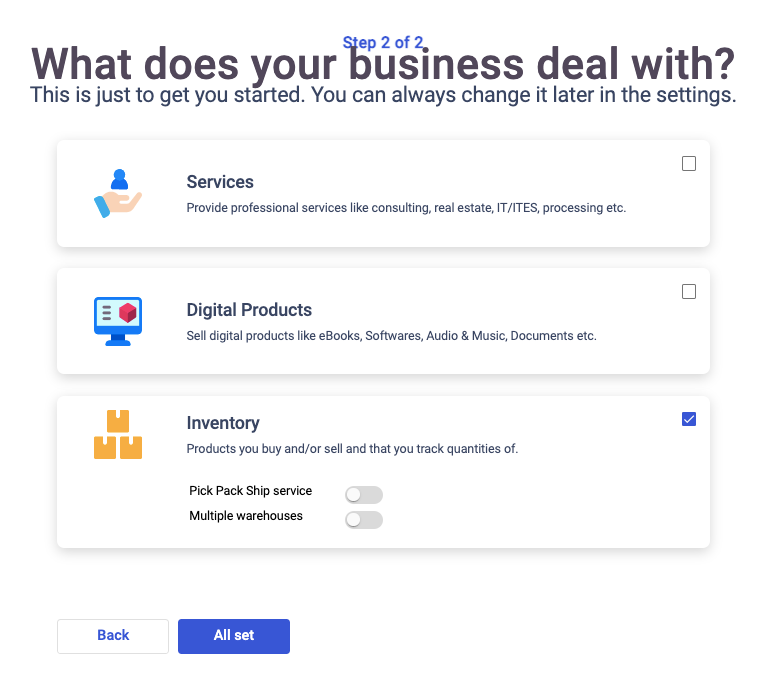
5. In the following screen, enter the nature of your products. Once you have set the nature of your products, click on the All Set button.
Where can I save my company registration number?
You have successfully set-up your organization in Saudi Arabia.
So, what's next?
Next, you will need to fill in your VAT number and business number.
To do that, follow the steps here:
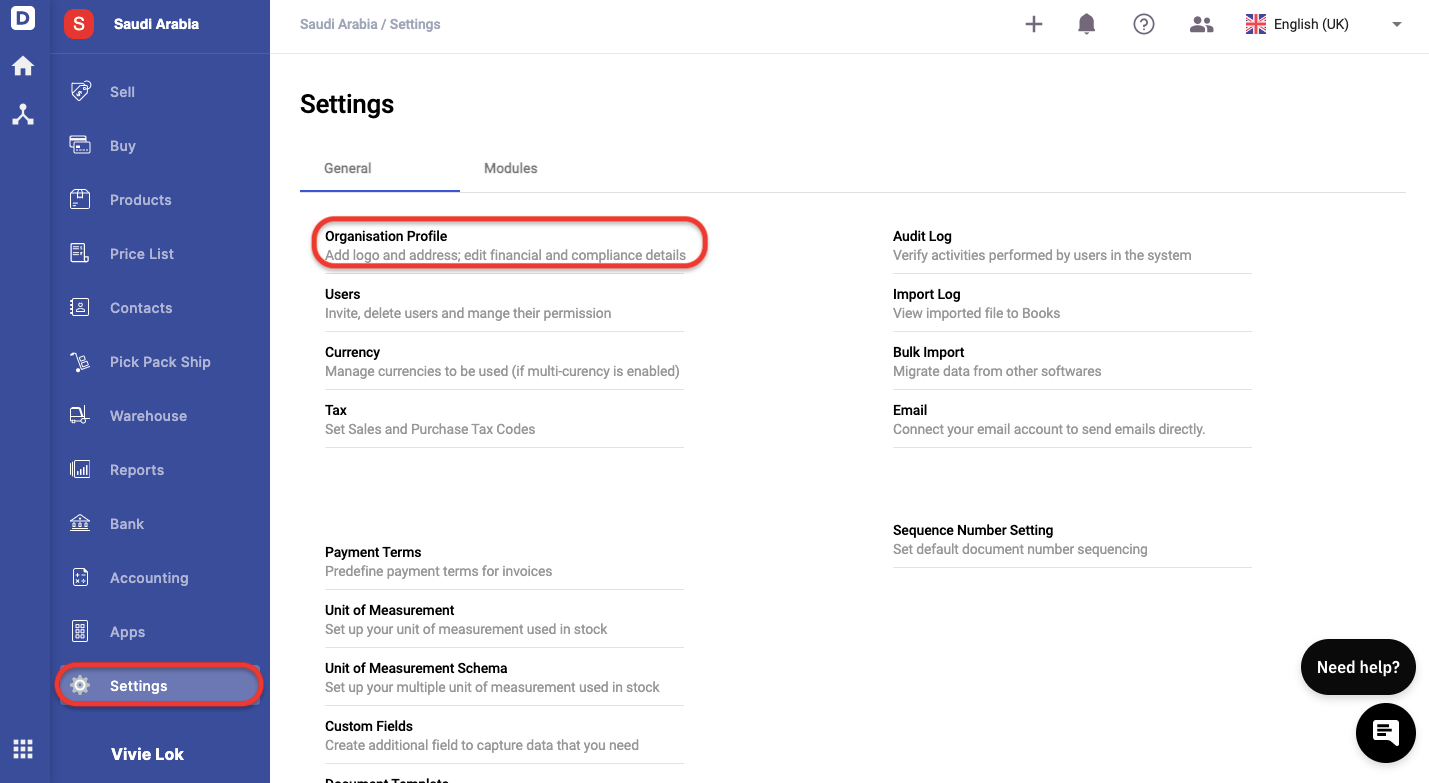
- On Deskera Books Main Dashboard, click on the company tab via the sidebar menu. The system will direct you to your company details page.
- Click on Organization Profile.
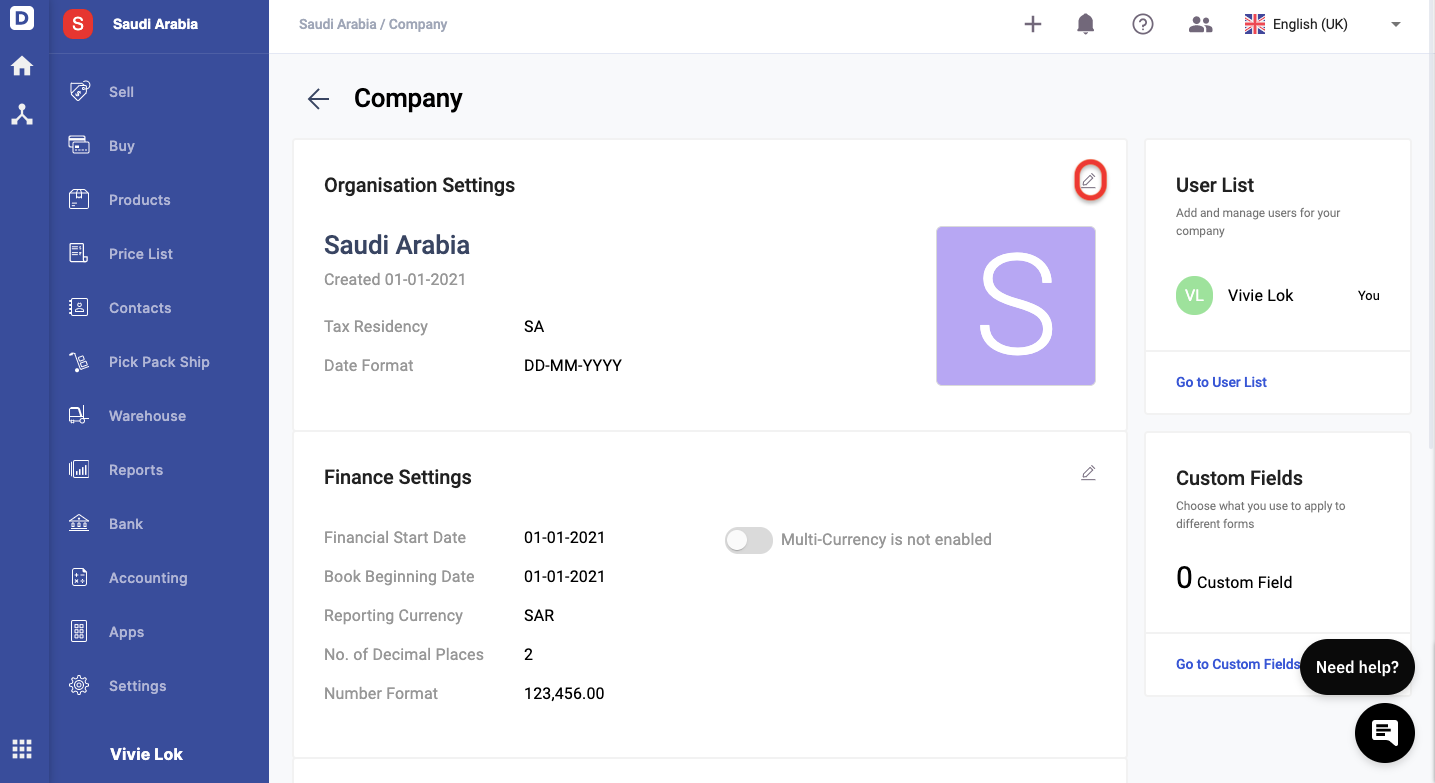
3. Click on the edit icon to edit your company details here.
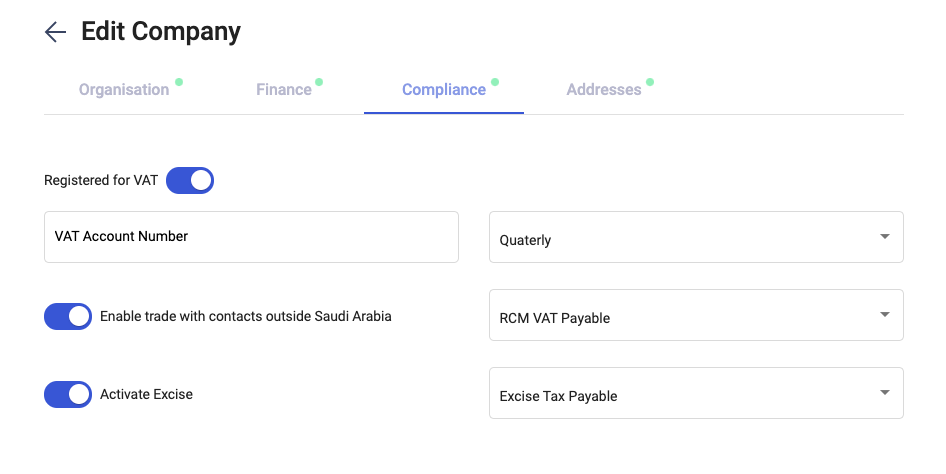
4. Next, click on the compliance tab and fill in the following details:
- Enable the Register for VAT toggle - Once you have enabled this enter your VAT account number and the filing frequency
- Enable the toggle if you are trading with contacts outside Saudi Arabia - Choose the respective account for any transactions outside Saudi Arabia
- Activate Excise, if applicable for your business - Choose the respective excise account for any transactions related to the excise tax
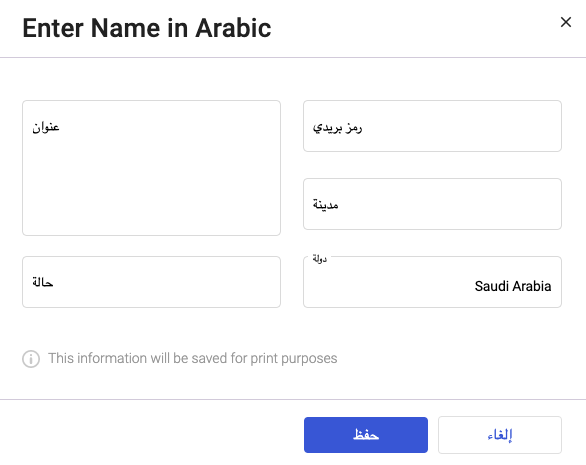
5. Click on the Address tab to update your billing and shipping address in English. Click on the Enter in Arabic button to translate.
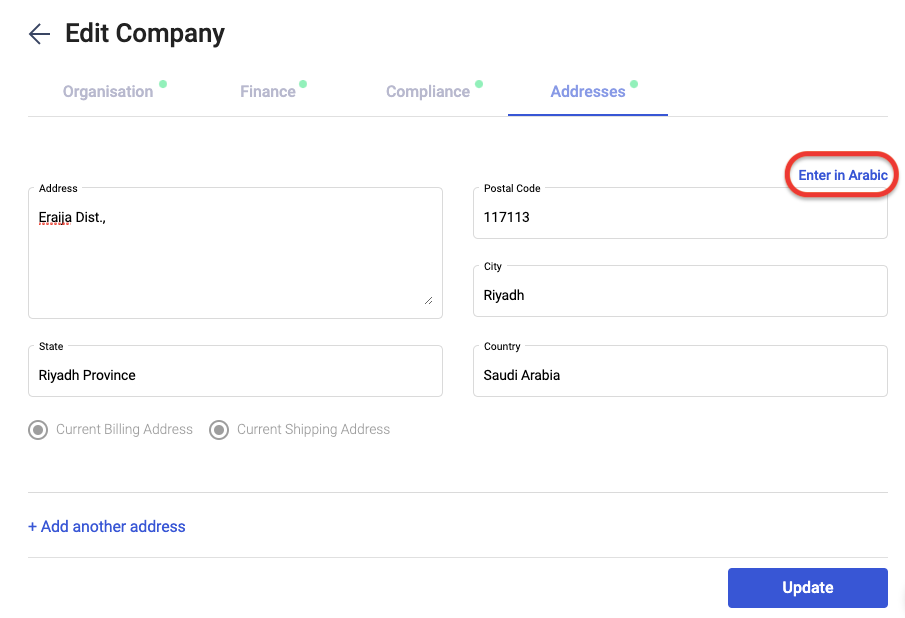
6. A pop-up will appear. Enter your address in Arabic and save it.
Setting up your Chart of Accounts
To view the default Chart of Accounts, you can read more on the steps here:
- Go to Accounting via the sidebar menu.
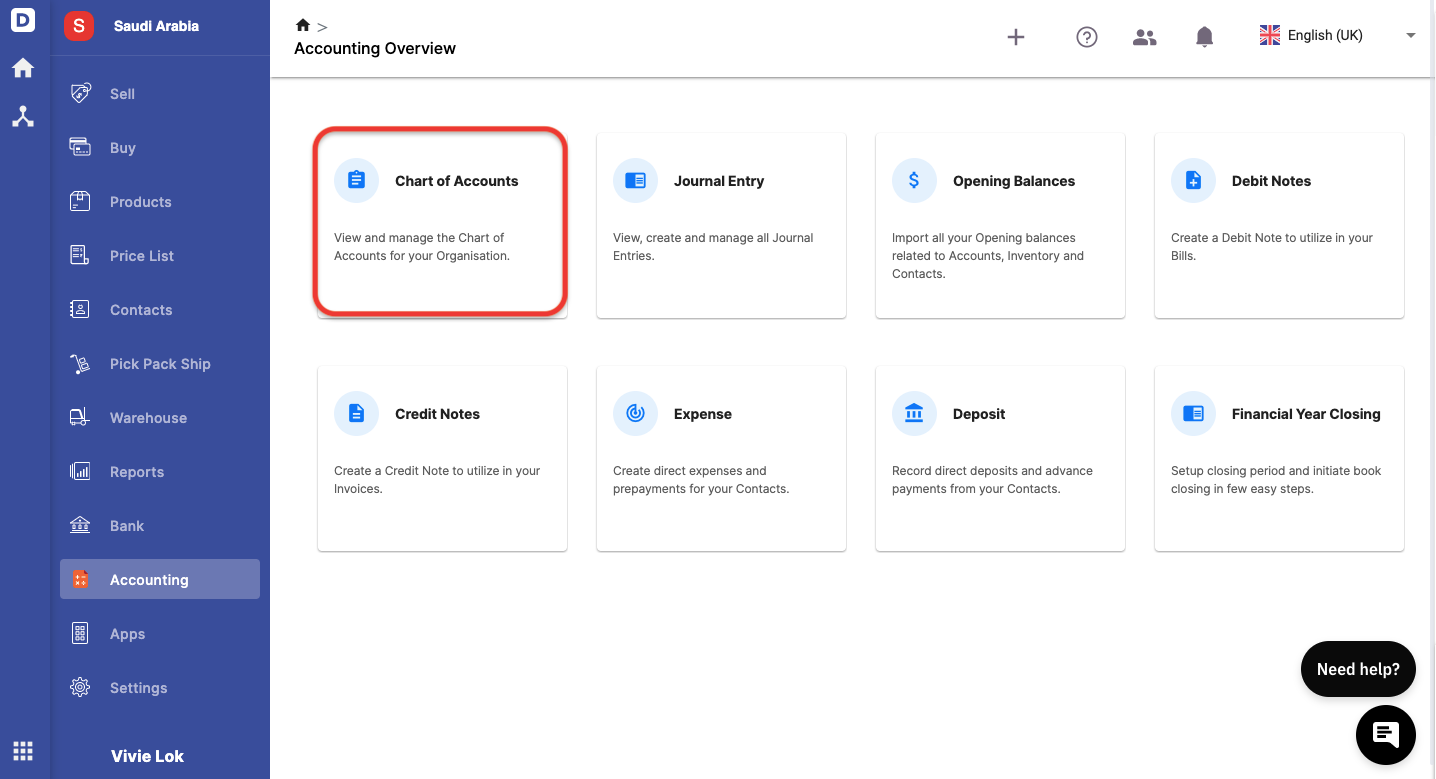
2. Click on the Chart of Accounts (COA).
3. On this page, you can view the default COA listed in Deskera Books. If you couldn't find any COA that fits your business requirements, you can always create a new account by clicking on the "Add" button.
Please refer to this article to guide you on creating the Chart of Account in Deskera Books.
Create a new tax rate
You need to ensure that the applicable tax rates are available for your organization once your Chart of Accounts is up and running.
Follows the steps here to view the default tax rates in Deskera Books:
- Click on Settings via the sidebar menu >> Select Tax.
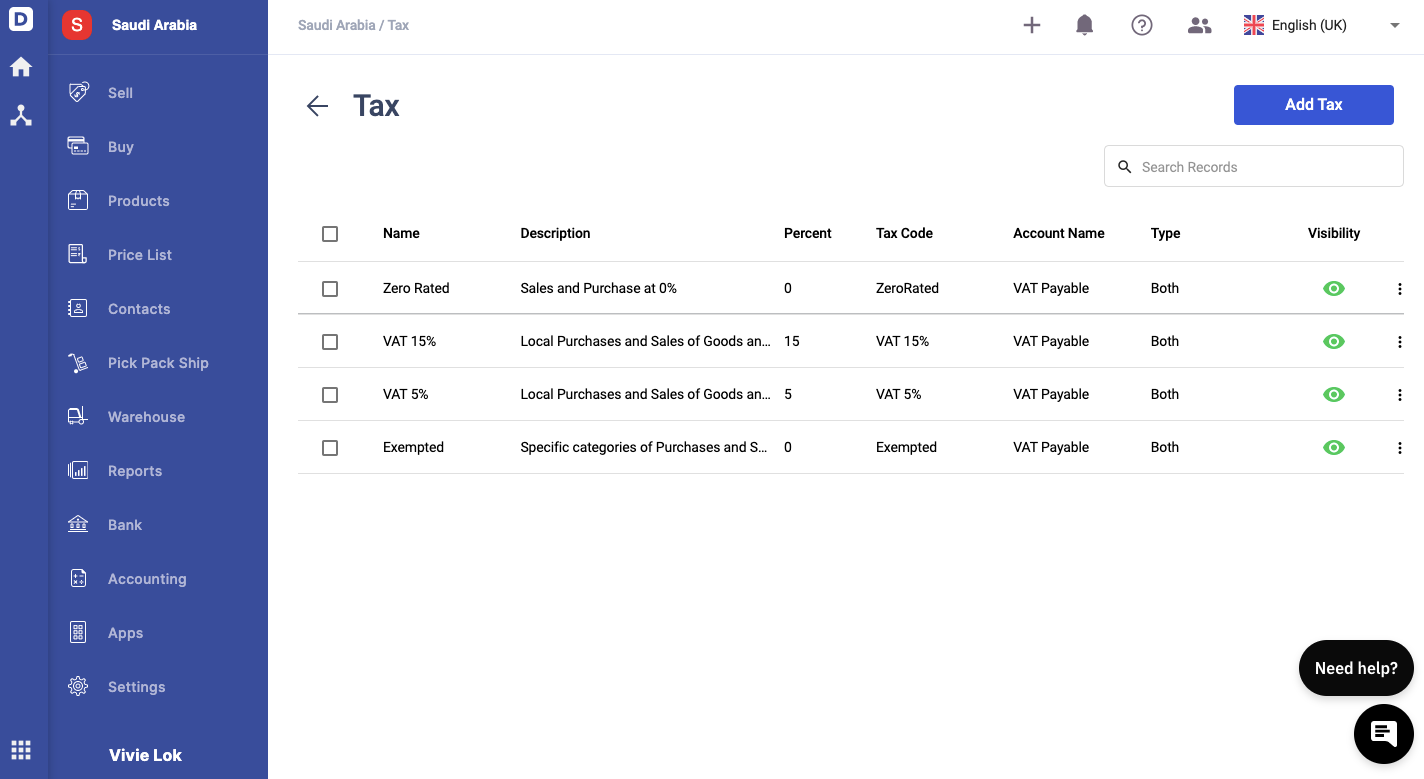
2. You can view the default tax rate in the system. However, if you couldn't find your tax rate here, you can always create a new tax by clicking on the Add Tax button.
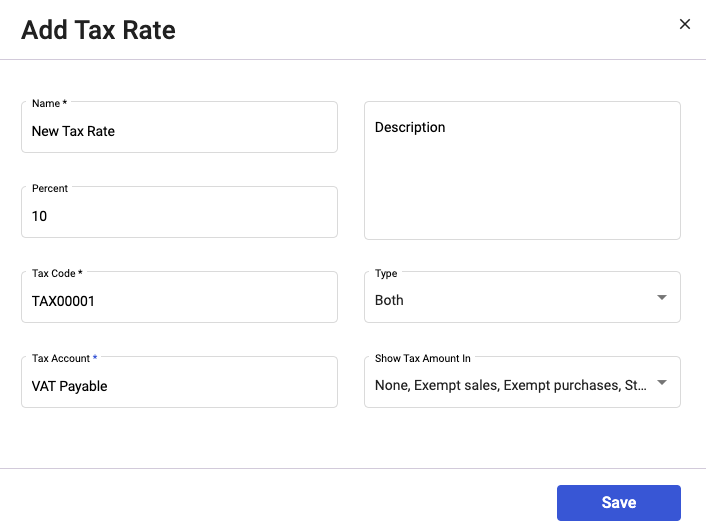
3. A pop-up will appear. Fill in the following fields:
- Tax Name - Enter the tax name
- Percentage - The percentage of the tax rate
- Description - Short notes describing the tax
- Tax Code - Enter the tax code
- Tax Type - Choose the tax type. You can select the tax type as Sales, Purchases, or both
- Tax Account - Select the tax account involved. The options that appeared from the dropdown here is populated based on the accounts in COA
- Show Tax Amount In - Choose the type of sales and purchases to apply this tax rate
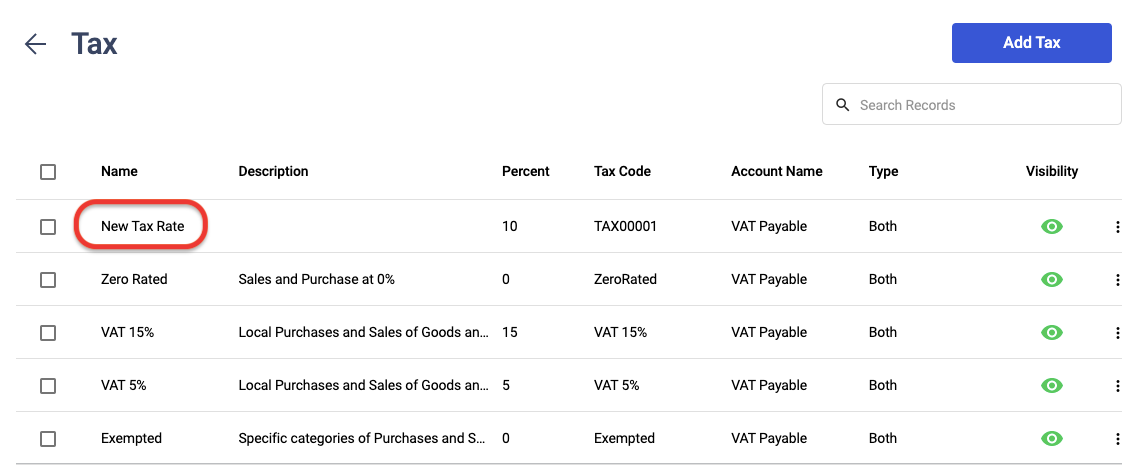
4. Click on the Save button. You can now view the newly added tax and tax group from the Tax List.
5. You can edit the tax details but cannot delete the system's default tax rate. Also, you are only allowed to delete the tax rate you created on your own.
6. If you have already applied the tax rate in any documents or contacts, you cannot delete the respective tax rate.
How can I apply the tax against my contact?
Contact means both your customers and vendors in Deskera Books.
To apply the tax rate for the respective contact, you can refer to the steps below:
- Go to the Contacts tab via the sidebar menu.
- Click on the Add Contact button.
- Fill in the fields, as shown below:
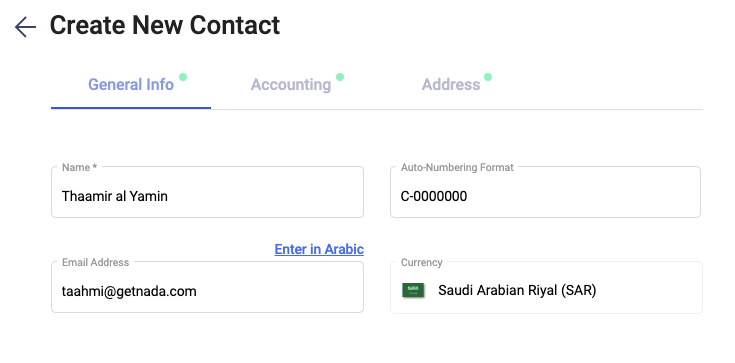
- Name - Your contact's name
- Auto-numbering format - Customize the auto-numbering format for the contact
- Email Address - The contact's email address. You can enter the email address in Arabic as well
- Currency - The currency is auto-populated based on the currency saved on the setting page
4. Update the contact's accounting tab - choose the payment term, account for the buy and sell tab, and contact's VAT registration type.
5. Next, update the contact's shipping and billing address. You can also enter the address in Arabic.
How can I apply the tax against a product?
- Follow the guide here to create a product in Deskera Books.
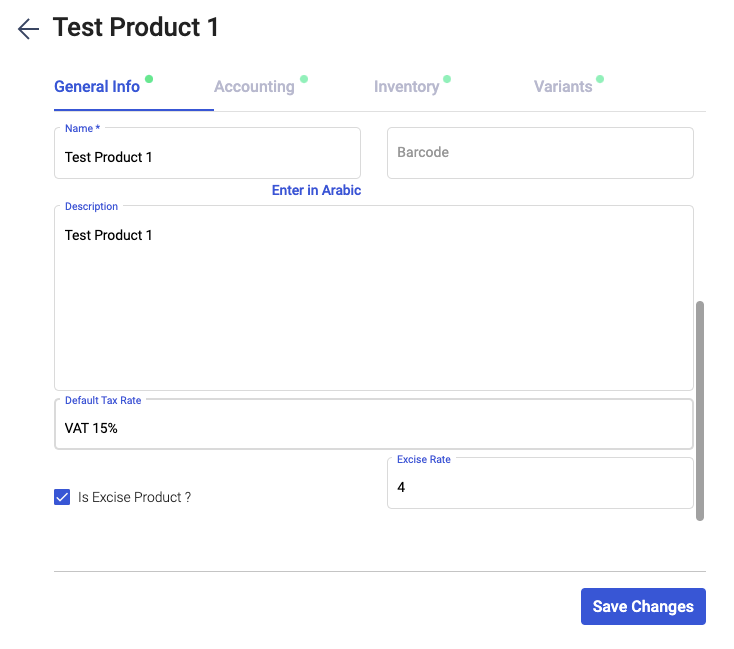
2. In the Product window, click on the general information. In this tab, select the default tax rate and enable the excise product checkbox, if applicable. Enter the excise rate and save the changes.
3. The purchase tax and sales tax will be populated as per the configuration in your Master Tax page.
4. Click on the Create product button once this is done.
How to apply the VAT rate against an invoice?
Once you have created your products and contacts, you can start issuing invoices or bills to your customers/vendors.
To create an invoice, you can follow the steps here:
- Go to the Sell tab on the sidebar menu.
- Click on the Create Invoice button.
- Fill in the fields in the invoice as per the guide here.
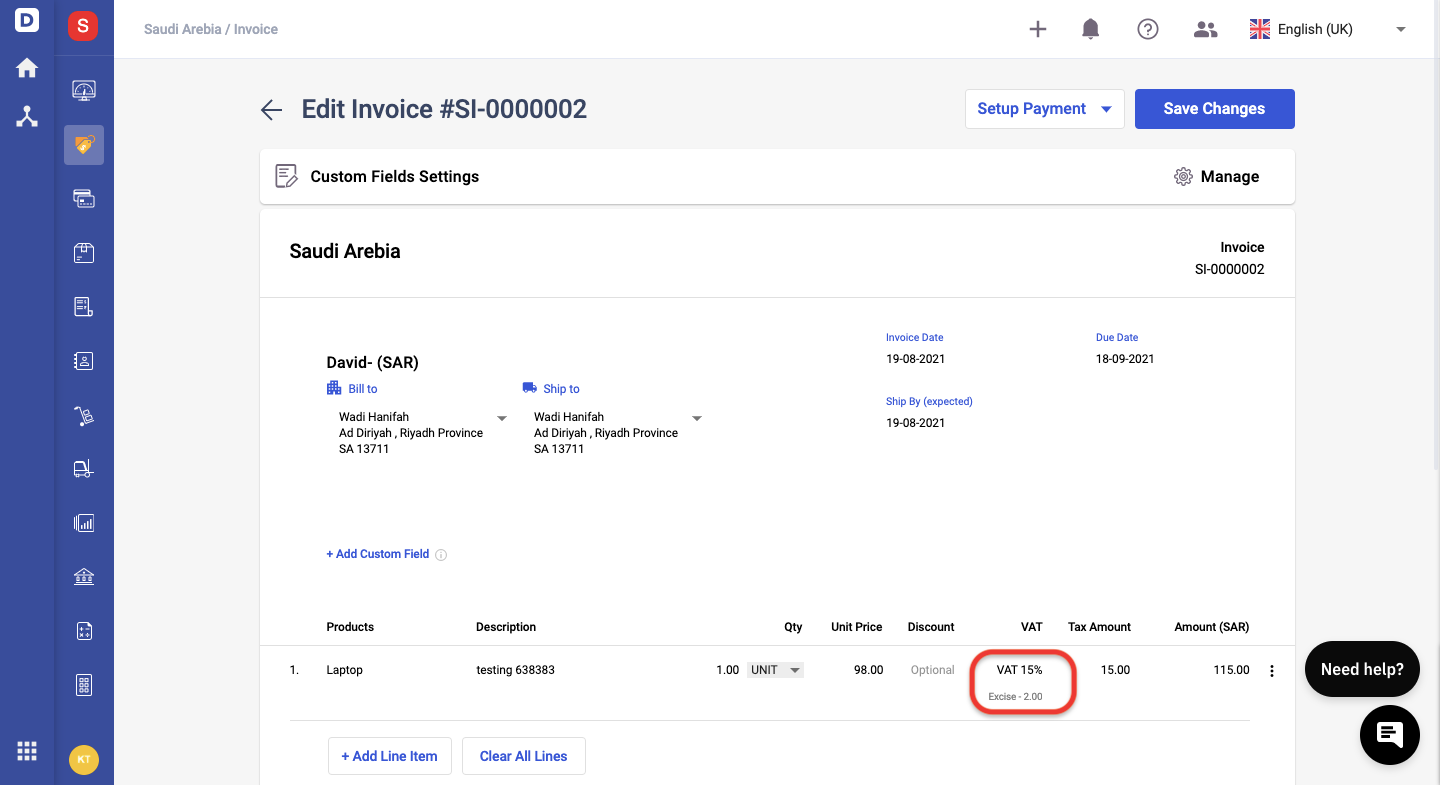
4. Upon selecting the product line item, the tax column will be auto-populated based on the default tax rate saved earlier in the Product Module. If you have enabled the excise tax, the excise rate will be computed as well.
5. Click on the Save button.
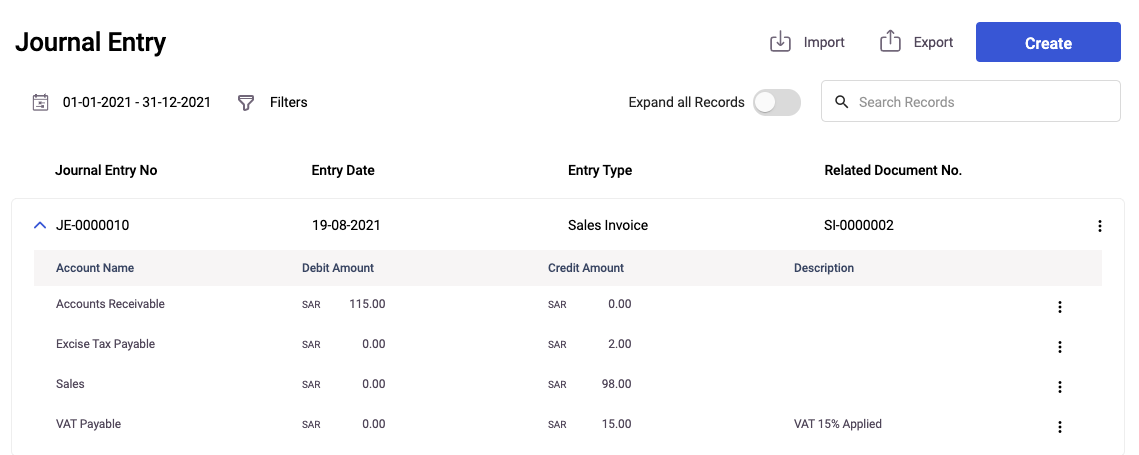
6. Next, go to Accounting tab on the sidebar menu >> Select Journal Entry >> Here you can view the journal entry populated for the sales invoice.
How to apply the VAT rate against a bill?
- Go to Buy via the sidebar menu
- Click on the Create Bill button.
- Fill in the fields in the bill as per the guide here.
- Upon selecting the product line item, the tax column will be auto-populated based on the default tax rate saved in the product module.
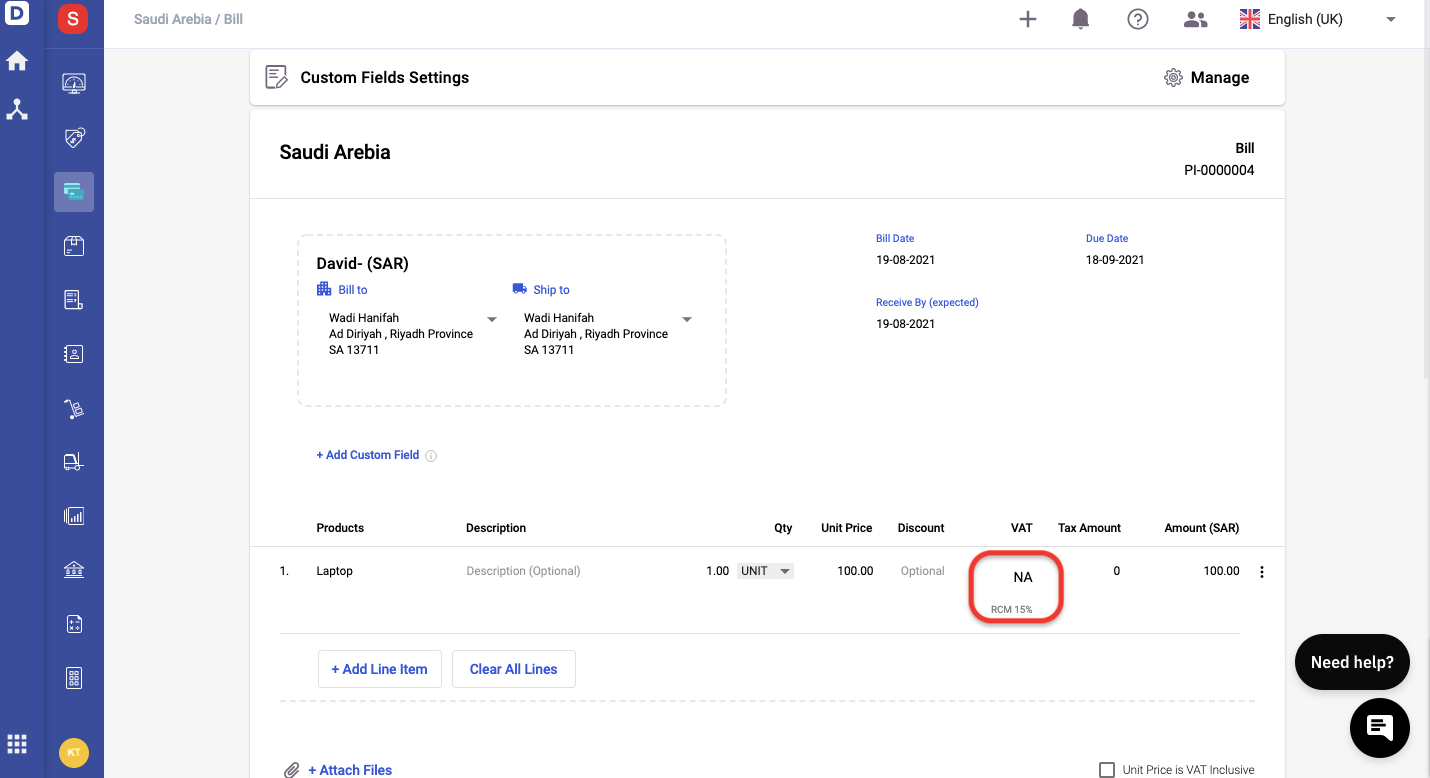
6. Enable the checkbox below if RCM is applicable, or if the VAT is paid at customs.
7. Click on the Save button.
How can I generate the VAT Return?
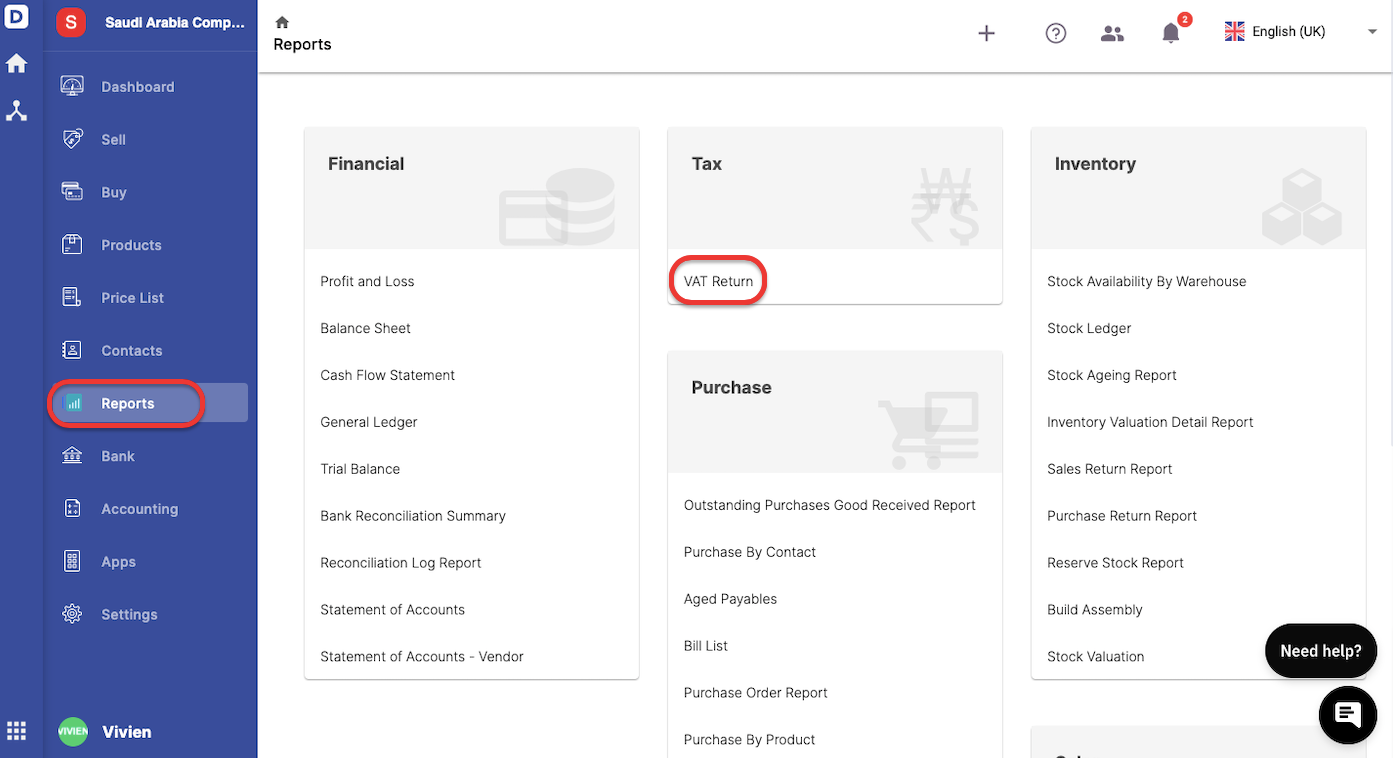
Follow the steps below to generate the VAT Return in Deskera Books:
- Click on the Reports via the sidebar menu.
- On the Reports page, click on the VAT Return button.
- Click on the Create button in the VAT Return page.
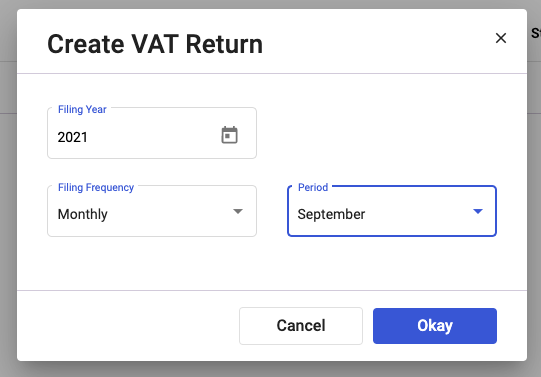
4. A pop-up will appear. Enter the filing year, filing frequency and respective period. Click on the Okay button.
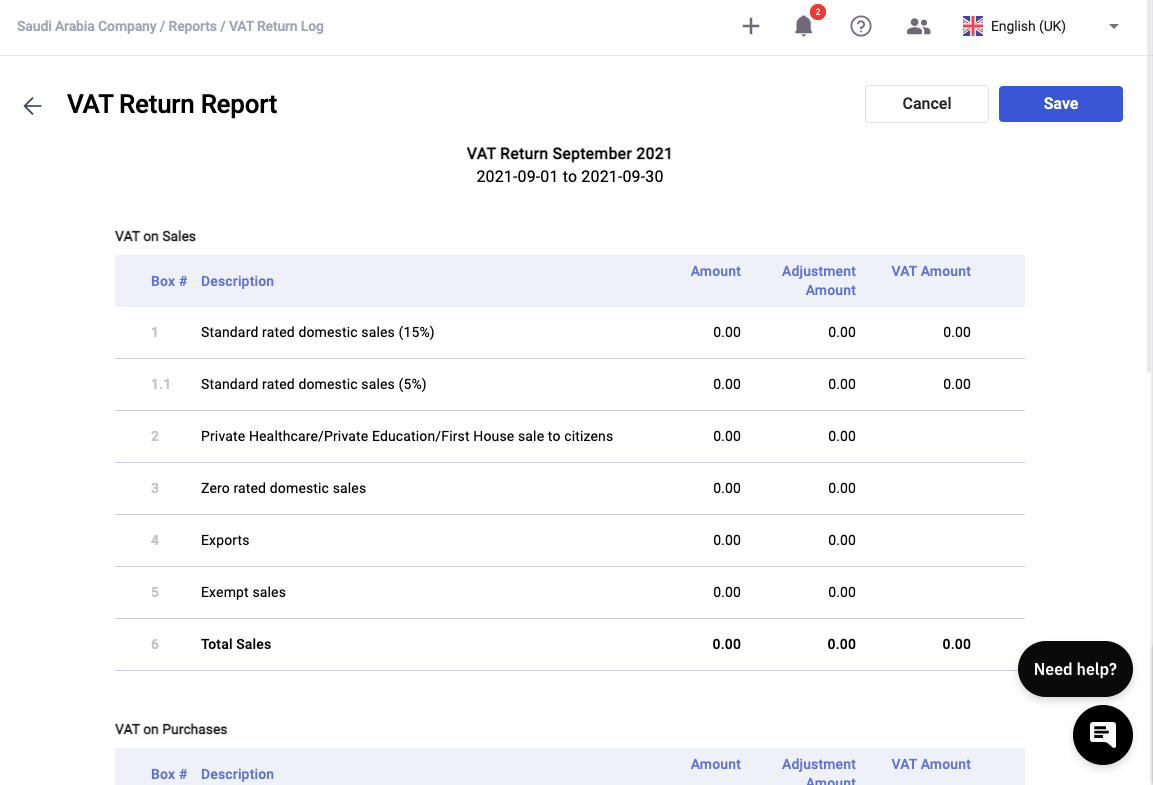
5. Next, you can view the VAT Return generated by the system with the amount indicated in each box.
6. Verify the amount in each box and click on the save button.
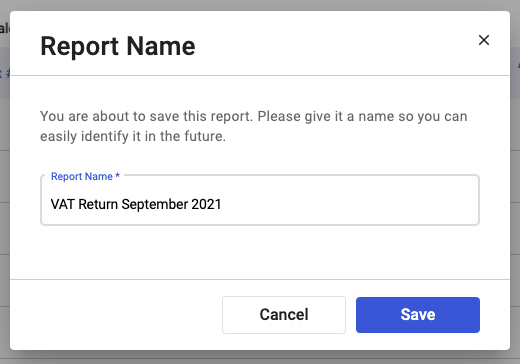
7. Enter the report name in the pop-up box and enter the save button.
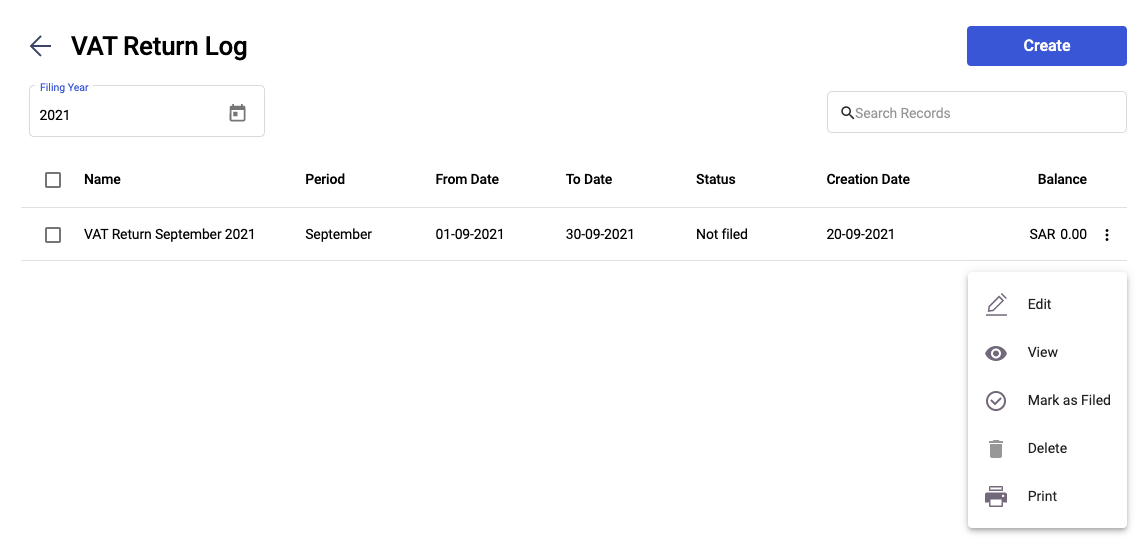
8. In the VAT Return Log, you can view the VAT Return created earlier. Click on the edit icon to edit, view, mark as filed, delete, or print this VAT Return.
Congratulations! You have successfully set-up your company details registered in the Saudi Arabia, customize the Chart of Accounts, add a new tax rate, tag a tax rate against your contact and product, and creating an invoice/bill in Deskera Books.