

Welcome & thank you for signing up and joining 500,000+ users worldwide in using Deskera.
In this guide, we have compiled resources and steps to quickly get your Deskera Books account up and running.
Read on to learn about:
- Setting up your organization
- Inviting your colleagues and accountant
- Adding your contacts
- Adding your products/services/inventory
- Connecting your bank
- Invoicing
Create & send invoices
Design beautiful invoices
Connect Stripe for payments
Connect PayPal for payments
Connect Veem for payments - Bills and expenses
- Using Multi-currency
- Creating Journal Entries
- Setting up your Chart of Accounts
- Adding opening balances
Setting up your organization
When you login to Deskera Books for the first time, you will have the option to setup your own org or play around with the Demo org. You can choose either option.
If you choose to use the Demo org, you will be directed to the demo company where you can play around with existing data and add your own invoices, products, and test some of the existing features.
If you choose to setup your org at this (or any time later), you'd be directed to enter a few details as shown in the image below.
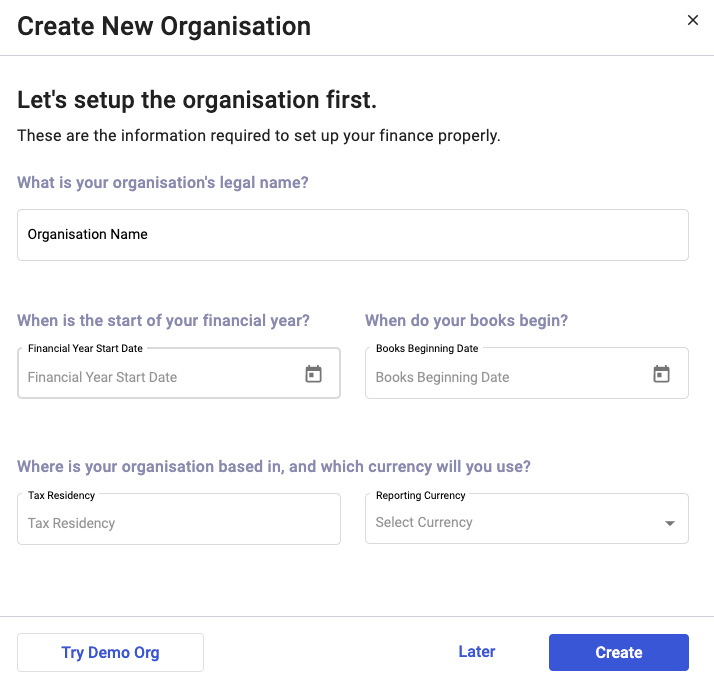
Explanation of fields:
- Organisation name: Name of your company
- Financial Year Start Date: Please select the start of the financial year in which you want to start entering transactions in Deskera. If you follow Jan to Dec financial year, and want to use Deskera in 2021, then select 1st Jan - 2021
- Book Beginning Date: This is the date from which you will enter live transactions in Deskera Books. Say you want to enter all transactions in Deskera Books from 1st July, 2021, then that is what you'd enter here.
Please note that the book beginning date ought to be in the same year as Financial Year Date. - Tax Residency: Select the country in which your business is registered.
- Reporting Currency: This would be auto populated to the currency of the country you select in most cases. You can change it to be something else though if your business needs it.
Word of Caution: These details, once set, cannot be changed unless you choose to create a new organization and delete the existing organization. Please contact support, care@deskera.com, for any clarifications
Help article: https://www.deskera.com/care/create-new-organization-deskera-books/
Inviting your colleagues and accountant
Working together is always better.
To invite your colleagues to use Deskera Books, just use the "Invite" option on top right side. This will bring up a pop-up as shown below. This will allow you to enter the user mail, select their role and send the invite.
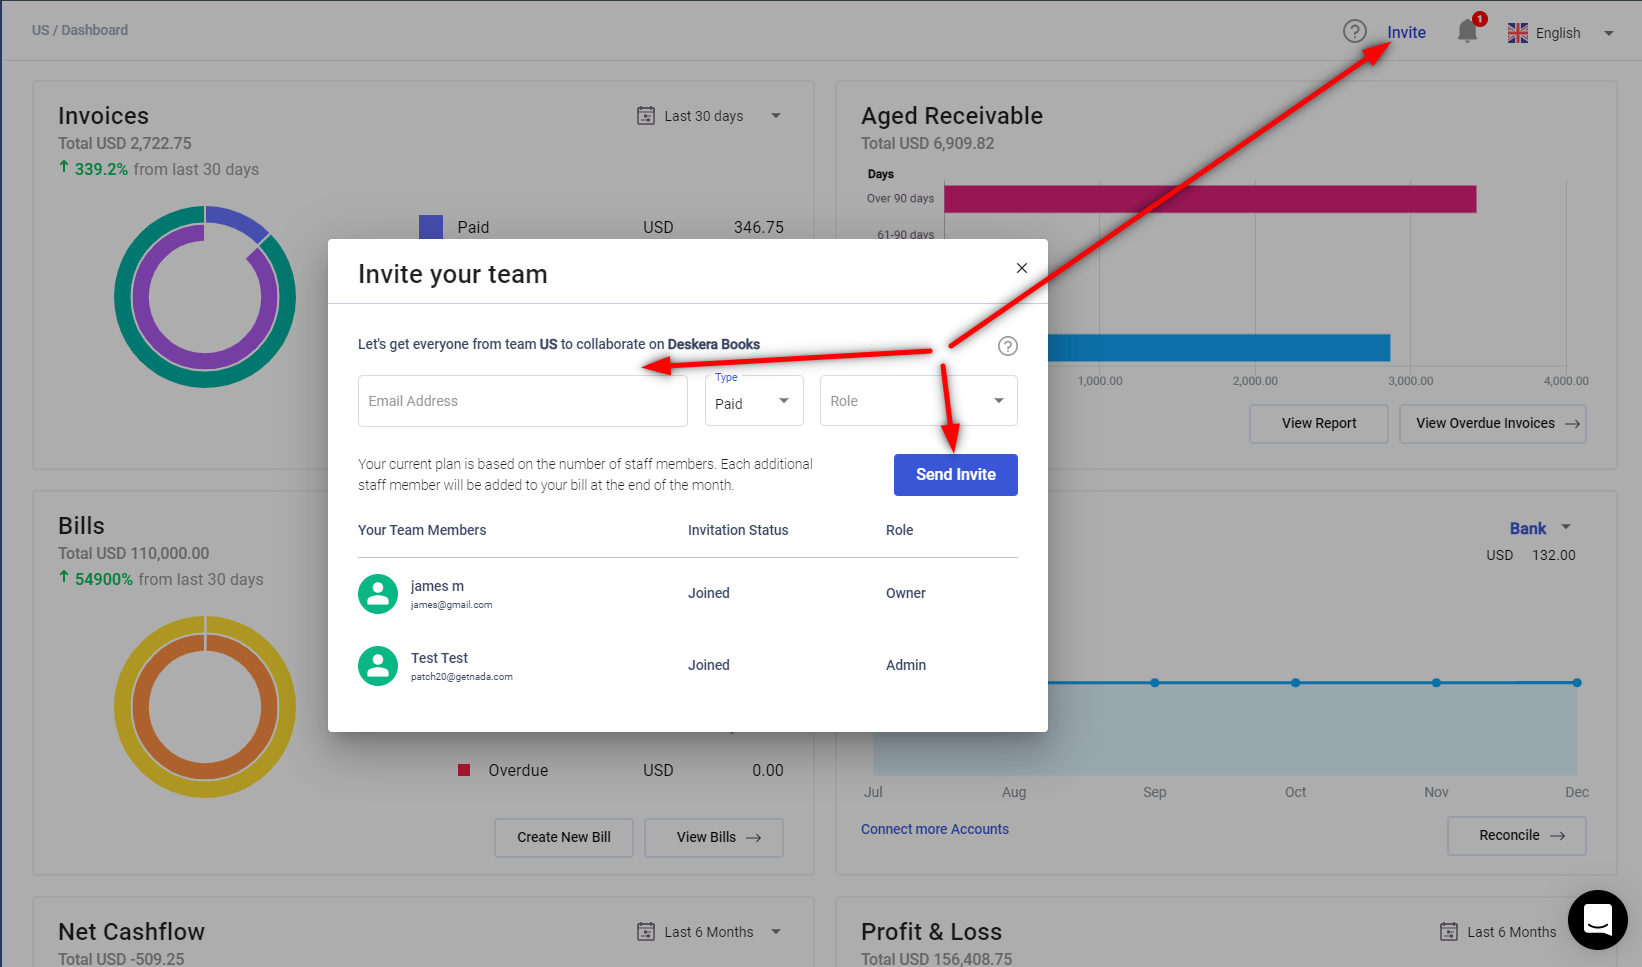
Once the user accepts the invite, they will be able to login and view/access Deskera Books based on the role provided.
Paid users are power users and certain admin roles are only available to them. Guest users or free users won't be charged for, but have certain restrictions on what they can do. Please refer to this help article on what each role can do.
 Janhavi Wagh
To invite your accountant to access Deskera Books as a free user, follow the steps in the article below:
Janhavi Wagh
Adding your contacts
Contacts are your customers, suppliers, vendors or parties that you deal with to do business. These could be companies or individuals, depending on your business.
To add contacts, we have a helpful article right here:
Janhavi Wagh
You can also import your contacts by following this helpful video.
Please note, some fields/column headers may change depending on which tax residency you chose while setting up your organization. The process remains the same though.
Adding products/services/inventory
A product is generally anything you may buy, or sell (exception being fixed assets)
This helpful video will guide you on how to add products/services/inventory to your Deskera Books account.
You can also import products using an excel file. Here is the video that shows how:
Let us spend some time on which option to choose from Tracked, Non-Tracked and Bill of Material when creating a new product for your business.
Generally speaking, following rules apply for selecting tracked/non-tracked/bill of material when creating a product.
If you want to know how many units/quantity you have in stock at any point of time, then you want to use Tracked item.
If you want only sales and/or purchase data of an item, but don't need to keep track of how many you have on hand, then you can use the Non-Tracked option.
If you are building/assembling/manufacturing any items from raw materials/purchased goods and selling them, then you should go for Bill of Material. Bill of Material is a type/special case of Tracked product.
For inventory and physical goods
Choose "Tracked" for inventory, physical goods which you need to keep a count of, or any other items/materials which you purchase for consumption or use in building your finished goods (Note: the finished good itself will be a Bill of Material type, but more on that later).
Example: You buy laptops or smartphones from overseas, and sell it at a markup locally. These would be tracked items.
For services
Use "Non-tracked" if you are selling, providing or consuming any services, be it consultation, training, coaching, man-hours, copywriting, bookkeeping etc.
For digital software products
Select "Non-tracked" if you are selling or buying any digital software products. The exception to this would be software sold with a physical device. If say you have software on a CD, and if you need to keep a count of how many CDs you have in stock, you may want to choose Tracked instead.
Connecting your bank
Deskera brings you ready-to-use bank connections to over 10,000 banks worldwide, through our partners.
You can check if your bank is available for automatic connection by checking the list of available banks here:

Even if your bank is not listed, you can still import the bank statement to Deskera via an excel file easily.
Add a new bank
Step #1: Go to Bank in the left hand menu in Deskera Books
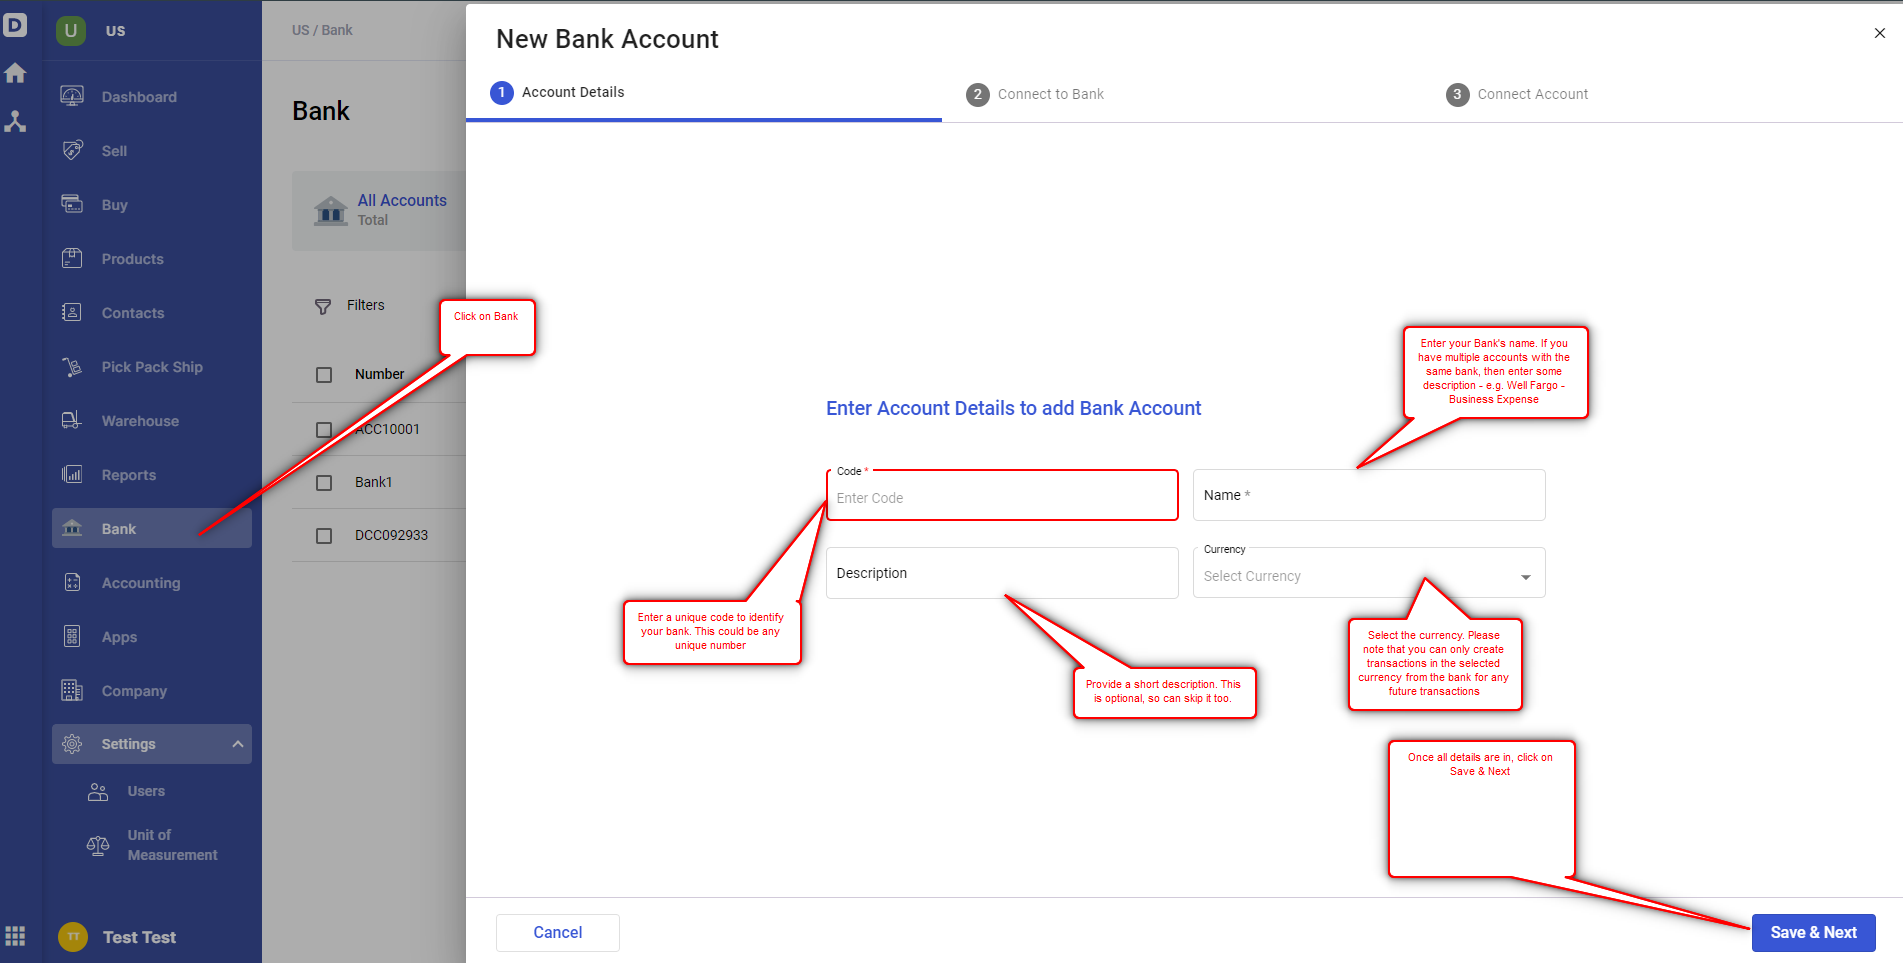
Step #2: Connect your bank.
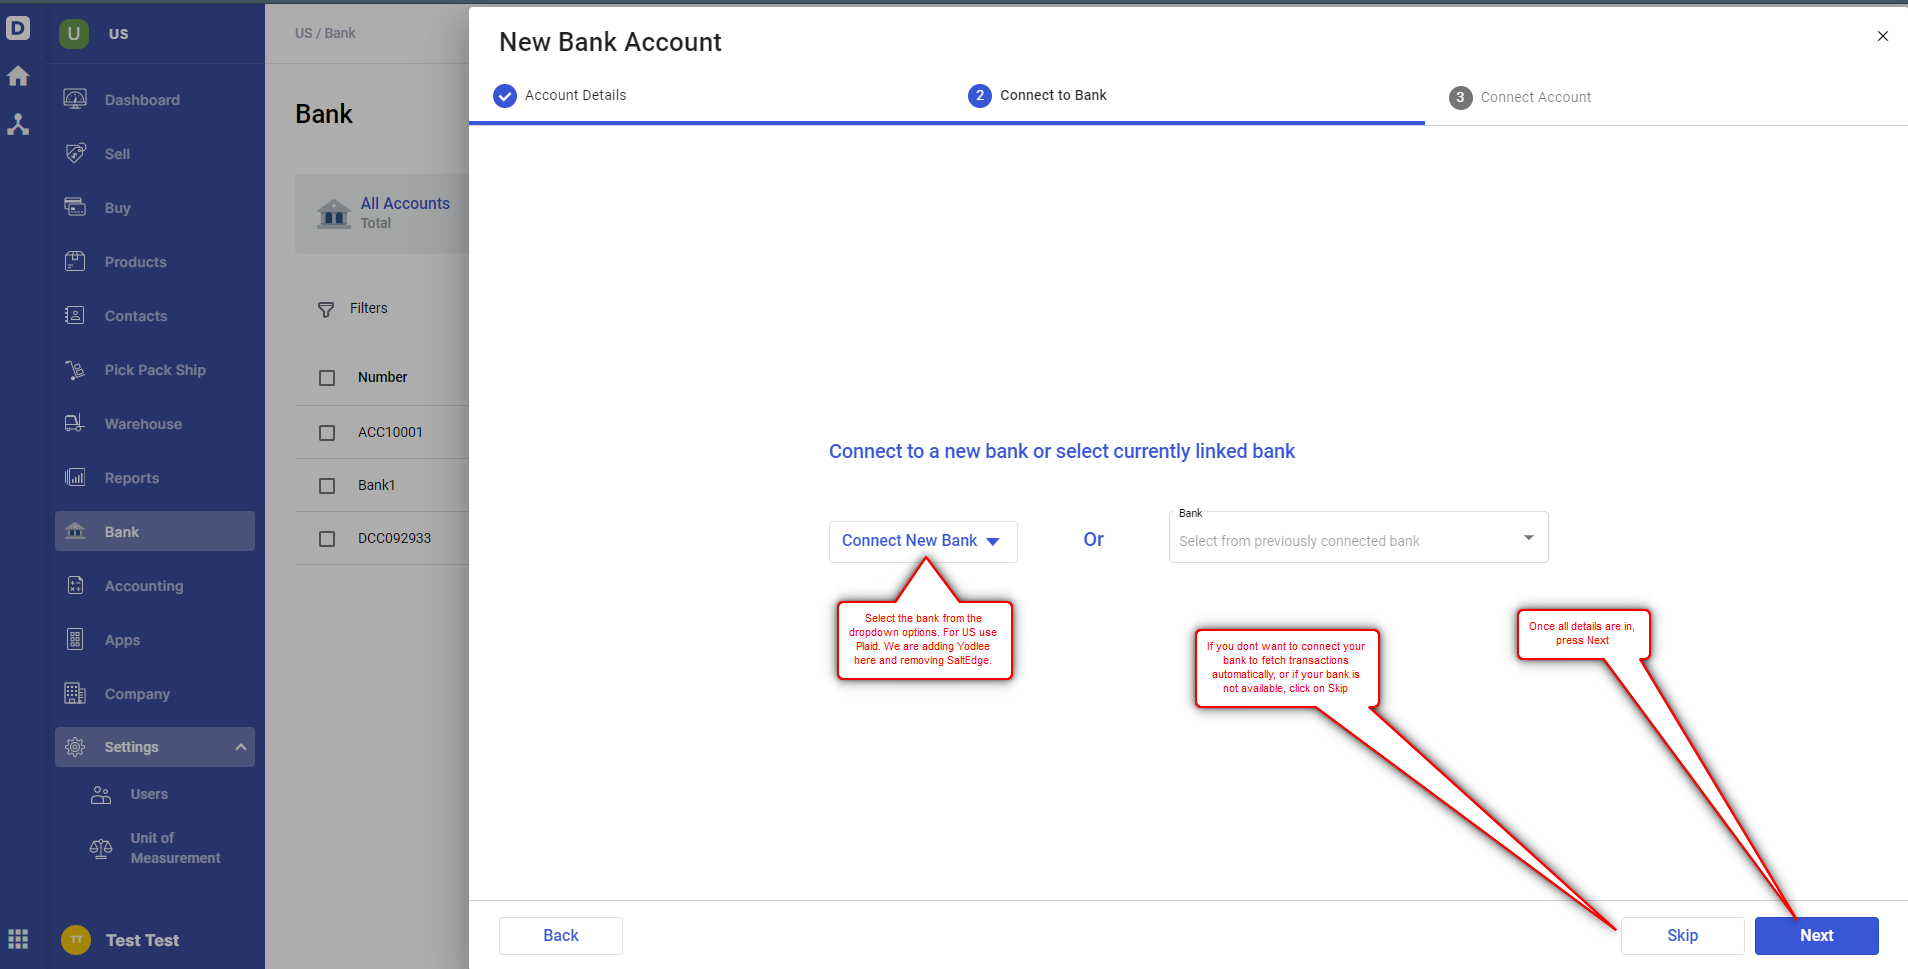
If you don't want to live connect your bank, or if the bank is not available, then instead of selecting a bank in stage 2, just click on Skip.

Bank reconciliation
Once your bank is connected, just hit on Reconcile or click on the bank name to view details of transactions.
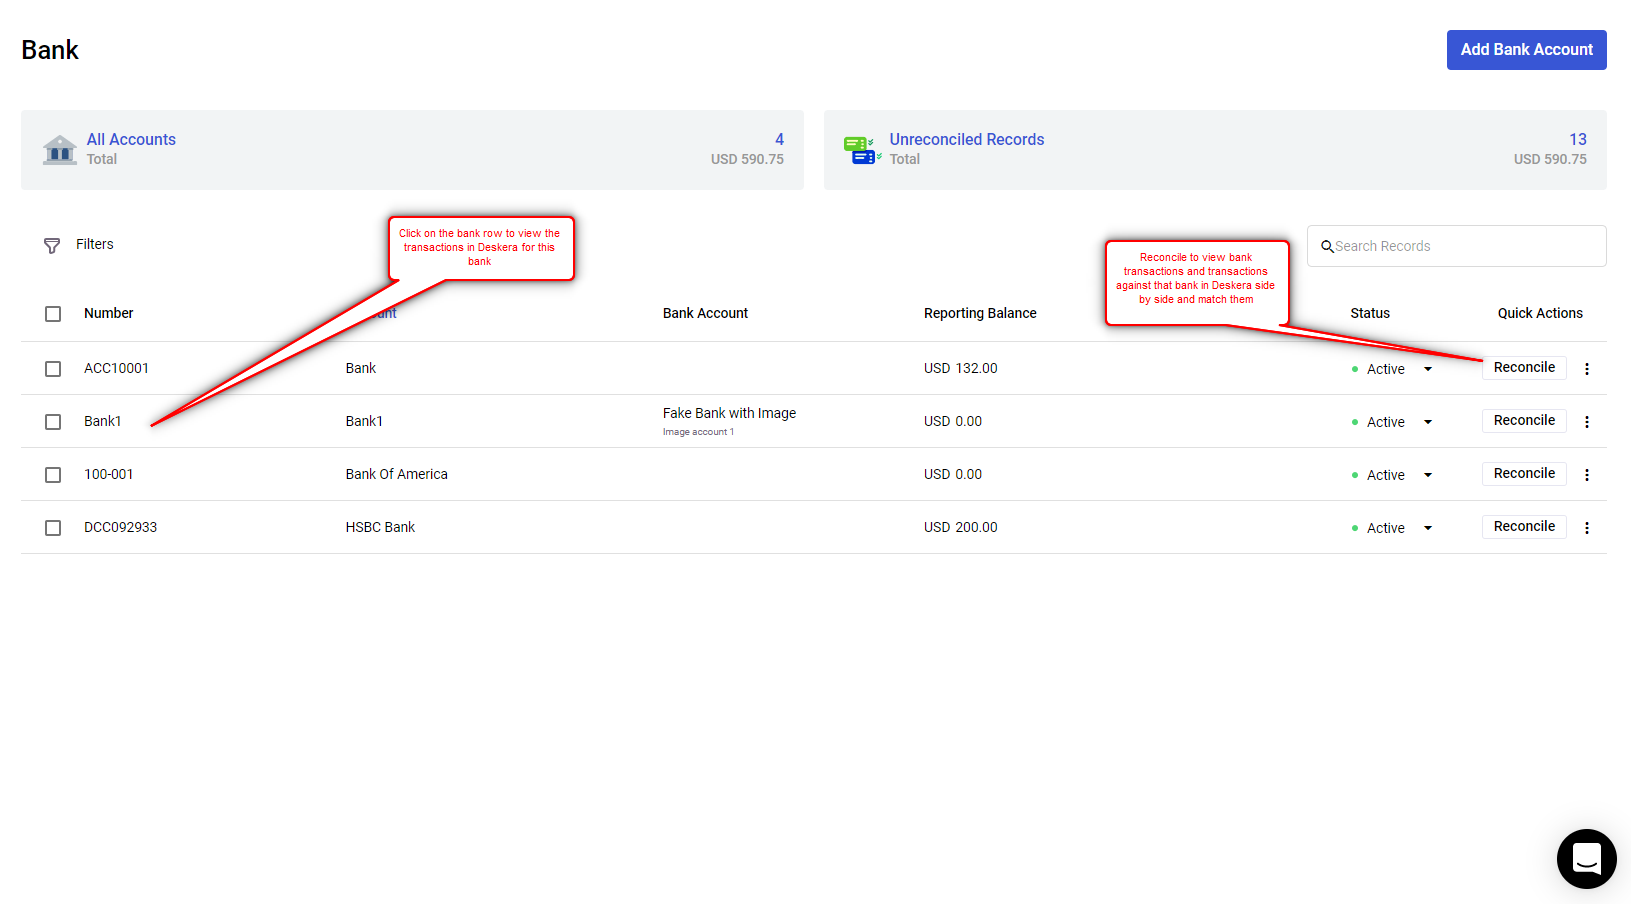
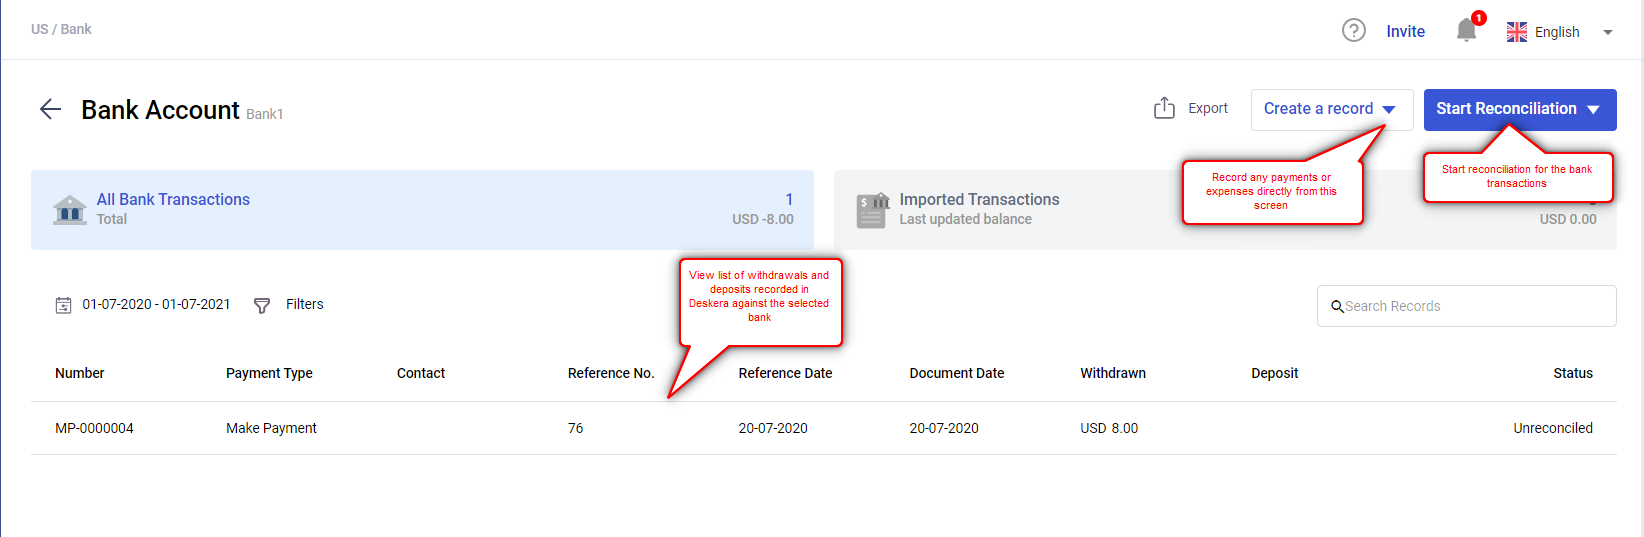
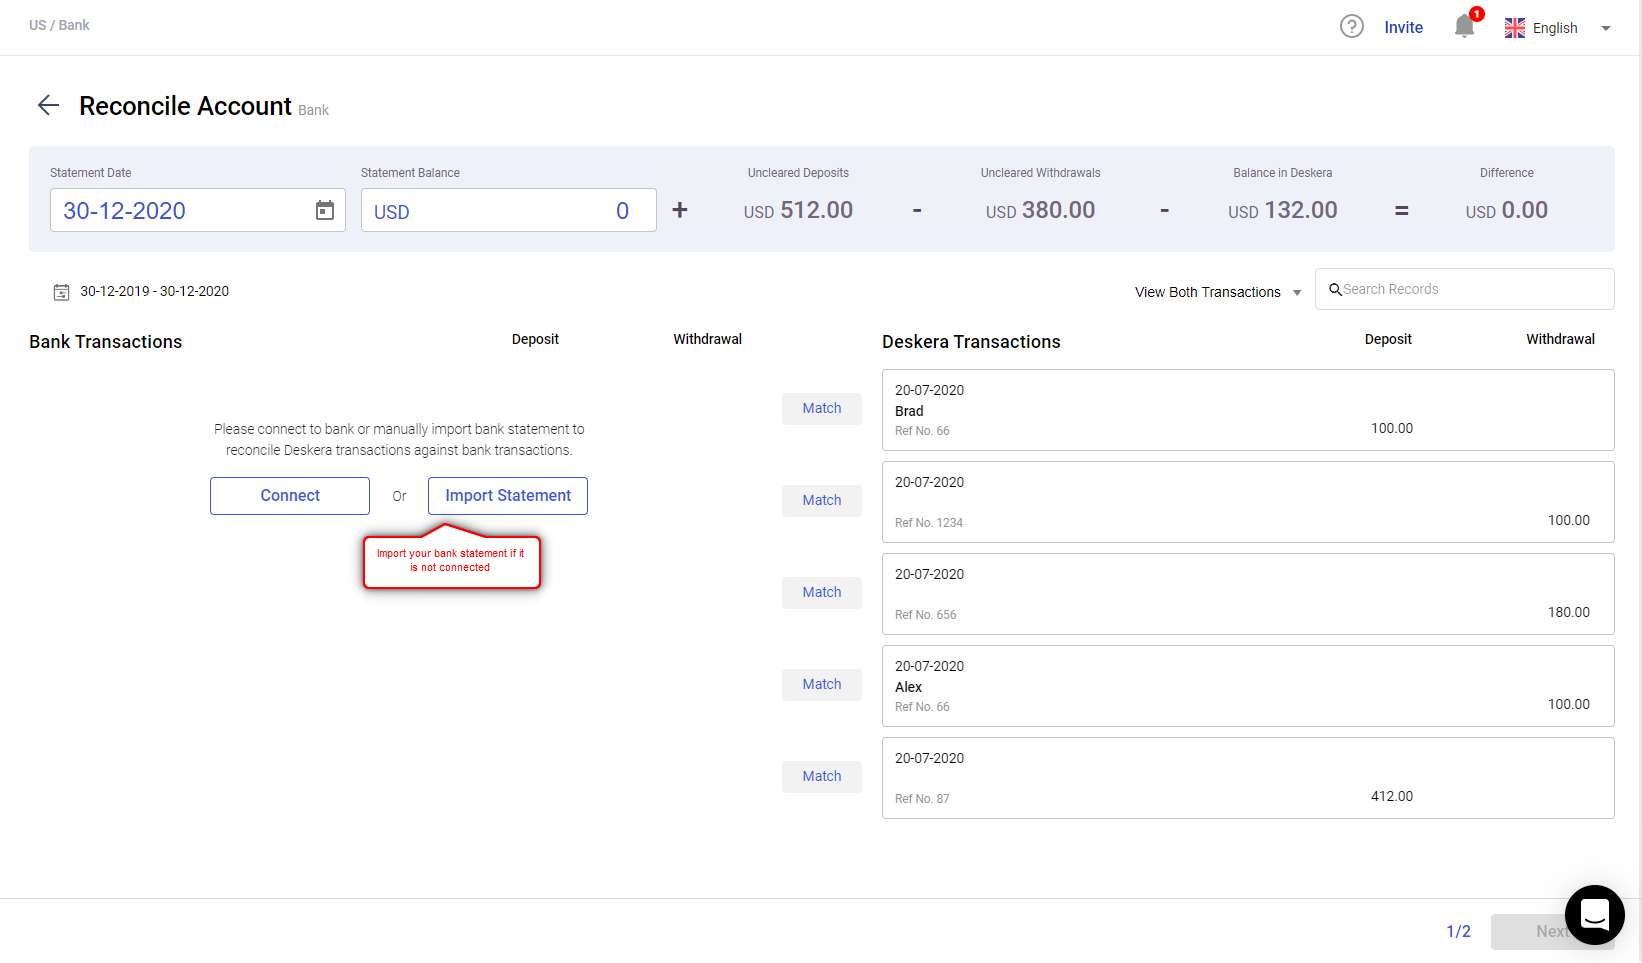
You can match transactions if they have been fetched from your connected bank account, or import the excel file as the case maybe.
Invoicing
Deskera makes it easy to create, design and send invoices and receive payments.
Create invoices
Just follow this helpful article to see how to create an invoice easily with Deskera Books.
Janhavi WaghDesign invoice
You have created your invoice, but you still need to send it. But before that, you want to make sure it looks just perfect. Don't worry, we have your back.
This helpful article explains how you can get the perfect looking design for your invoice.
Vivien Lok
You can even show/hide the fields as needed on the designer, as shown in the video below.
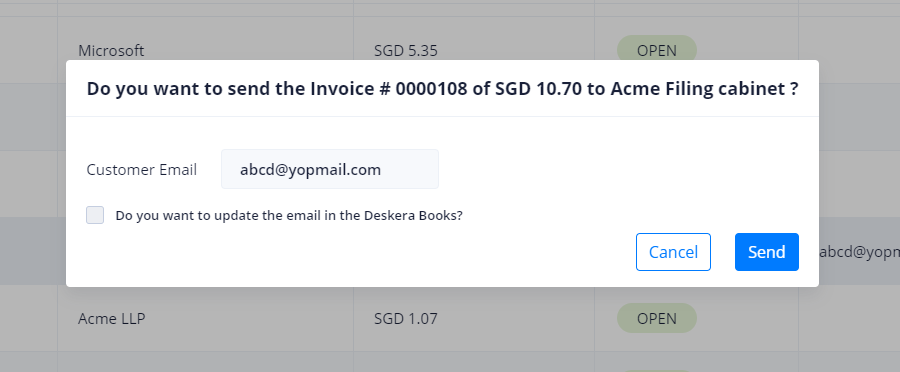
Once your invoice is ready, you can email it directly from the invoice designer to your customer.
You can also email an existing invoice from within the system by following the steps listed here -
Janhavi Wagh
Recurring invoices
Automate sending your invoices every month with this super useful feature from Deskera Books. Just create an invoice, set recurring rules and you are set.
Use this if you wish to send invoices at regular intervals to the same set of customers, e.g. if you have monthly billing.
Import invoices using excel
You can easily import your existing invoices to Deskera using a simple excel import. Watch this helpful video to find out how.
Recording payments against invoice
To record payments manually, just follow the steps below:
- Go to the Sell tab on the sidebar menu.
- Click on the Invoice Tab.
- Users can either choose to select the 'Get Paid' button on the summary page or click on the button on the invoice page.
- After selecting the 'Get Paid' button, a pop-up will appear. You will need to fill in the specific fields as shown such as the currency, payment date, amount and receive into which bank or cash account, or to an undeposited fund.
- You can receive partial payments, and can change the payment amount as required.
- Click the 'Save' button after verifying the information.
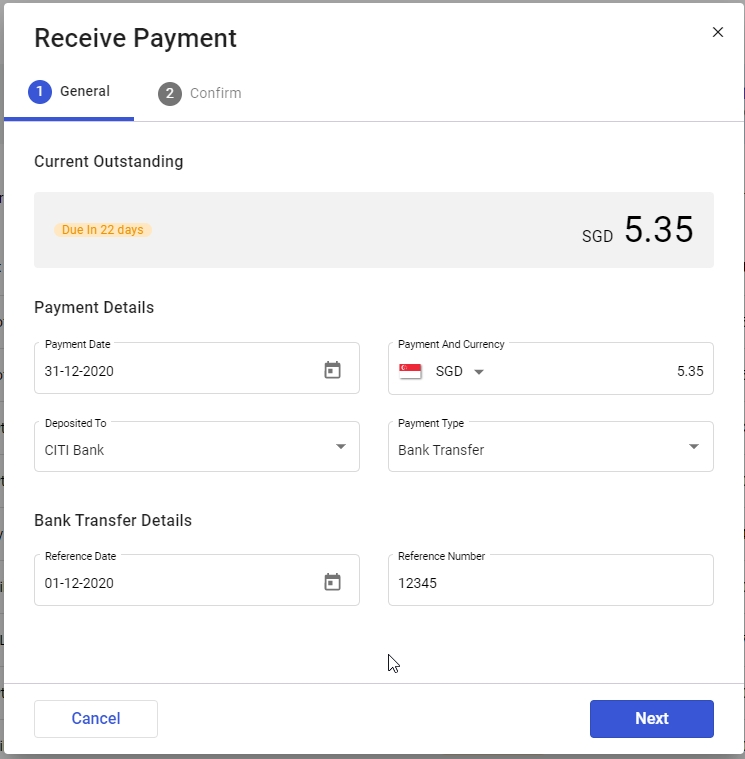
Please note that if the amount if not paid in full, the outstanding amount will be shown. This will be indicated in the Invoice Lists as well under the payment column.
You can also use Stripe, Veem or PayPal to collect payments online and avoid recording payments received manually.
Using Stripe to collect payment
Step 1 is to connect Stripe to one of your bank accounts.
I don't have a Stripe account
If you don't have a Stripe account, you can create one and connect it to Deskera right away. See how to do that in the following video.
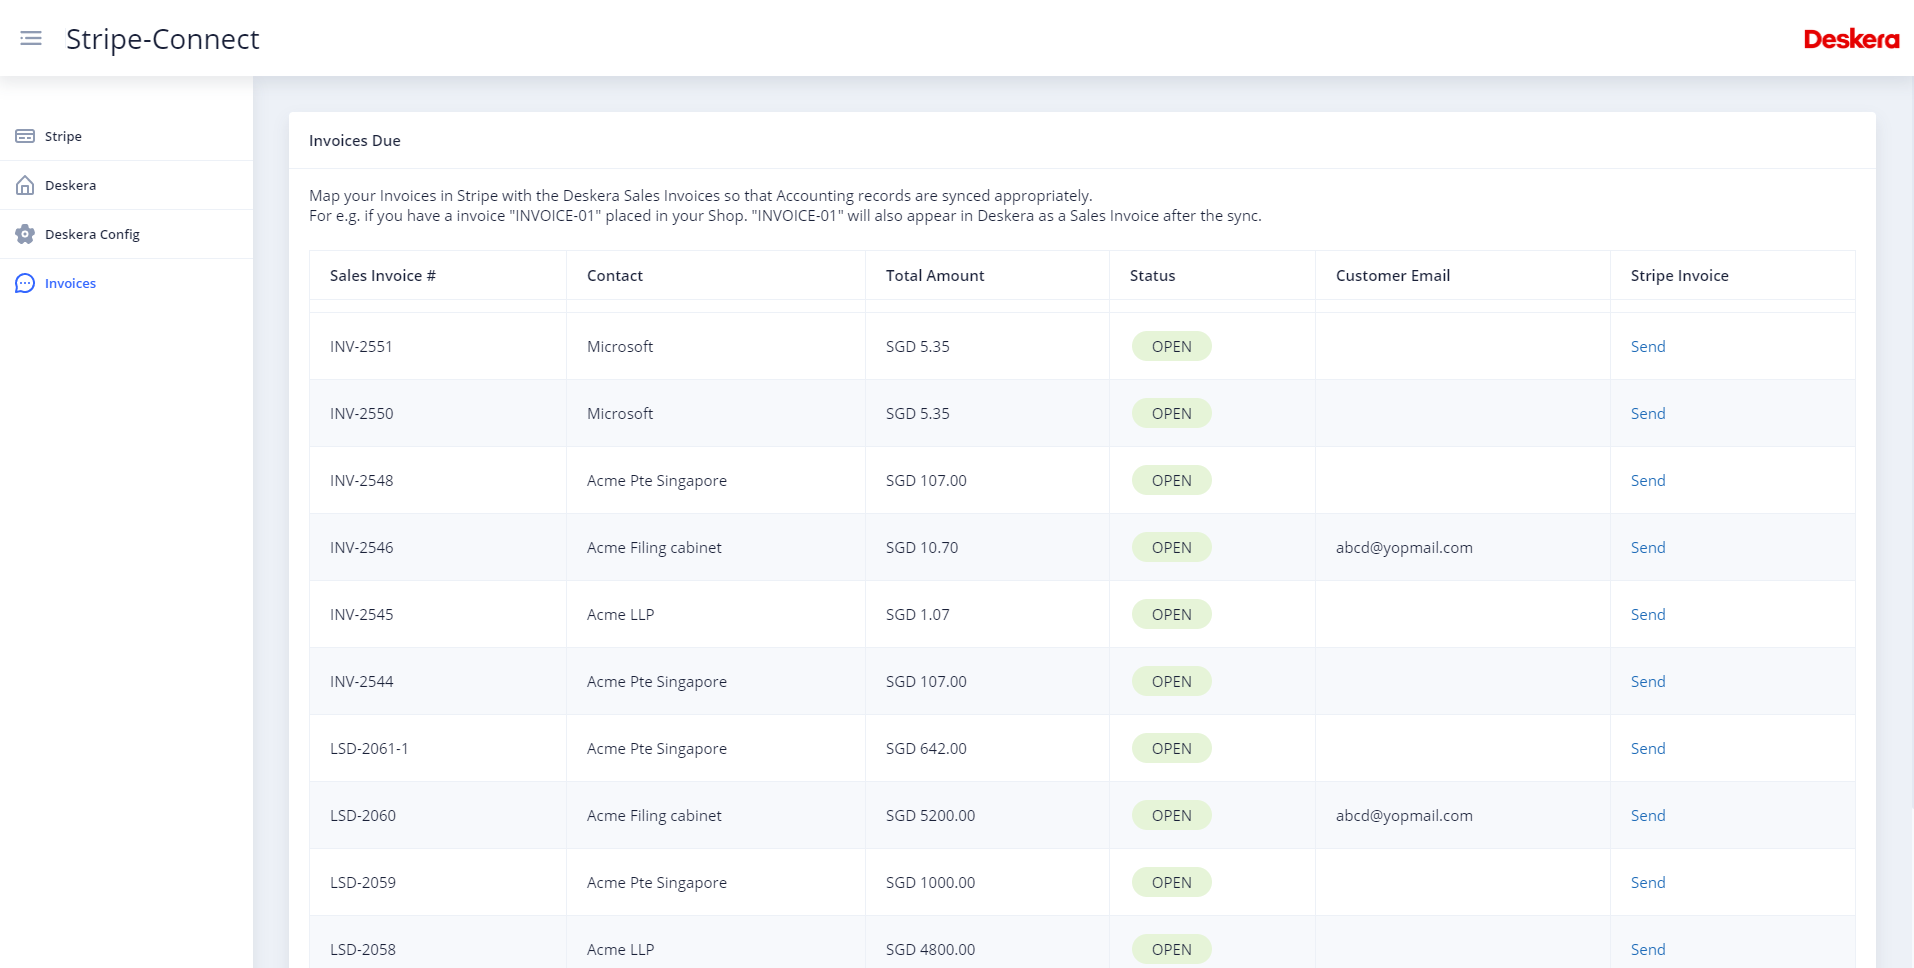
Once you have connected your brand new Stripe account, you can email payment links to your customers using the steps outlined in this helpful article:
Janhavi Wagh
I have a Stripe account
If you have an existing Stripe account, then you can connect the Stripe App available on Deskera App Store and use it to send payment links and receive payments.
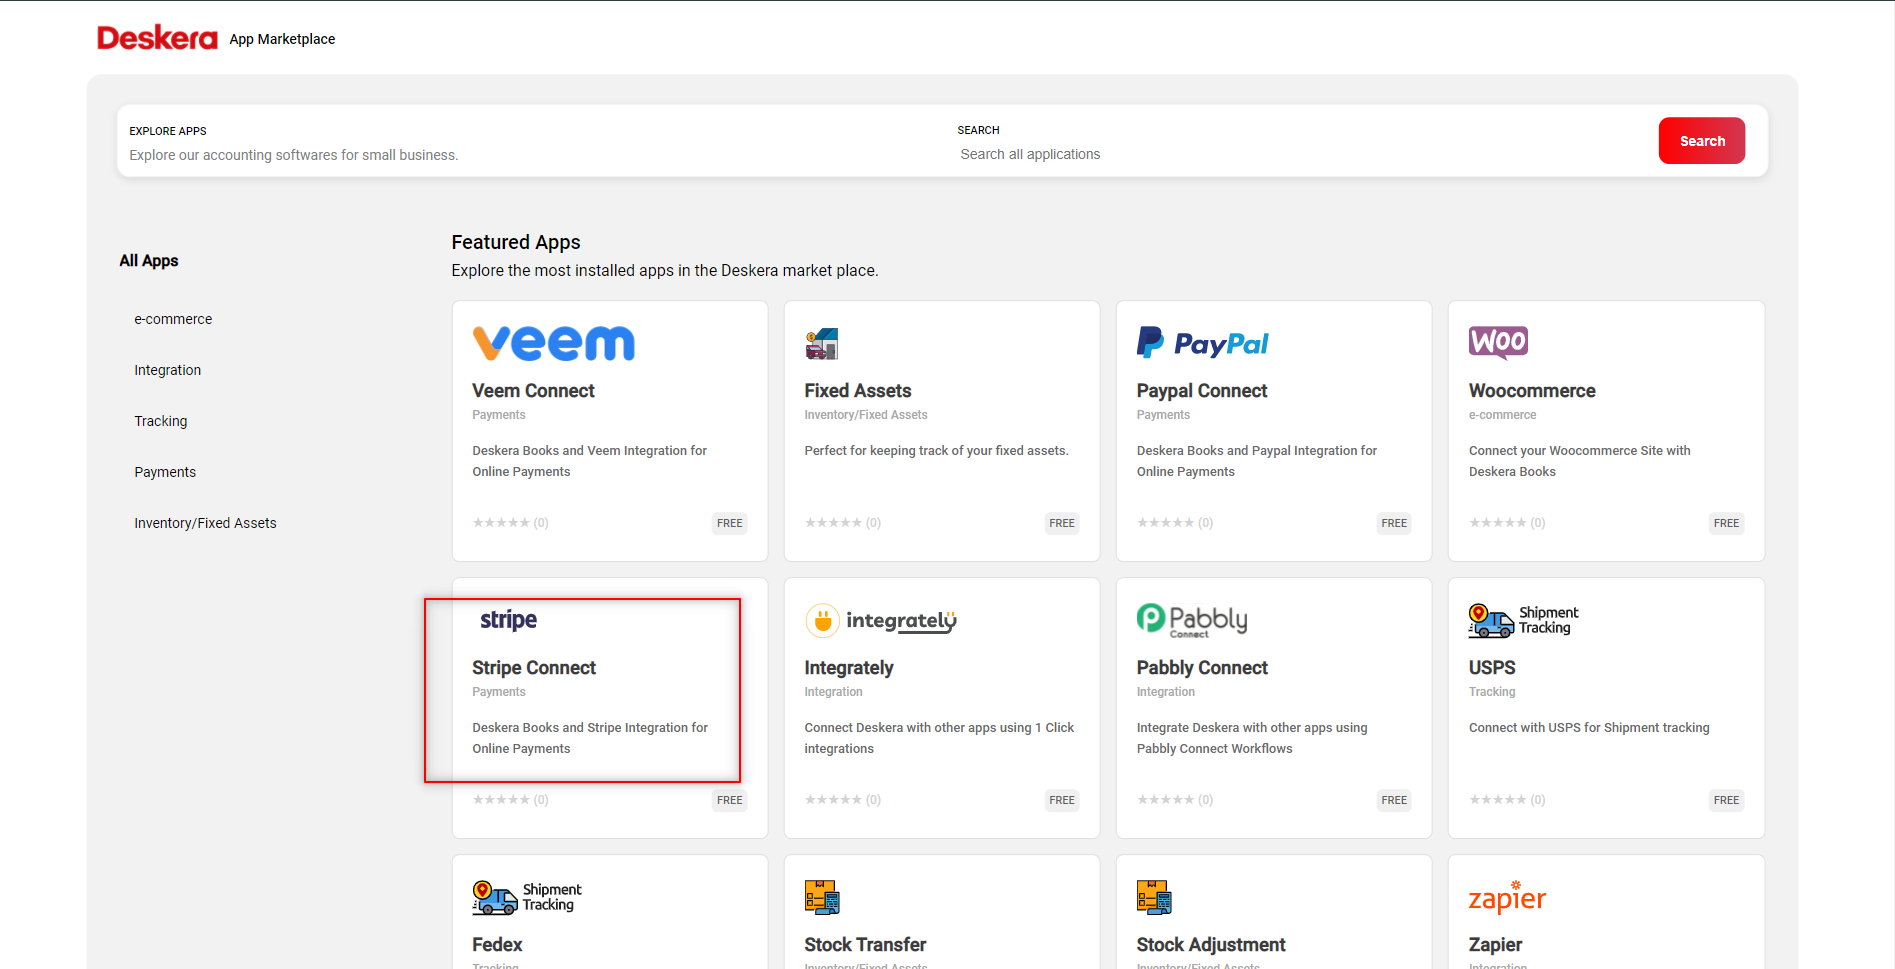
- Have your Deskera Books credentials handy. If you have not signed up as yet for Deskera, sign up now.
- Have your Stripe credentials handy.
- Open the app & connect your Deskera Books account to your Stripe account. You will need to authorise by entering your Deskera Books and Stripe credentials.
- Map the accounts as needed. A default mapping is provided. This takes care of recording Stripe fee as well.
- You are ready to receive online payments.


Once the customer pays online using Stripe, the payment will be recorded in the system automatically and the invoice "Paid" status will change.
Use PayPal to collect payments
If you use PayPal, you can easily collect online payments from your customers.
Connect Deskera Books to PayPal and offer your customers more flexible payment options. Once you have linked your Deskera Books and PayPal accounts, a ‘Pay now’ button appears on your invoices.
Your customers can simply click on the ‘Pay Now’ button and pay online by entering their credit or debit card details. Once the online payment is received, all your successful payments are automatically recorded in Deskera Books.
You can view and reconcile payment transactions in Deskera Books. Having this integration in place will help you in simplifying the whole payment collection process resulting in faster payment receipts. This saves you time by automating bookkeeping.
Follow these simple steps to connect Deskera Books and Paypal for automated payments:
- Have your Deskera credentials handy. If you have not signed up as yet for Deskera, sign up now.
- Have your Paypal credentials handy. If you don’t have a PayPal account, sign up here.
- Connect your Deskera Books account to your PayPal account.
- Authorise the permissions as required.
- You are ready to receive online payments.
Watch this helpful video to see how to do that.
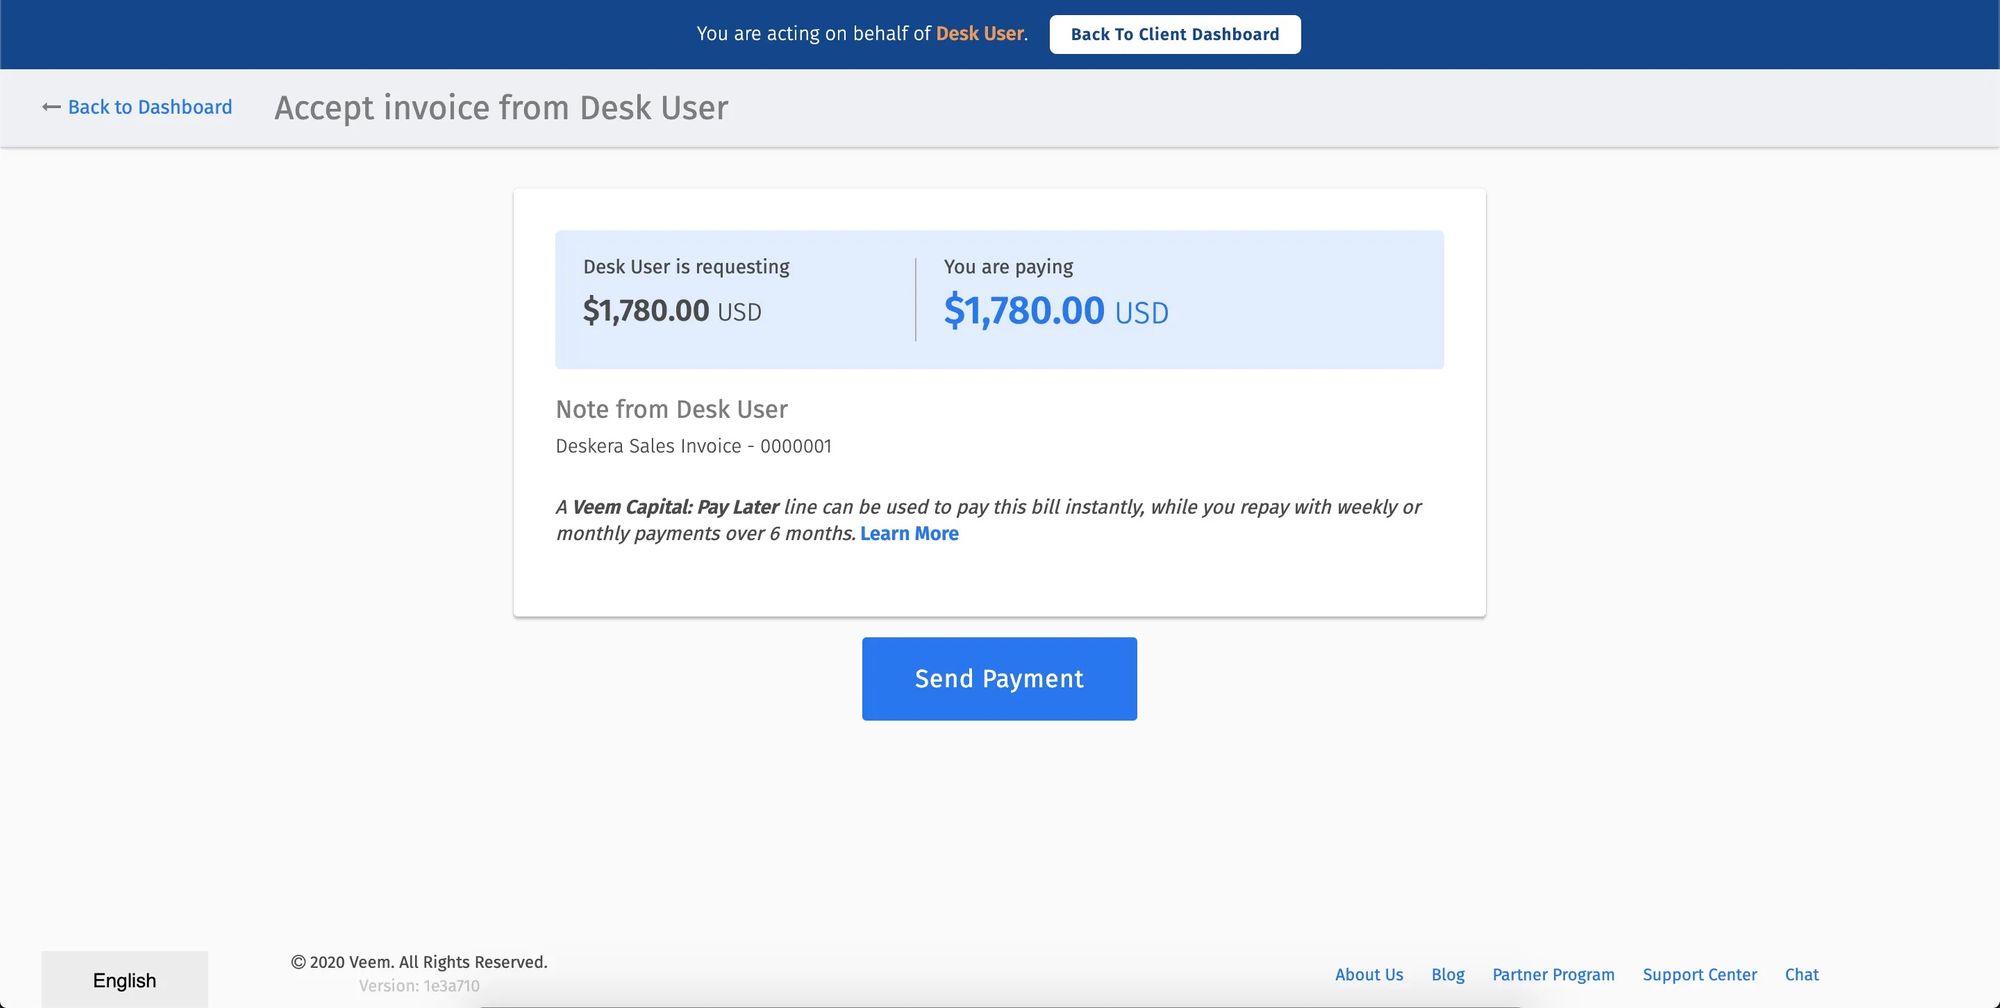
Using Veem to record payments
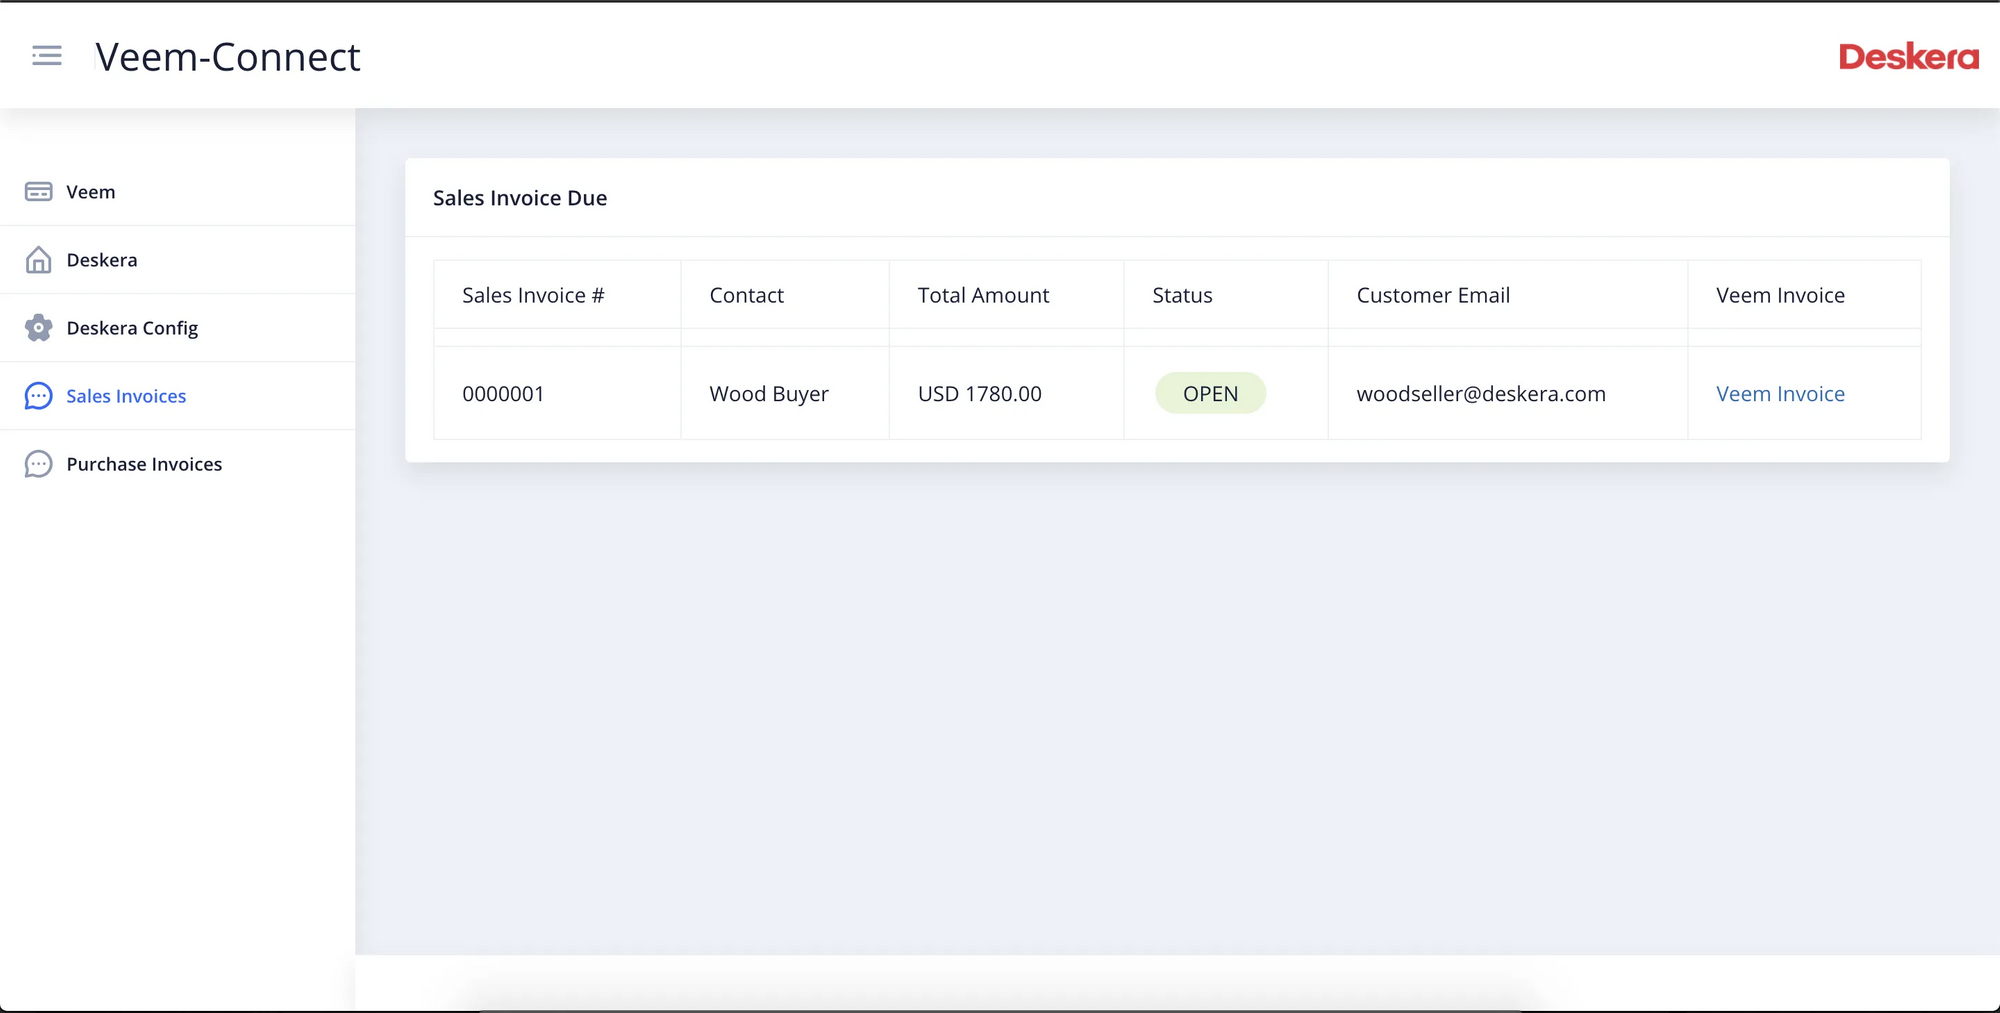
Deskera Books and Veem integration allows you to receive and send online payments from and to your customers and view, reconcile payment transactions in Deskera Books. Your customers can simply click on the ‘Pay Now’ link in the invoice and make payment online.
You can access the Veem connect app here: https://store.deskera.com/
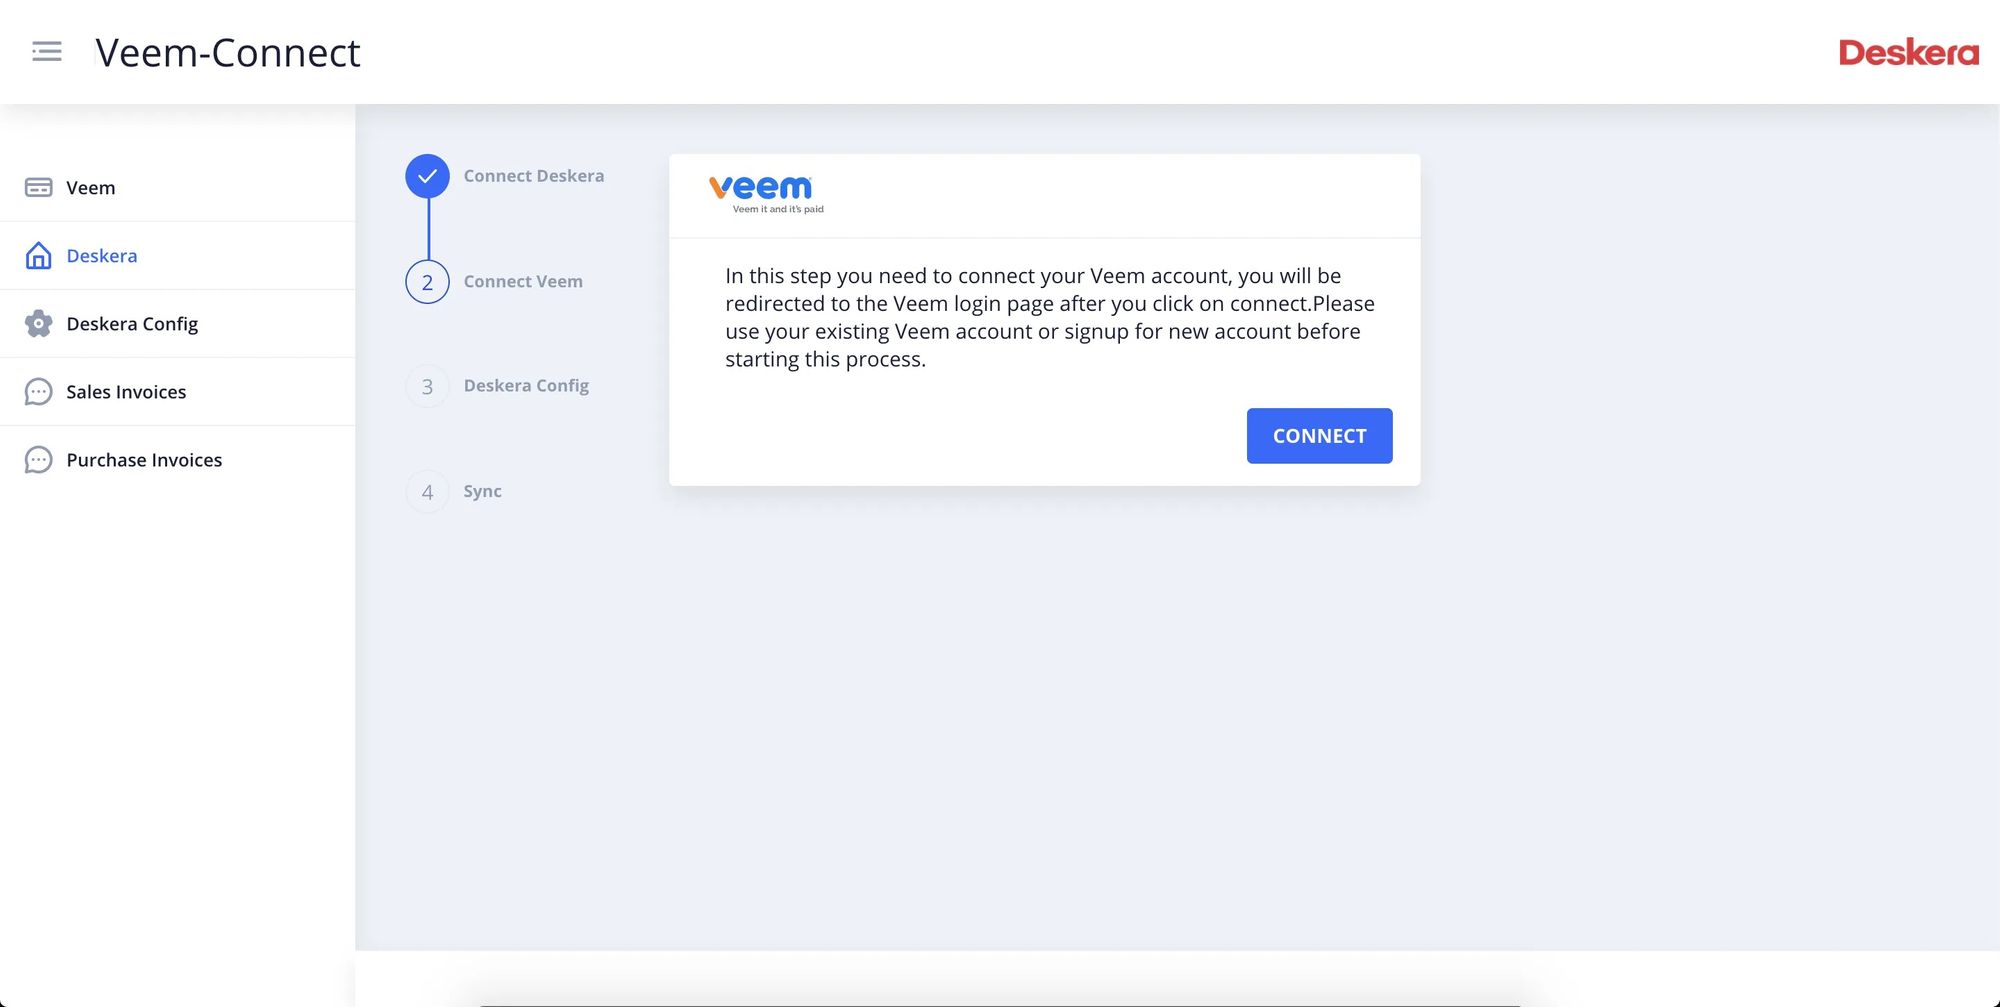
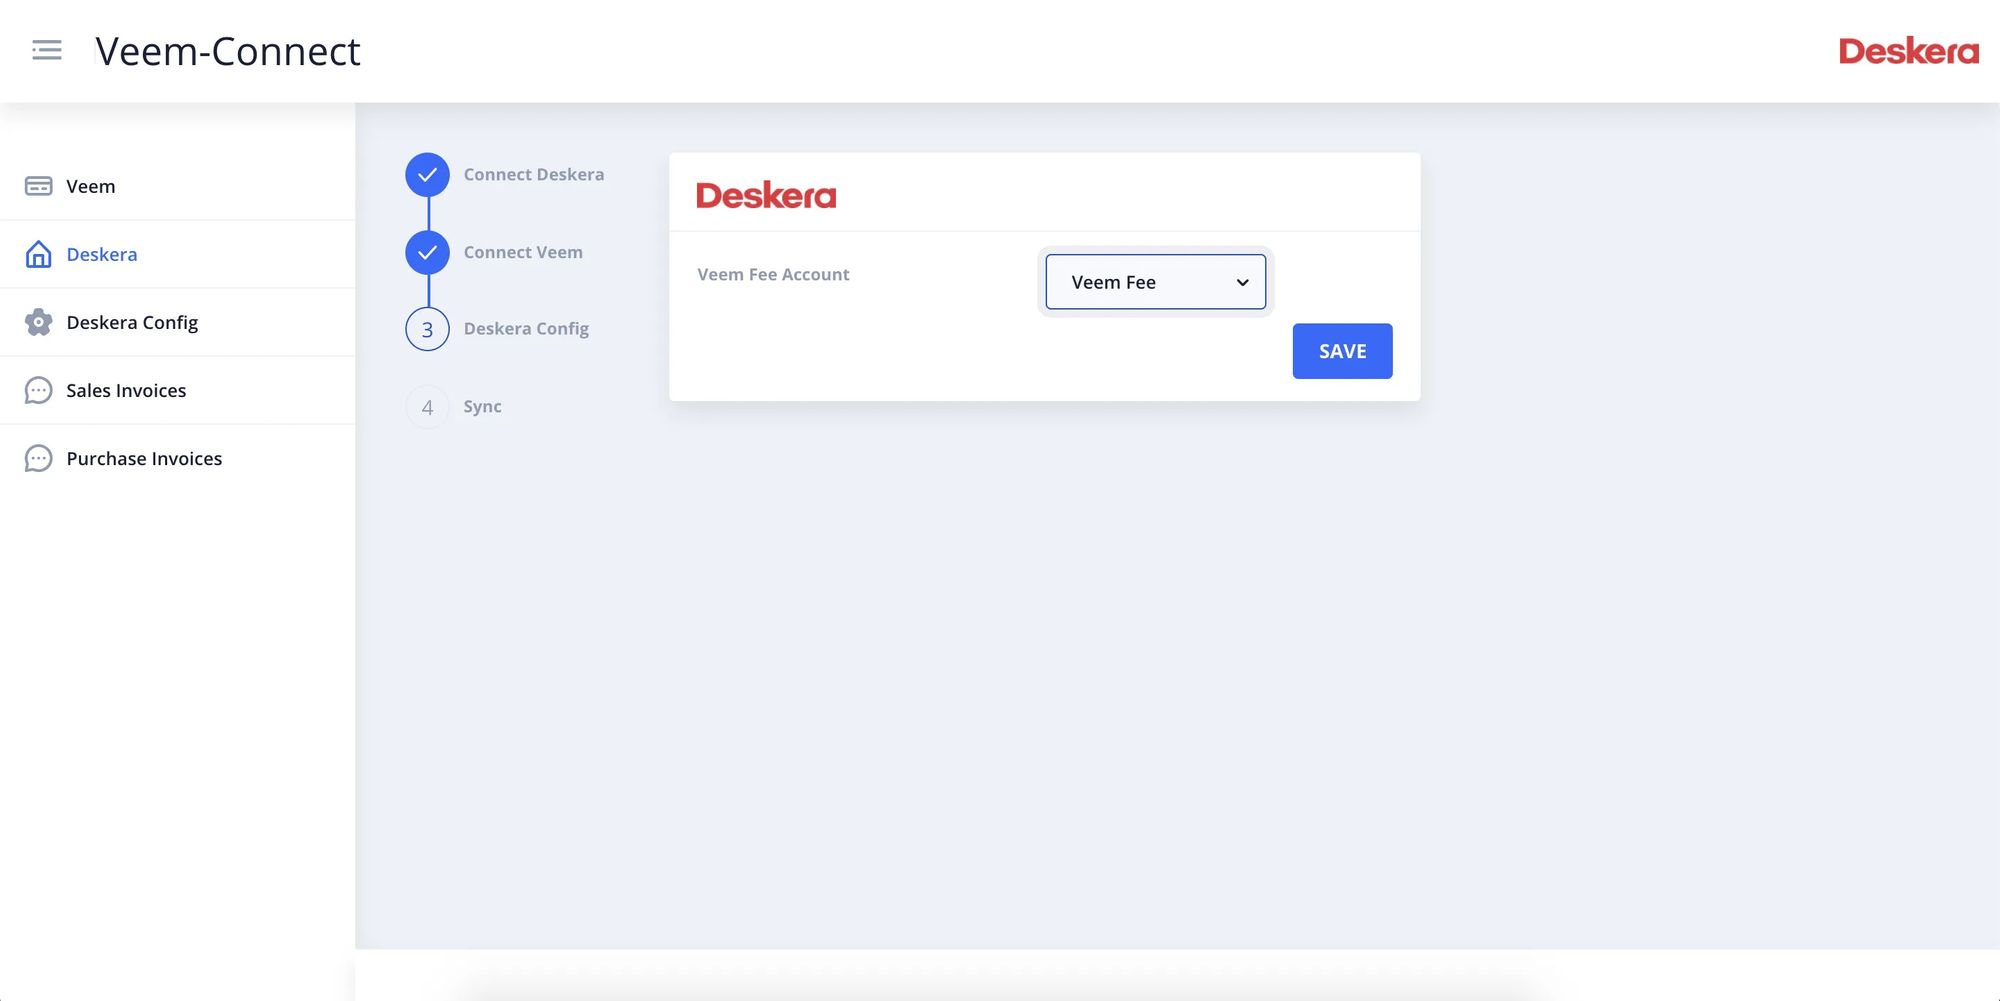
Follow these simple steps to connect Deskera Books and Veem for automated payments:
- Have your Deskera credentials handy. If you have not signed up as yet for Deskera, sign up now.
- Have your Veem credentials handy. If you don’t have a Veem account, sign up here.
- Connect your Deskera Books account to your Veem account.
- Authorise the permissions as required.
- You are ready to receive online payments.
Bills & Expenses
You can record bills and expenses against contacts easily and make payments against them.
Add a new bill
To add a regular bill for any products/service/item you have purchased from a vendor or supplier, use the Create New Bill option under "Buy"
Here is the article that explains this in detail:
Janhavi Wagh
Add a new expense bill
You can add an expense bill when you just want to record the amount but don't want to create/add any additional product/service/inventory in your system.
You can do this by going to Buy -> Create New Expense Bill
Here is the article that helps you do it step by step:
Janhavi Wagh
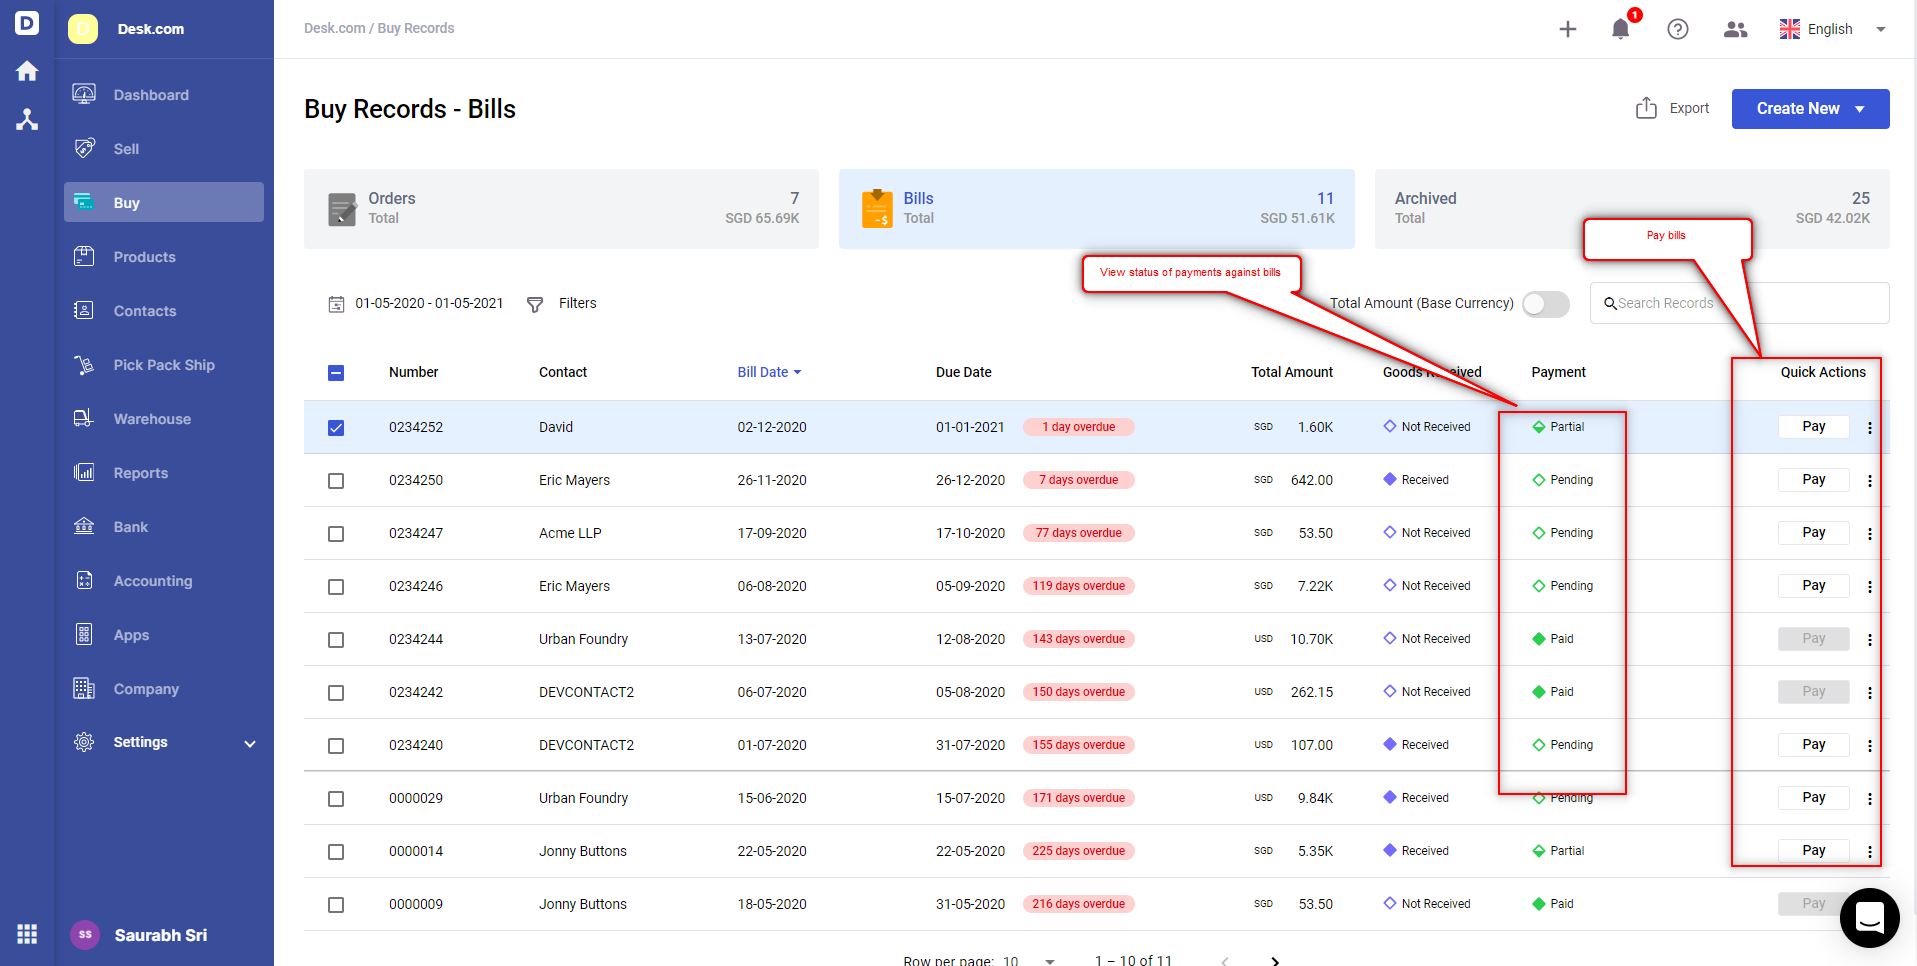
How do I mark a bill as paid?
Once you have created the bills, either with products, or an expense bill, you'd want to pay against them and make sure it is recorded in your system. Here is how you can do that.
- In the Bill tab, click the Pay button under the Action column, which you want to make payment for. This will trigger a pop-up on the side of the page.
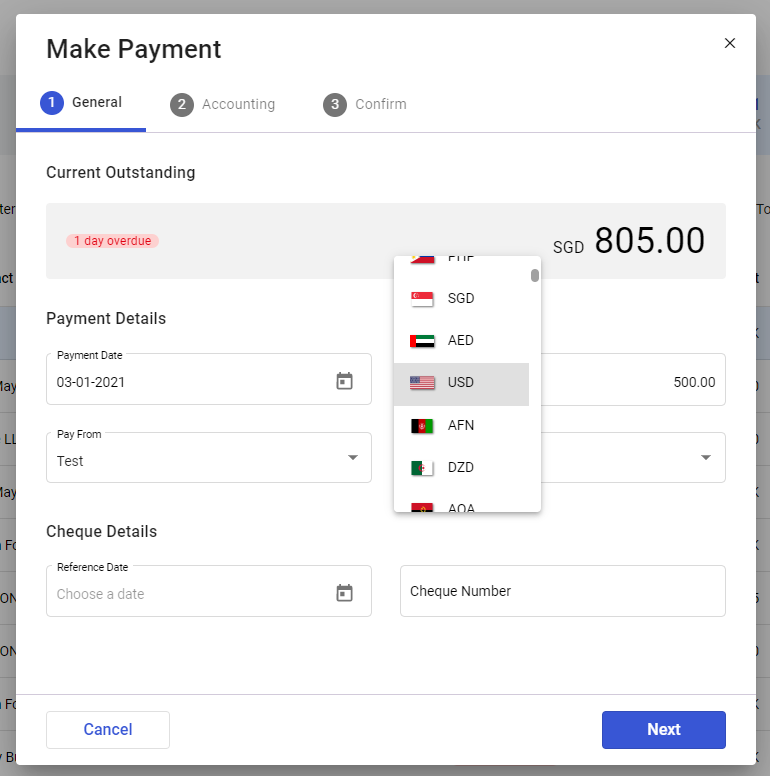
- You will be able to see the Outstanding Amount of the Bill. Indicate the Currency, Amount to be paid, and the Account used to deduct the Payment - Cash or Bank, or other Bank accounts created previously.
- Select the Payment Type.
- If you have selected Cheque as the Type of Payment, you will have to indicate the Reference Date and the Cheque Number.
- If you have selected Bank Transfer as the Type of Payment, you will have to indicate the Reference Date and Reference Number.
- Select cash payment if you are making a cash payment
You can also make Partial Payments - this will update Bill's Payment status to Partial until you have paid the Amount in full.
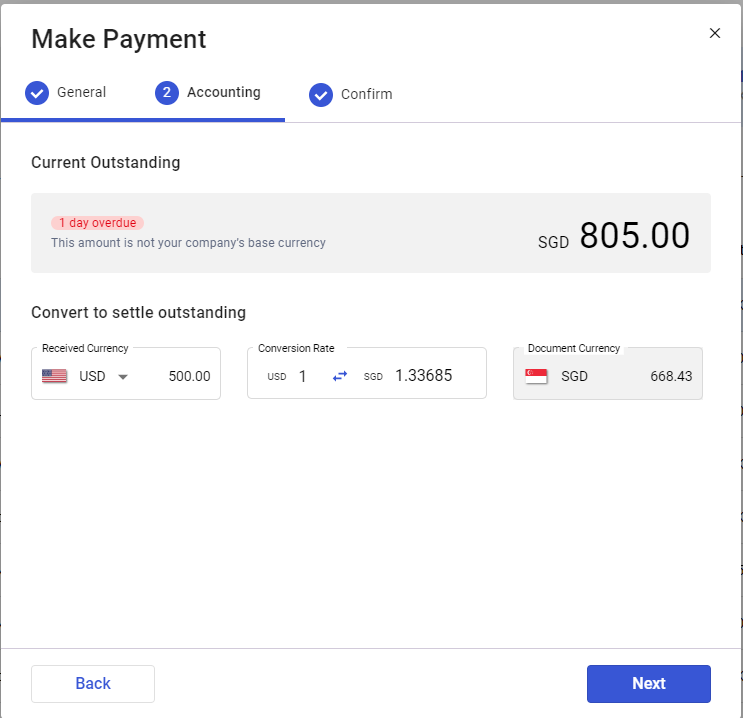
If you are paying in a different currency, then you will get the option to select the exchange rates at the time of payment
If you have connected your Veem account to Deskera, then you can pay against bills/purchase invoices online using the Veem Connect app on Deskera App Store
Transferwise is also coming soon on live environment to facilitate easier payments to your vendors and suppliers using Deskera Books.
Multi Currency
Using multi currency is easy with Deskera. You can create invoices, bills, expenses, orders, quotes, deposits, journal entries – any transaction in multi currency.
Please note - Multicurrency is available on Essential Plan and above.
See how you can use multi currency in Deskera by following these helpful articles:
Janhavi Wagh Janhavi Wagh
Here is a helpful video that shows you how you can use multi-currency in Deskera Books.
Creating Journal Entries
To create a journal entry, simply go to Accounting -> Journal Entry and use the create option. Here is a helpful article which shows you how.
Janhavi Wagh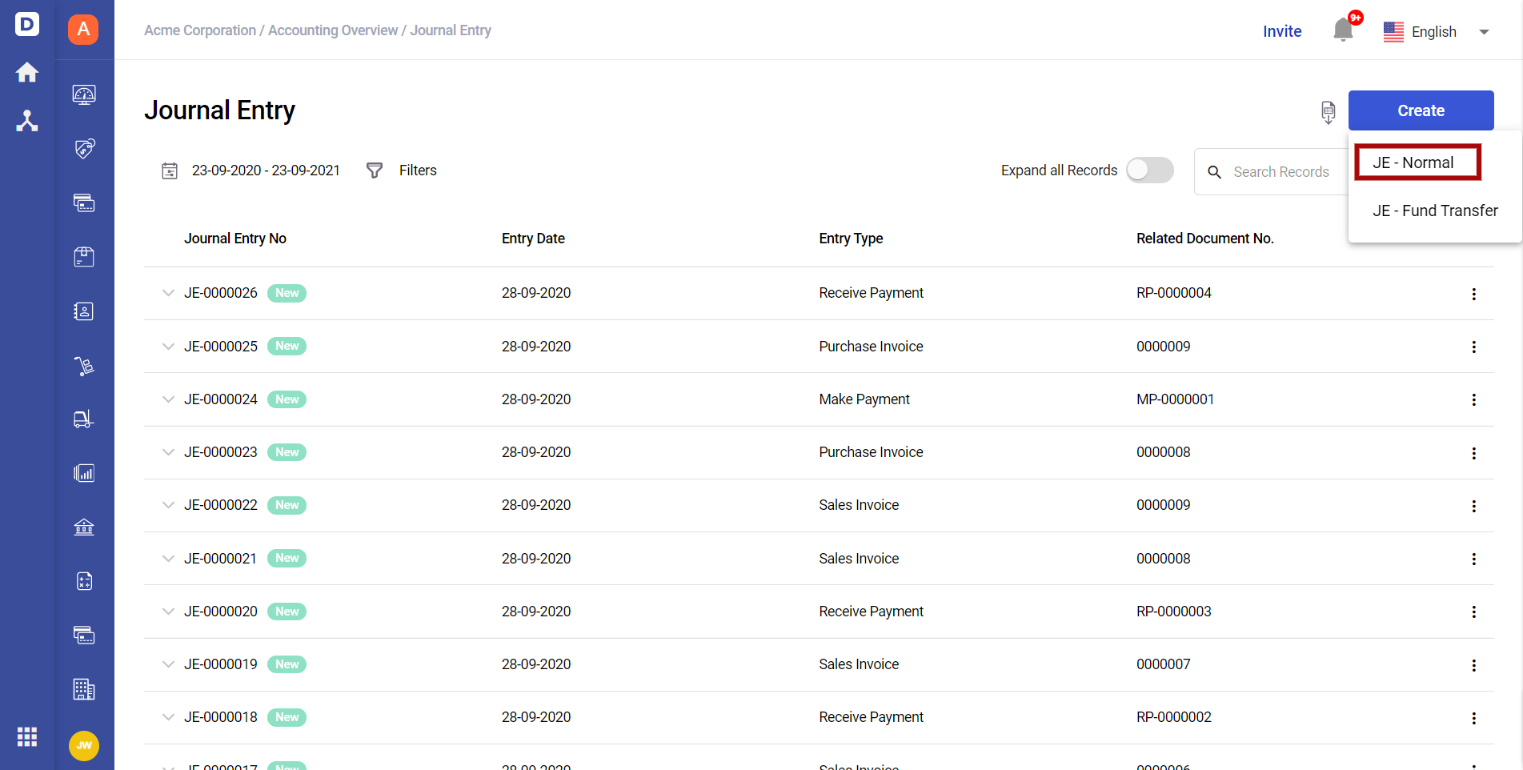
Setting up Chart of Accounts
Now you know how to add your products & contacts and create invoices, bills, expenses etc in Deskera Books. Let us see how you can manage your own chart of accounts in the system now.
What is Chart of Accounts?
Deskera Books has inbuilt chart of accounts for all default functions you need, and it works just fine for all accounting purpose. You can also read this blog on what Chart of Accounts is.

How to add or import Chart of Accounts?
To add or import your chart of accounts, just follow the steps outlined in this helpful article:
Janhavi Wagh
Once you have imported/added your own Chart of Accounts, you can use it anywhere in the system.
Importing opening balances
So, what is opening balance?
Remember the book beginning date you selected while setting up the organization? The opening balance is your accounts value (whether credit or debit) as of the book beginning date.
The different types of opening balances you need to be aware of when using Deskera Books are as follows:
- Opening invoices against contacts
These are unpaid invoices, money that is owed to you by your contacts/customers, as of the book beginning date.
Adding or importing opening invoices will provide the opening balance for your Accounts Receivable ledger. - Opening bills/expenses against contacts
These are unpaid bills/expenses, money that you owe to your suppliers/vendors/contacts, as of the book beginning date.
Adding or importing opening invoices will provide the opening balance for your Accounts Payable ledger. - Opening stock value
This is the value of the stock/inventory you had as of the book beginning date. The opening value imported/added here will provide the opening balance for your Inventory account. - Opening general ledger values
Once you have added the opening values for invoices, bills, expenses and stock/inventory, you can add/import the opening values for all other accounts in your Chart of Accounts.
Note: Do not import/add the Accounts Receivable, Accounts Payable and Inventory opening manually as direct GL opening balance. It is best to import/add them via opening invoices, bills and stock/inventory to maintain consistency.
To import your opening balances, follow this helpful article:
Janhavi Wagh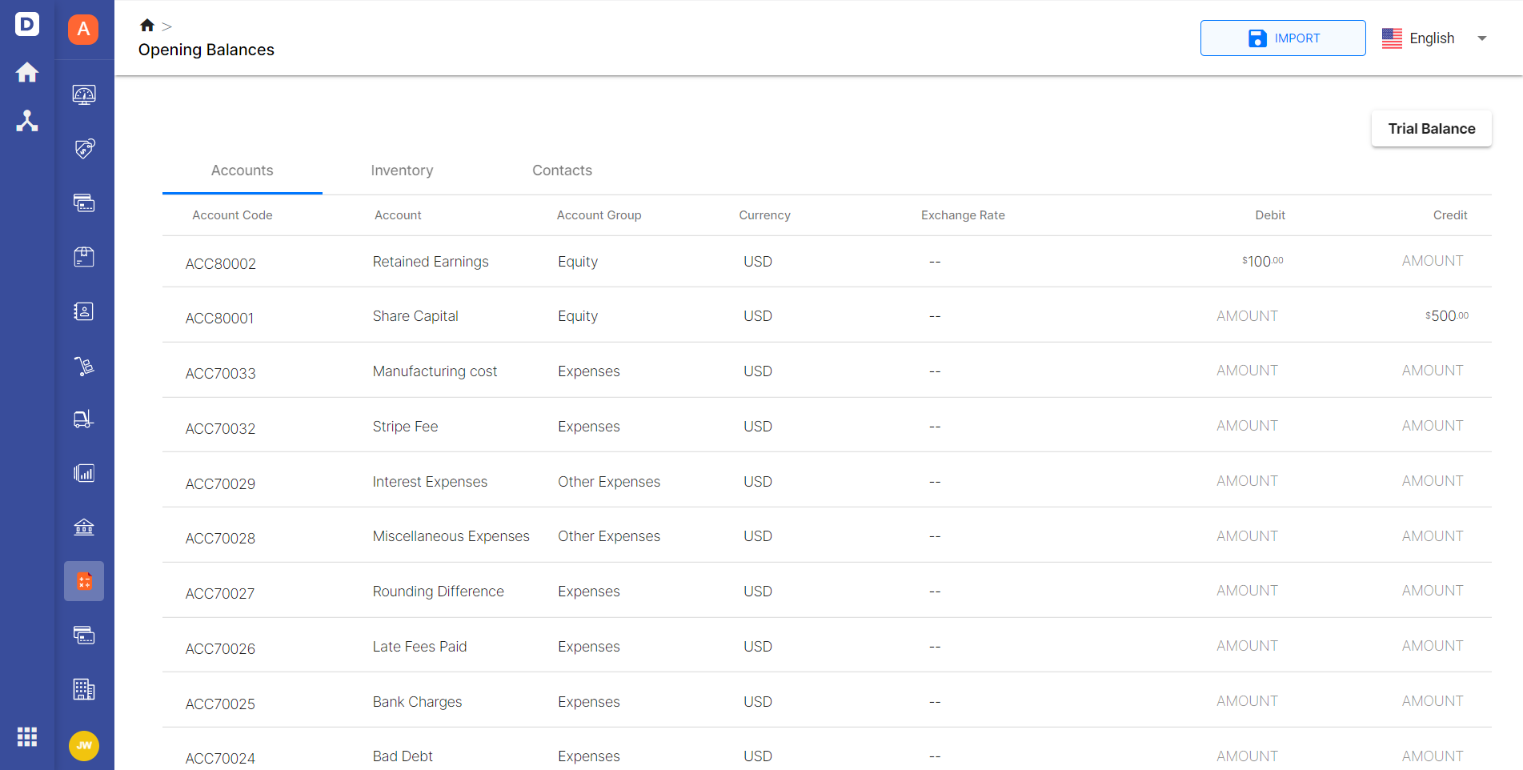
Once you have imported your opening balances, make sure to check the trial balance and ensure there are no "opening balance difference" entries. If there is, you may have missed adding/importing some data.
Key takeaways
So there you have it. If you follow the above steps, you would have:
- Created your organization
- Invited your colleagues and accountant
- Added your contacts
- Added your products/services/inventory
- Created and send invoices
- Created bills
- Learned how to receive and record payments, both online and offline
- Learned where and how to add journal entries
- Added your Chart of Accounts
- Added your opening balances
Your Deskera Books account is ready and you know how to do the basic operations. Subscribe to the blog to get more information, tricks/tips from the Deskera team coming your way in the future.