
GSTR-9 is a document or a statement that has to be filed once a year by the registered taxpayer irrespective of the turnover of an entity. This document will contain the details of all supplies made and received under various tax heads (CGST, SGST and IGST) during the entire year along with the turnover and audit details for the same. This is to be filed by SEZ units and SEZ developers as well.
This article will take you through the steps to file GSTR-9 on the GST Portal.
Prerequisites for Filing GSTR-9
- A taxpayer should be registered as a normal taxpayer under GST at least for a single day in a financial year.
- A taxpayer should have filed GSTR-1 and GSTR-3B for the financial year before filing the annual return because GSTR-9 is a compilation of data filed in GSTR-1 and GSTR-3B.
- Table number 6A will be auto-populated from the Form GSTR-3B and the same is not editable.
- Table number 8A will be auto-populated from the Form GSTR-2A and the same is not editable.
- Table number 9- “Details of Tax Paid” as declared in returns filed during the financial year will be auto-filled based on the details provided by you in Form GSTR-3B for the relevant financial year. In this, “paid through cash” and “paid through ITC” are the non-editable columns.
Step-by-Step Guide to File GSTR-9 on GST Portal
Step 1: Logging in to the GST Portal
- Access the www.gst.gov.in URL. The GST home page will be displayed.
- Here, you will have to log in to the GST Portal with valid credentials.
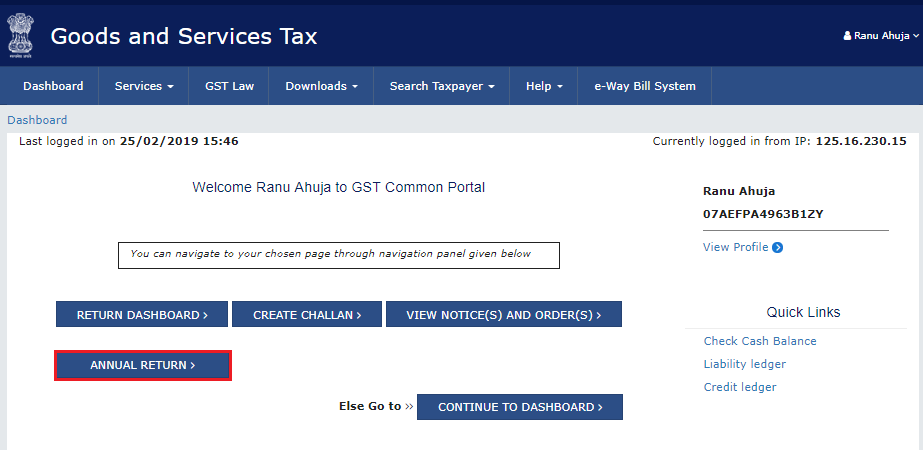
Step 2: Accessing the Returns Dashboard
- Click on the Services > Returns > Returns Dashboard option.

- Alternatively, you can also click the “annual return” link on the dashboard.
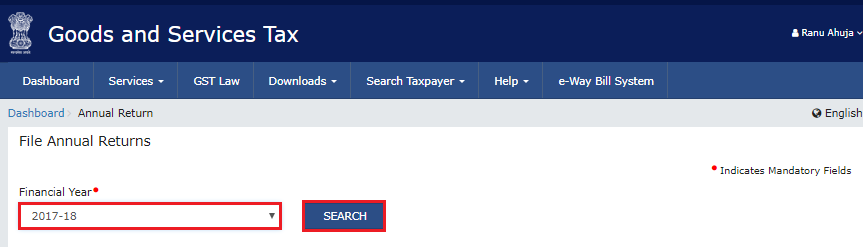
Step 3: File Annual Returns Page
- The “file annual returns” page is displayed.
- Select the “financial year” for which you want to file the annual return from the drop-down list.
- Click the “search” button.
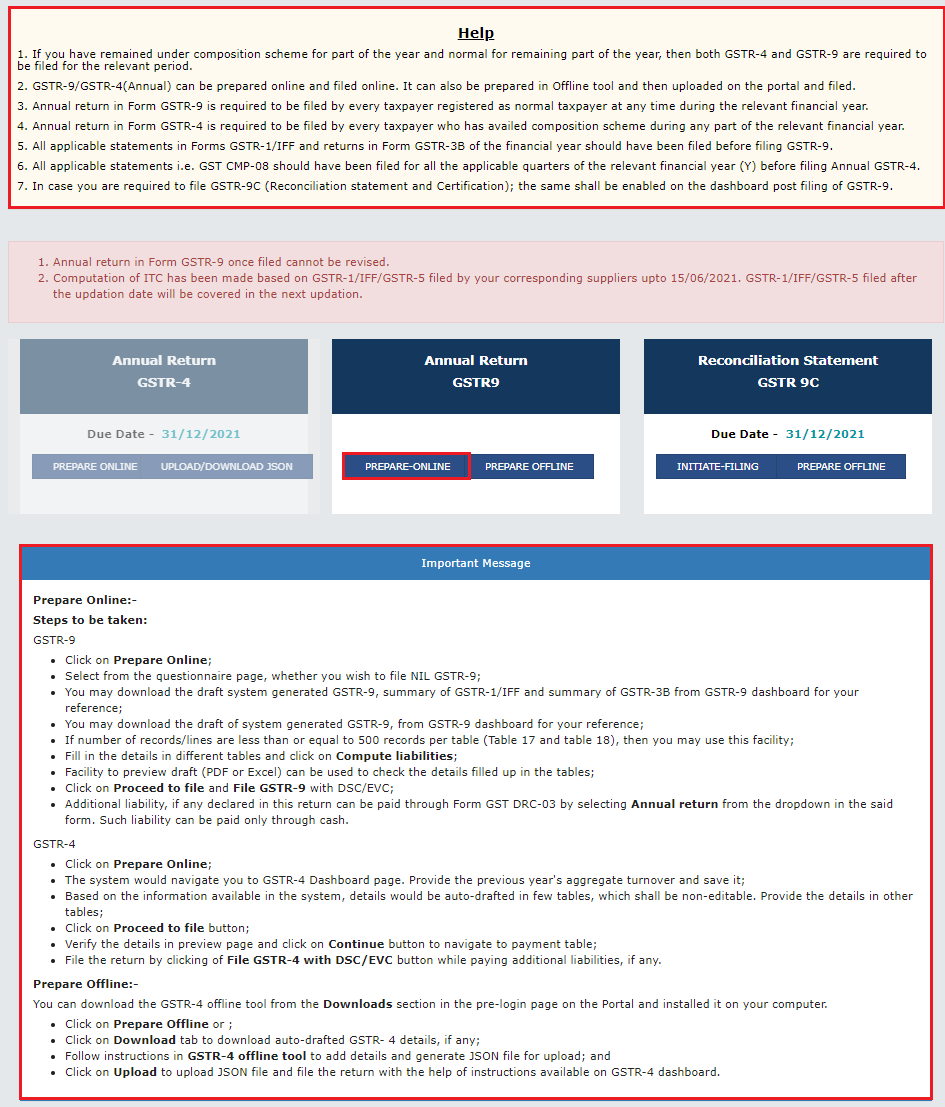
Step 4: Detailed File Annual Returns Page
- A detailed file annual returns page is displayed.
- Please read the important information in the boxes carefully.
- This page displays the due date of filing annual return, by giving relevant information in separate tiles by the taxpayer.
- In the GSTR-9 tile, click on the “prepare online” button.
Step 5: Answering the Question to Proceed to the Next Screen
- A question is displayed.
- You will have to answer whether you want to file a nil annual return for that particular financial year or not.
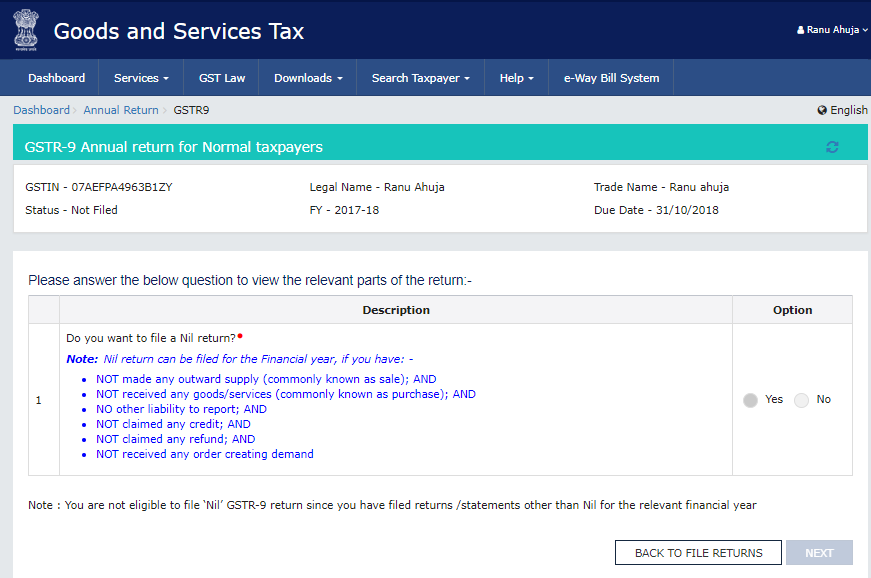
- You will then proceed to the next screen.
Note:
Nil annual return can be filed for a particular financial year if you have:
- NOT made any outward supply (sales)
- NOT received any goods or services (purchase)
- NO other liability to report
- NOT claimed any credit
- NOT claimed any refund
- NOT received any order creating demand
- There is no late fee to be paid, etc.
In case of Yes (File Nil Return):
- Select “yes” for option 1 to file nil return
- Click the “next” button
- Click on “compute liabilities” and proceed to file
- File GSTR-9 with DSC/EVC
In case of No (Non-Nil Return):
- Select “no” for option 1 to file GSTR-9 return
- Click the “next” button
Note:
- The option for “no” is pre-filled in case the data from Form GSTR-1 and GSTR-3B returns is auto-populated in Form GSTR-9 being filed by you.
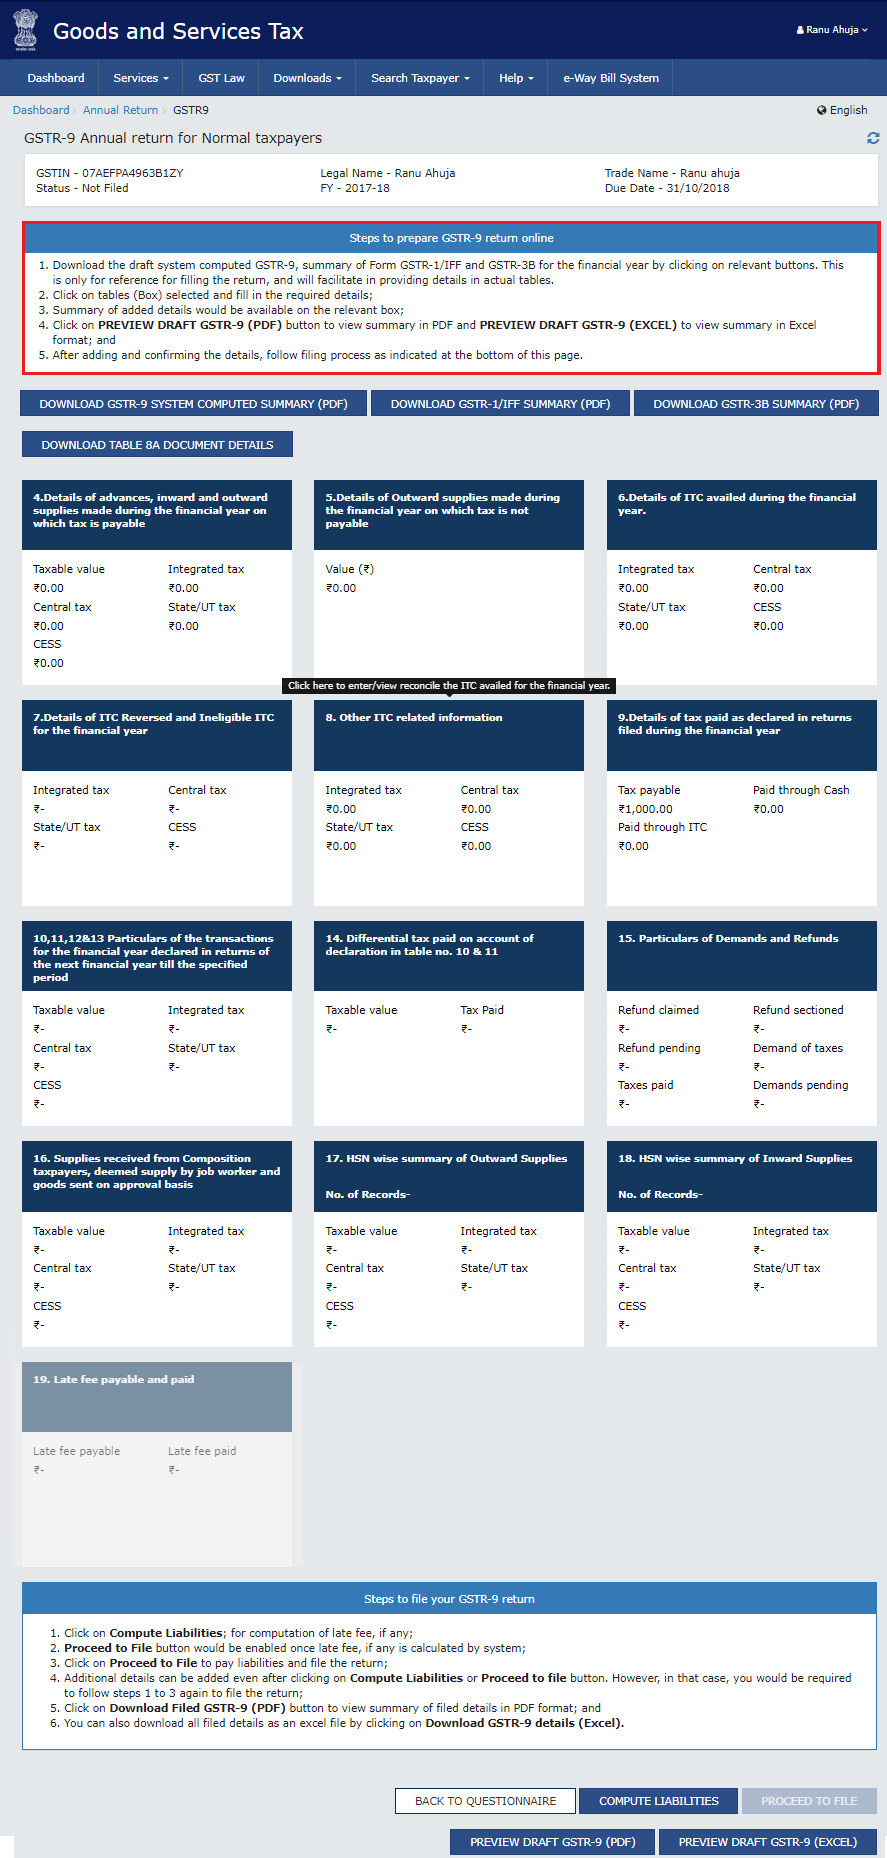
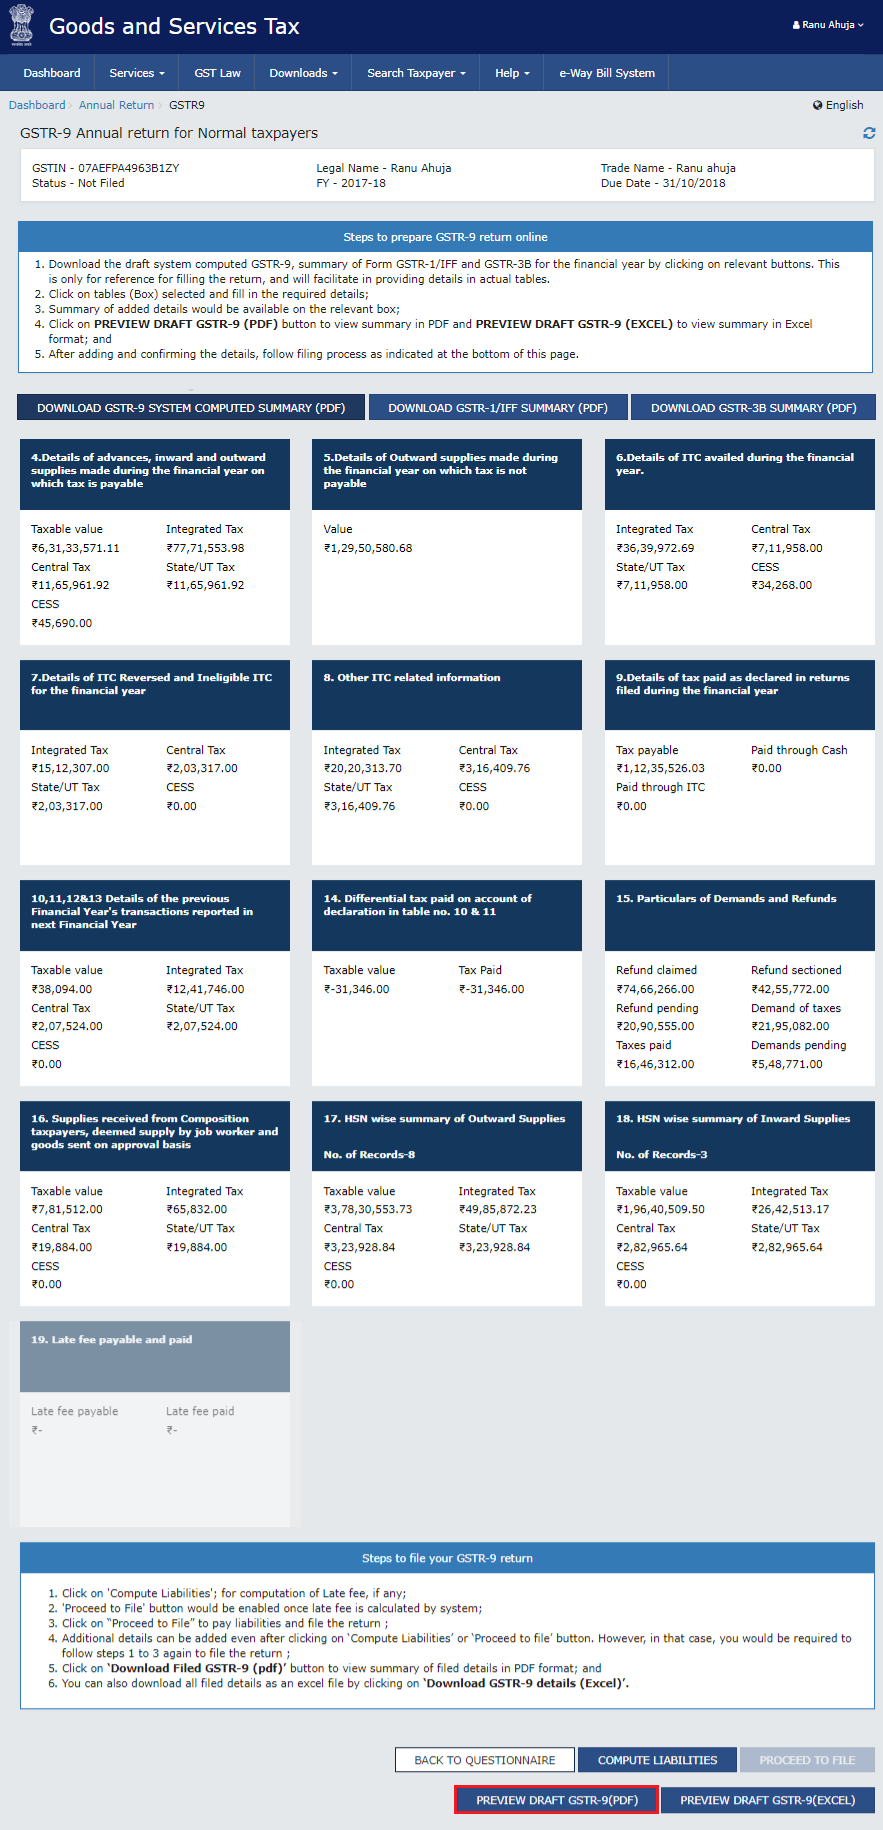
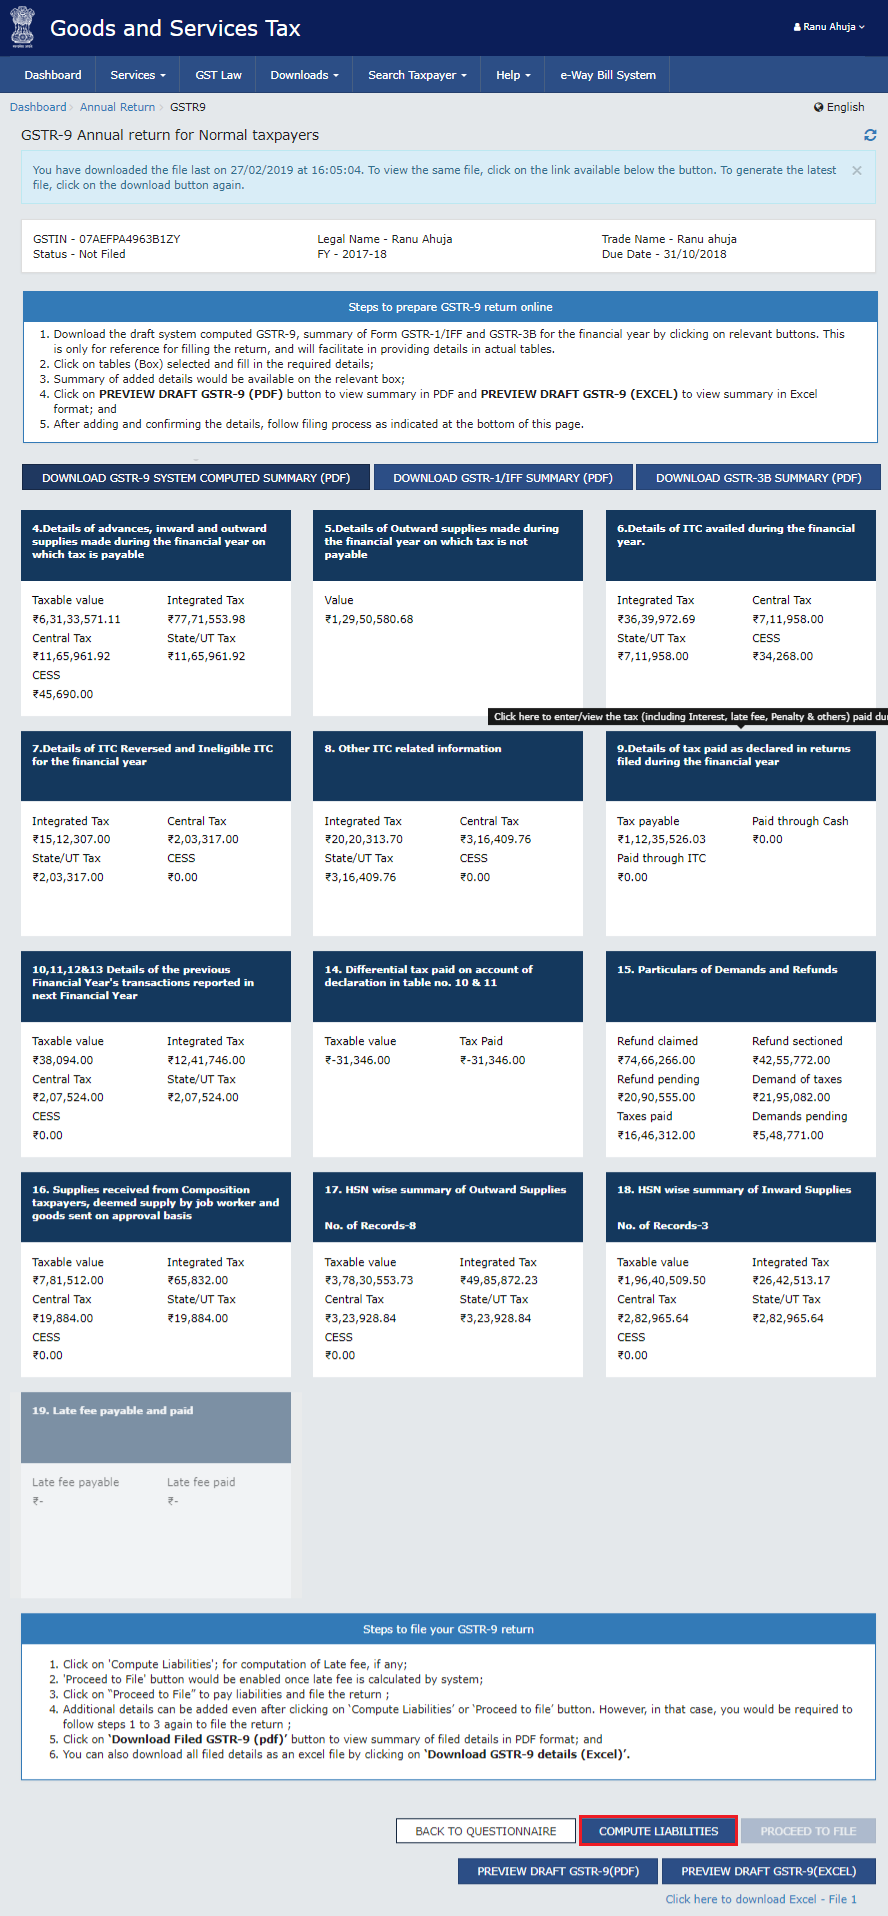
Step 6: “GSTR-9 Annual Return for Normal Taxpayers” Page is Displayed
- Please read the important message in the boxes “steps to prepare GSTR-9 return online” carefully.
- It will also contain various tiles for which details must be filled.
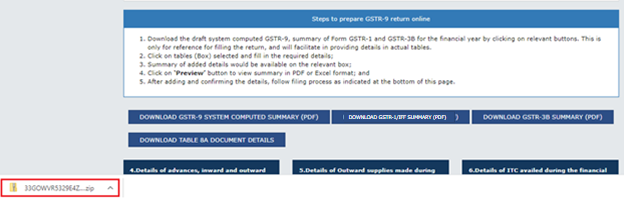
- Click on all the 3 tabs to download: GSTR-9 System Computed Summary, GSTR-1/IFF Summary, GSTR-3B Summary and Table 8A document details (excel format).
- You will have to click on the hyperlinks to download the files.
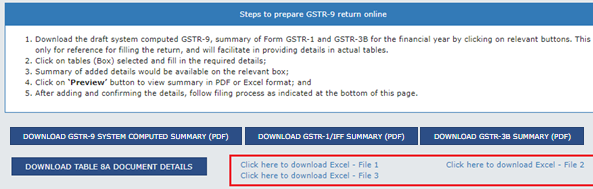
- In some cases, zip file will be directly downloaded if they contain less data.
- The downloaded summaries will help you with the details to be provided in various tiles of GSTR-9
Note:
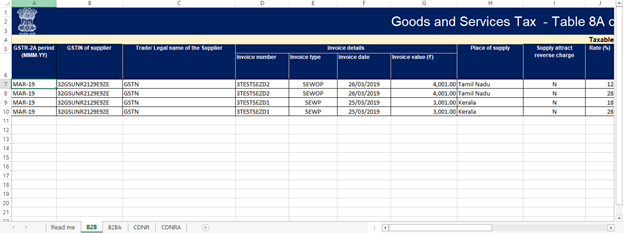
- Table 8A of Form GSTR-9 is populated on the basis of documents in file Form GSTR-1 or Form GSTR-5 of the supplier. Thus, all the documents which are present in GSTR-2A (Table 3 and 5) will not be available here. This is because the documents which are in the uploaded or submitted stage in Form GSTR-1 or Form GSTR-5 are not accounted for credit in Table 8A of Form GSTR-9.
- Data saved/submitted in Form GSTR-1 or Form GSTR-5 will be shown in Form GSTR-2A, but will not be shown in the downloaded excel file of Table 8A of Form GSTR-9.
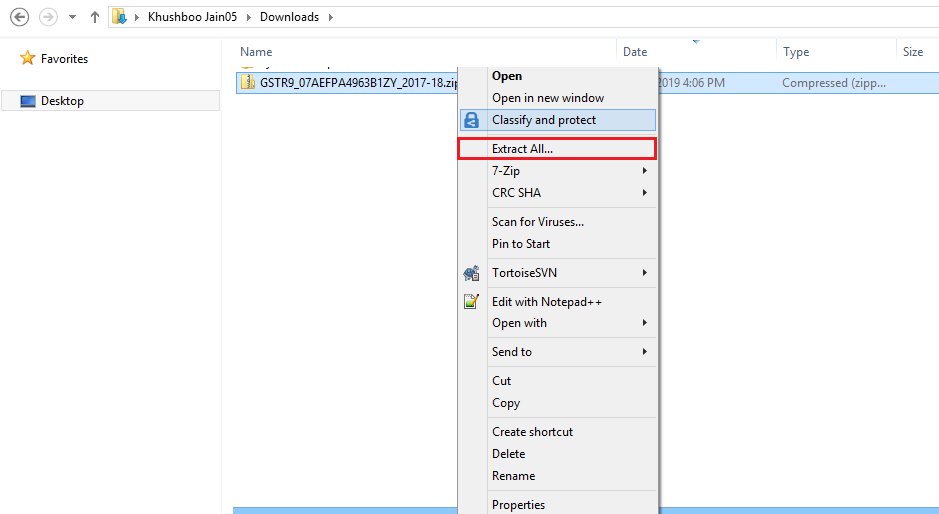
- The document wise details for Table 8A is downloaded in the zip format. You will have to unzip the file.
- Also, the details of Table B2B, B2BA, CDNR and CDNRA will be available in the downloaded excel. This will help you in reconciling the values of Table 8A and hence facilitate in filing Form GSTR-9.
Step 7: Enter Requisite Details in Various Tables for the Financial Year
1.“Details of advances, inward and outward supplies made during the financial year on which tax is payable”
- Click on the “details of advances, inward and outward supplies made during the financial year on which tax is payable” tile to enter/view the summary of outward/inward supplies made during the financial year.
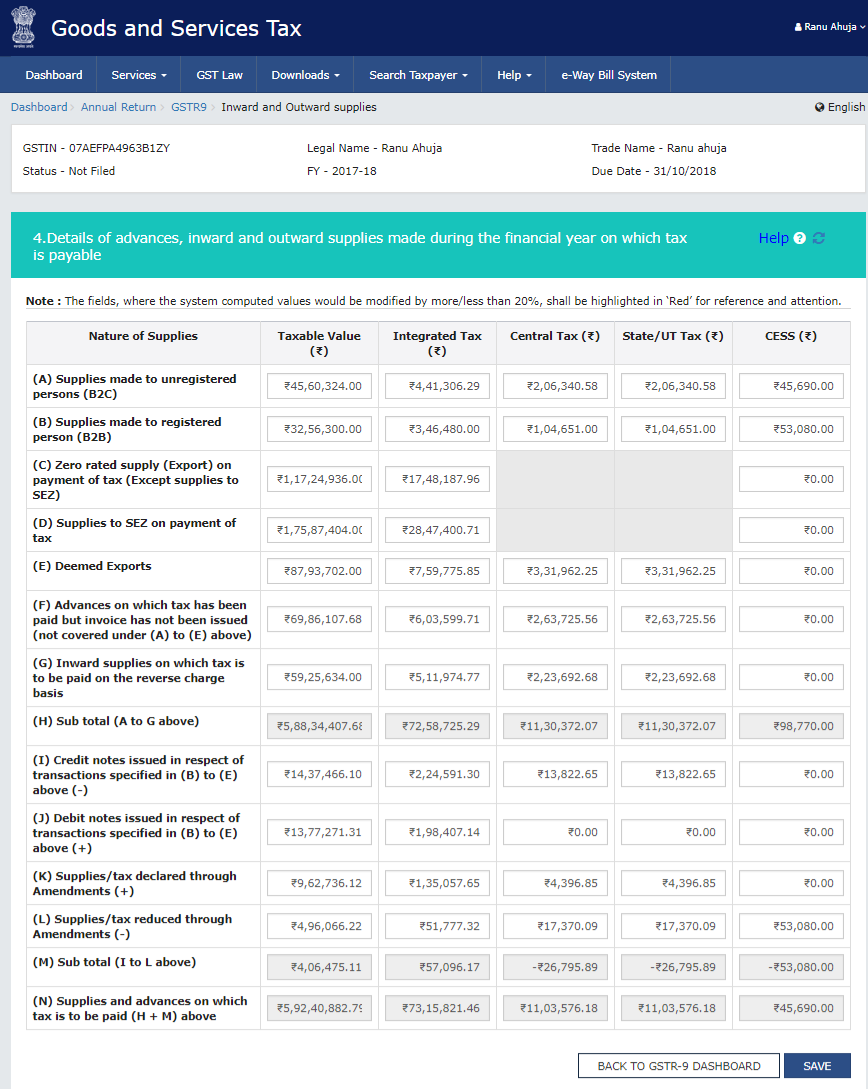
- Then enter/edit the “taxable value, integrated tax, central tax, state/UT tax and cess” details.
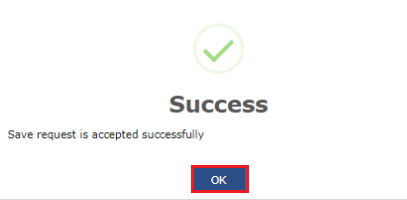
- Then click the “save” button. A confirmation message would be displayed saying, “save request accepted successfully” the pop-up on which you have to click the “ok” button.
- Lastly, click on the “back to GSTR-9 dashboard” button to go back to the Form GSTR-9 Dashboard page.
- You will be directed to the GSTR-9 dashboard landing page and the tile summary will be updated based on the details filled up in Table Number 4N.
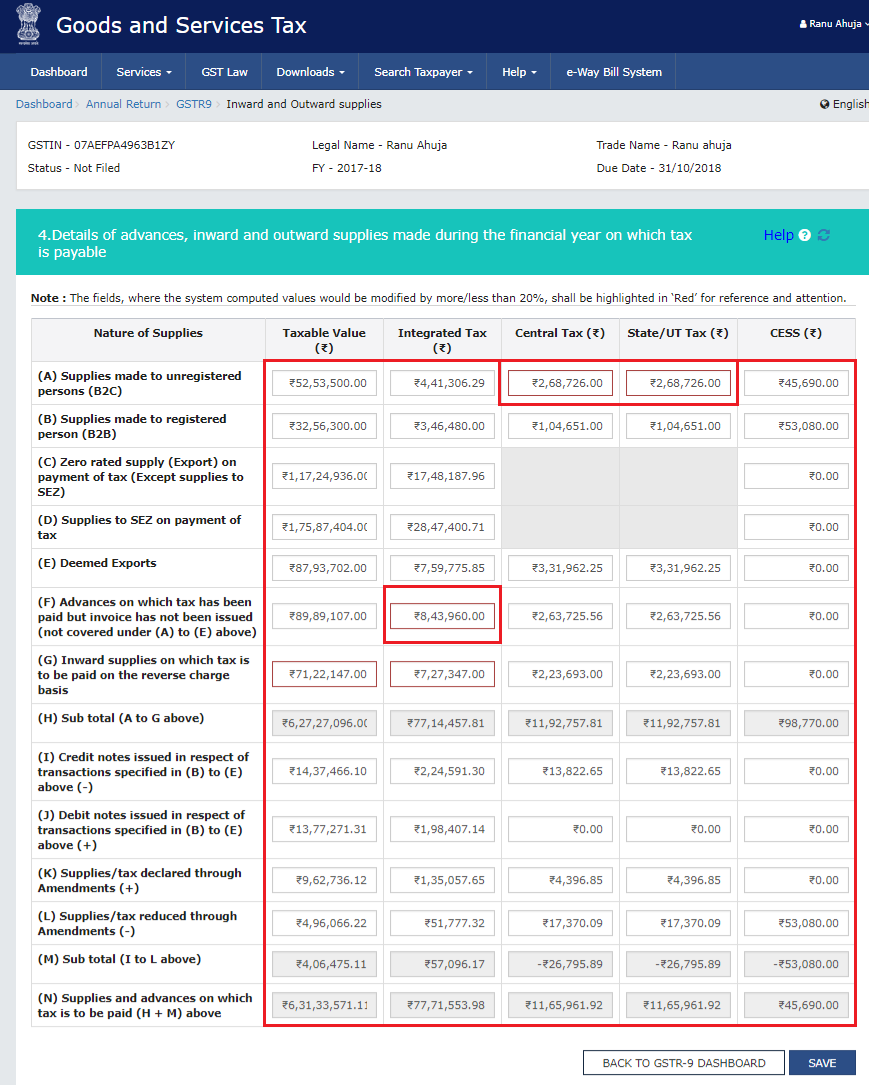
Note:
- Details will be auto-filled based on the details uploaded by you in the Form GSTR-1 and Form GSTR-3B during the said relevant financial year.
- You can click on the “help” link to know more details.
- If the details provided are +/- 20% from the auto-populated data, then the cells would be highlighted in red for your reference and attention. Post which before proceeding, you will get a confirmation message, in which you have to click the “yes” button to proceed further.
2. “Details of Outward Supplies Made During the Financial Year on Which Tax is Not Payable”
- Click on the “details of outward supplies made during the financial year on which tax is not payable” tile to enter/view the summary of non-taxable outward supplies made during the financial year.
- Enter the “taxable value” details
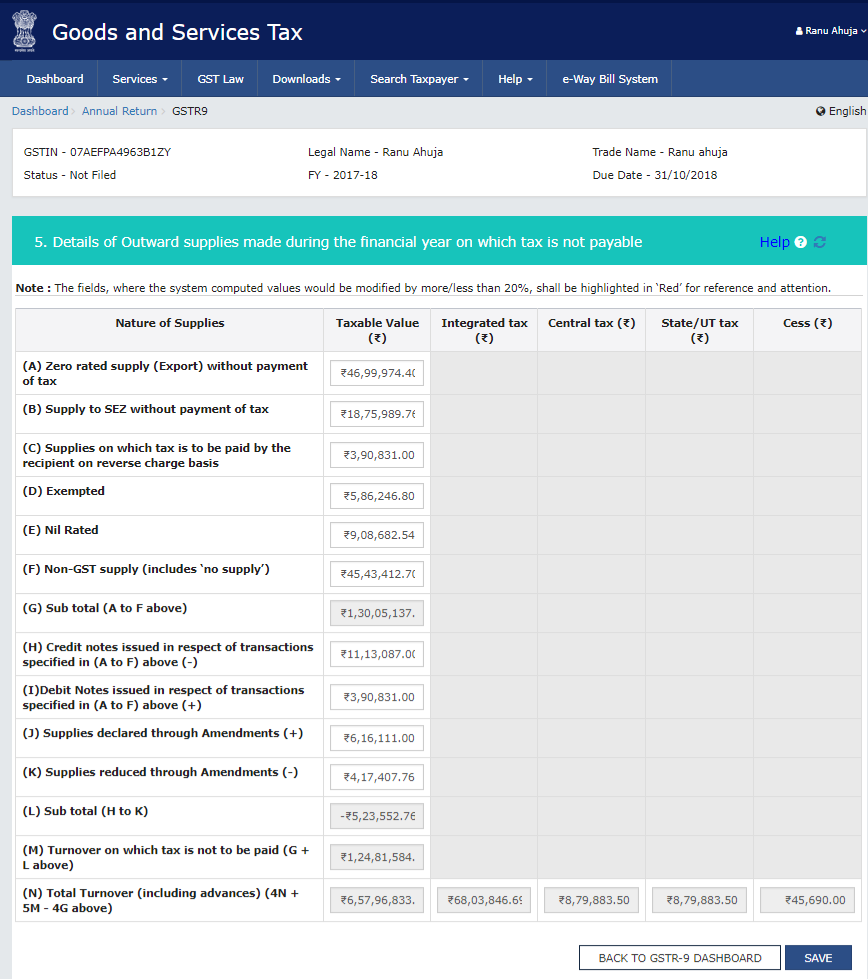
- Click the “save” button. A confirmation message would be displayed saying, “save request accepted successfully” the pop-up on which you have to click the “ok” button.
- Lastly, click on the “back to GSTR-9 dashboard” button to go back to the Form GSTR-9 Dashboard page.
- You will be directed to the GSTR-9 dashboard landing page and the tile summary will be updated based on the details filled up in Table Number 5(M).
Note:
- Details will be auto-filled based on details uploaded by you in Form GSTR-1 and Form GSTR-3B during the said relevant financial year.
- If the details provided are +/- 20% from the auto-populated data, then the cells would be highlighted in red for your reference and attention. Post which before proceeding, you will get a confirmation message, in which you have to click the “yes” button to proceed further.
3. “Details of ITC Availed During the Financial Year”
- Click on the “details of ITC availed during the financial year” tile to enter/view the summary of ITC availed during the financial year.
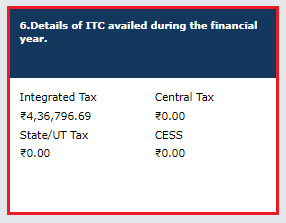
- Enter the “integrated tax, central tax, state/UT tax and Cess.”
- Click the “save” button. A confirmation message would be displayed saying, “save request accepted successfully” the pop-up on which you have to click the “ok” button.
- Lastly, click on the “back to GSTR-9 dashboard” button to go back to the Form GSTR-9 Dashboard page.
- You will be directed to the GSTR-9 dashboard landing page and the tile summary will be updated based on the details filled up in Table Number 6(O).
Note:
- Details will be auto-filled based on the details provided by you in Form GSTR-3B for the relevant financial year.
- Table number 6A will be auto-filled based on the Form GSTR-3B and the same is non editable.
4. “Details of ITC Reversed and Ineligible ITC for the Financial Year”
- Click on the “details of ITC reversed and ineligible ITC for the financial year” tile to enter/view the summary of ITC reversed or ineligible during the financial year.
- Enter the “integrated tax, central tax, state/UT tax and Cess.”
- In case you want to add other reversals, enter the description of reversal and tax details.
- Click the “Add” button to add more rows, if required.
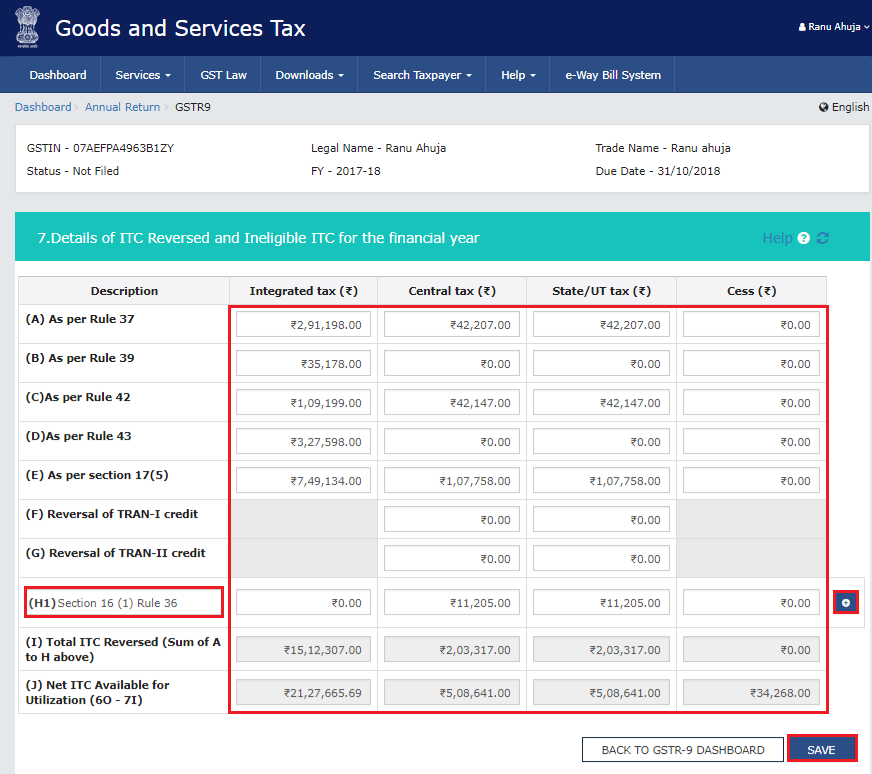
- Click the “save” button. A confirmation message would be displayed saying, “save request accepted successfully” the pop-up on which you have to click the “ok” button.
- Lastly, click on the “back to GSTR-9 dashboard” button to go back to the Form GSTR-9 Dashboard page.
- You will be directed to the GSTR-9 dashboard landing page and the tile summary will be updated based on the details filled up in Table Number 7(I).
5. “Other ITC Related Information”
- Click on the “other ITC related information” tile to enter/view the ITC availed during the financial year.
- Enter the “integrated tax, central tax, state/UT tax and cess” details in row C, E, F and G of the table.
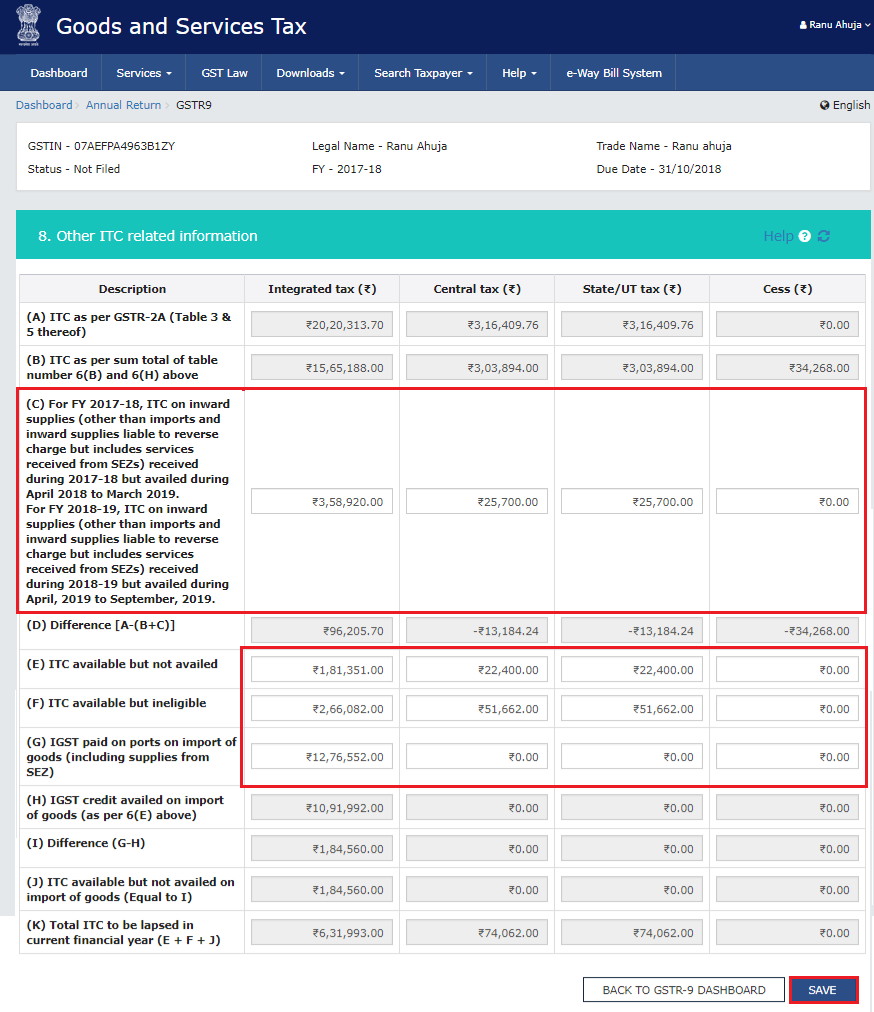
- Click the “save” button. A confirmation message would be displayed saying, “save request accepted successfully” the pop-up on which you have to click the “ok” button.
- Lastly, click on the “back to GSTR-9 dashboard” button to go back to the Form GSTR-9 Dashboard page.
- You will be directed to the GSTR-9 dashboard landing page and the tile summary will be updated based on the details filled up in Table Number 8(A).
Note:
- Table number 8A will be auto-filled based on the details auto populated in Form GSTR-2A and the same is not editable.
6. “Details of Tax Paid as Declared in Returns Filed During the Financial Year”
- Click on the “details of tax paid as declared in returns filed during the financial year” tile to enter/view the tax (including interest, late fee, penalty and others) paid during the financial year.
- Enter the tax payable for “integrated tax, central tax, state/UT tax, cess, interest, late fees, penalty and others.
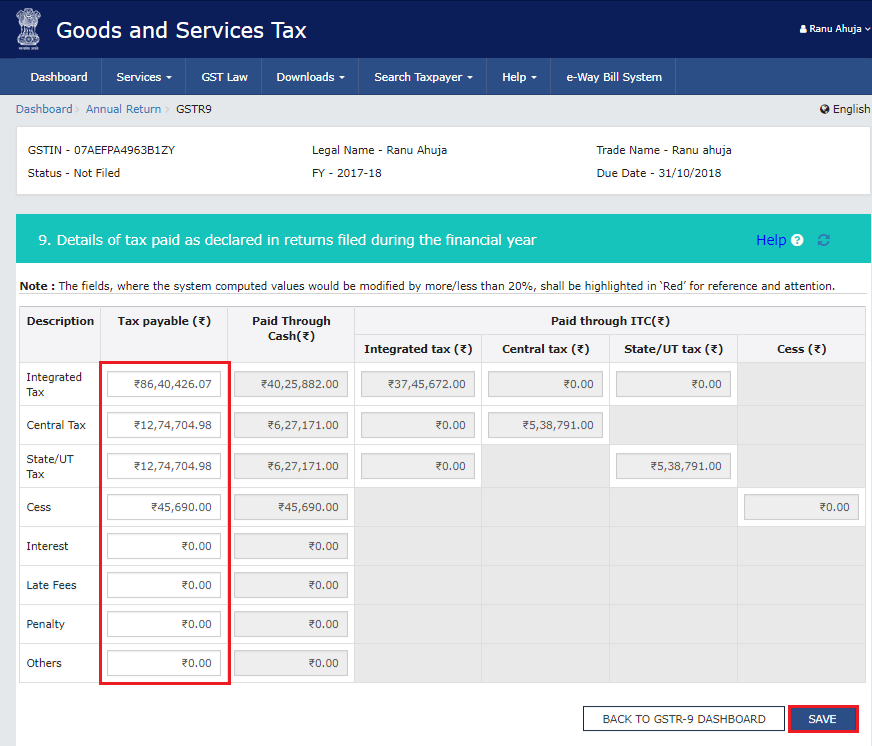
- Click the “save” button. A confirmation message would be displayed saying, “save request accepted successfully” the pop-up on which you have to click the “ok” button.
- Lastly, click on the “back to GSTR-9 dashboard” button to go back to the Form GSTR-9 Dashboard page.
- You will be directed to the GSTR-9 dashboard landing page and the tile summary will be updated based on the details filled up in Table Number 9.
Note:
- Complete Table Number 9 will be auto filled based on the details provided by you in Form GSTR-3B for the relevant financial year. “Paid through Cash” and “Paid through ITC” columns are non-editable.
7. “10, 11, 12 and 13 Details of the Previous Financial Year’s Transactions Reported in the Next Financial Year”
- Click the “10,11,12 and 13 details of the previous financial year’s transactions reported in the next financial year” tile to enter/view the summary of transactions reported in the next financial year.
- Enter the “taxable value, integrated tax, central tax, state/UT tax and cess” in the relevant rows of the table.
- Click the “save” button. A confirmation message would be displayed saying, “save request accepted successfully” the pop-up on which you have to click the “ok” button.
- Lastly, click on the “back to GSTR-9 dashboard” button to go back to the Form GSTR-9 Dashboard page.
- You will be directed to the GSTR-9 dashboard landing page and the tile summary will be updated based on the details filled in the respective tile.
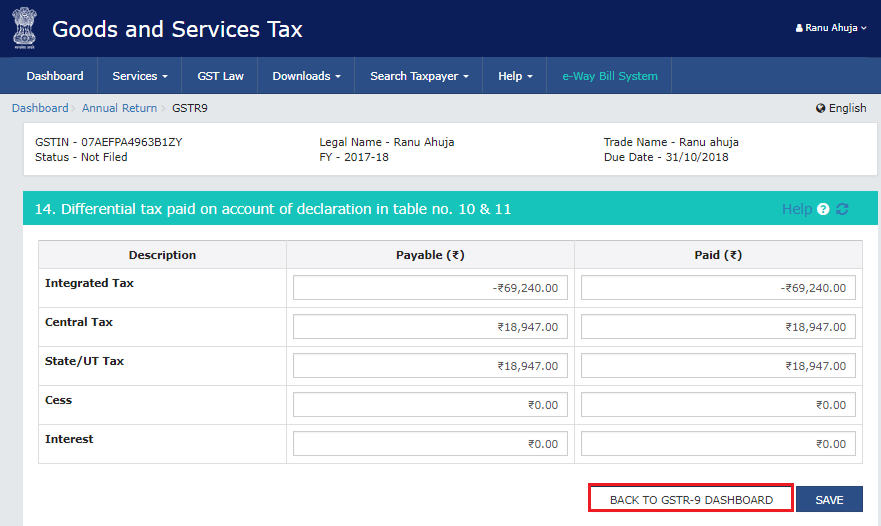
8. “Differential Tax Paid on Account of Declaration in Table No. 10 and 11”
- Click the “differential tax paid on account of declaration in table no. 10 and 11” tile to enter/view the total tax paid on transactions reported in the next financial year.
- Enter the “payable” and “paid amount” details.
- Click the “save” button. A confirmation message would be displayed saying, “save request accepted successfully” the pop-up on which you have to click the “ok” button.
- Lastly, click on the “back to GSTR-9 dashboard” button to go back to the Form GSTR-9 Dashboard page.
- You will be directed to the GSTR-9 dashboard landing page and the tile summary will be updated based on the details filled in the respective tile.
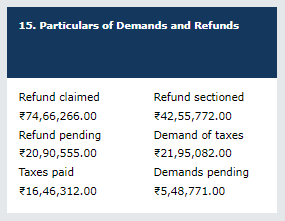
9. “Particulars of Demands and Refunds”
- Click on the “particulars of demands and refunds” tile to enter/view particulars of demands and refunds during the financial year.
- Enter the “tax” details.
- Click the “save” button. A confirmation message would be displayed saying, “save request accepted successfully” the pop-up on which you have to click the “ok” button.
- Lastly, click on the “back to GSTR-9 dashboard” button to go back to the Form GSTR-9 Dashboard page.
- You will be directed to the GSTR-9 dashboard landing page and the tile summary will be updated based on the details filled in the respective tile.
10. “Supplies Received from Composition Taxpayers, Deemed Supply by Job Worker and Goods Sent on Approval Basis”
- Click the “supplies received from composition taxpayers, deemed supply by job worker and goods sent on approval basis” tile to enter/view the summary of the above mentioned details
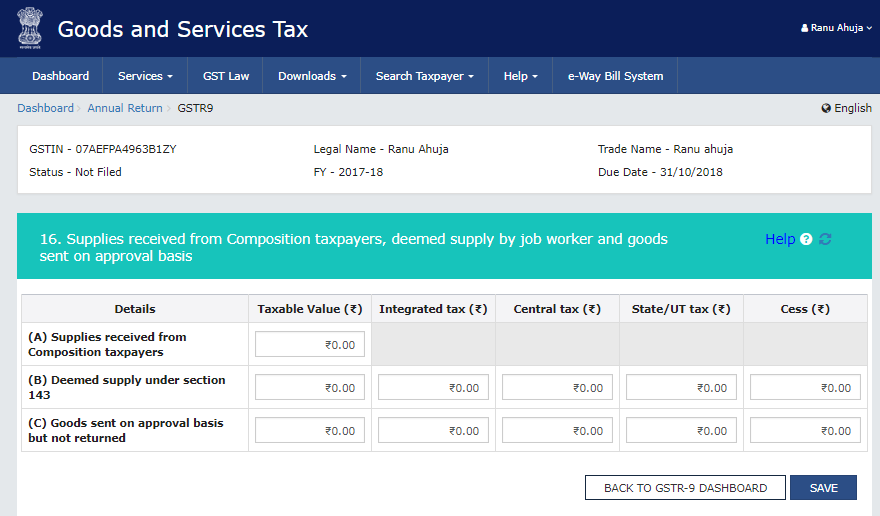
- Enter the “taxable value” and “tax” details
- Click the “save” button. A confirmation message would be displayed saying, “save request accepted successfully” the pop-up on which you have to click the “ok” button.
- Lastly, click on the “back to GSTR-9 dashboard” button to go back to the Form GSTR-9 Dashboard page.
- You will be directed to the GSTR-9 dashboard landing page and the tile summary will be updated based on the details filled in the respective tile.
11. “HSN Wise Summary of Outward Supplies”
- Click the “HSN wise summary of outward supplies” tile to enter/view HSN wise summary of outward supplies made during the financial year.
- In the “HSN” field, enter the applicable provision of reporting HSN or Service Classification Code of the outward supplies.
- In the “UQC” field, select UQC. For supply related to services, “OTH-Others” may be selected from the dropdown
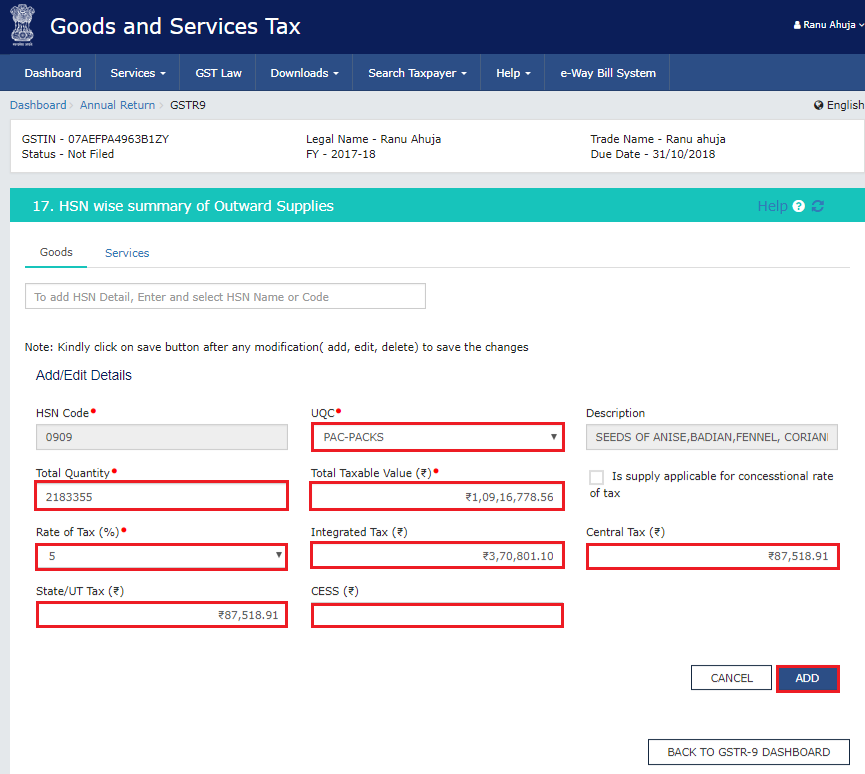
- In the “Total Quantity” field, enter the quantity. For supply related to services, report “zero.”
- In the “Total Taxable Value” field, enter the total taxable value of the outward supply.
- Select whether supply is applicable for concessional rate of tax.
- Select the “rate of tax” from the drop-down list.
- Enter the “central tax, integrated tax, state/UT tax and cess” amount.
- Click the “Add” button. The HSN details are added. You can click the “add/delete” button to add or delete the details.
- Similarly, add other details and click the “save” button.
- A confirmation message would be displayed saying, “save request accepted successfully” the pop-up on which you have to click the “ok” button.
- Lastly, click on the “back to GSTR-9 dashboard” button to go back to the Form GSTR-9 Dashboard page.
- You will be directed to the GSTR-9 dashboard landing page and the tile summary will be updated based on the details filled in the respective tile.
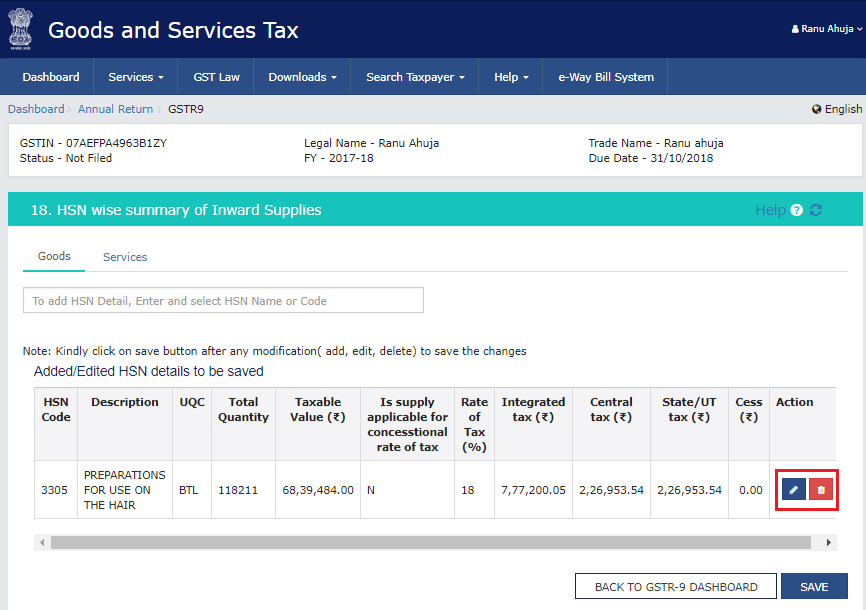
12. “HSN Wise Summary of Inward Supplies”
- Click the “HSN wise summary of inward supplies” tile to enter/view HSN wise summary of inward supplies received during the financial year.
- In the “HSN” field, enter the applicable provision of reporting HSN or Service Classification Code of the inward supplies.
- In the “UQC” field, select UQC. For supply related to services, “OTH-Others” may be selected from the dropdown
- In the “Total Quantity” field, enter the quantity. For supply related to services, report “zero.”
- In the “Total Taxable Value” field, enter the total taxable value of the outward supply.
- Select whether supply is applicable for concessional rate of tax.
- Select the “rate of tax” from the drop-down list.
- Enter the “central tax, integrated tax, state/UT tax and cess” amount.
- Click the “Add” button. The HSN details are added. You can click the “add/delete” button to add or delete the details.
- Similarly, add other details and click the “save” button.
- A confirmation message would be displayed saying, “save request accepted successfully” the pop-up on which you have to click the “ok” button.
- Lastly, click on the “back to GSTR-9 dashboard” button to go back to the Form GSTR-9 Dashboard page.
- You will be directed to the GSTR-9 dashboard landing page and the tile summary will be updated based on the details filled in the respective tile.
Step 8: Preview Form GSTR-9 Summary
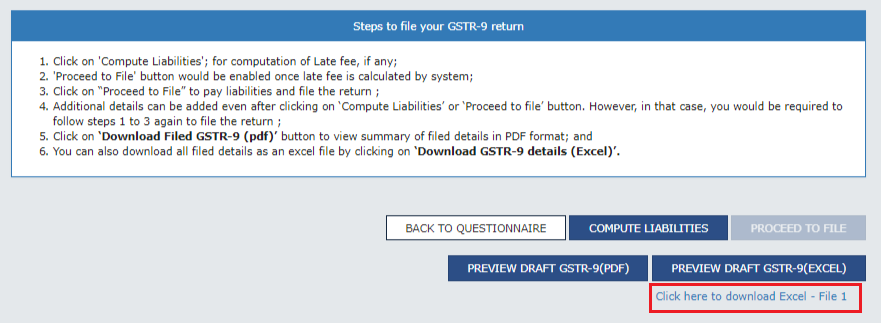
- Once you have entered all the details, click the relevant button “preview draft GSTR-9 (PDF) or preview draft GSTR-9 (excel).
- Your draft summary page of Form GSTR-9 will be downloaded for your review.
Note:
- It is recommended that you download this summary page and review the summary of entries made in different sections carefully before computing the liabilities.
- The PDF file generated would bear the watermark of “draft” as the details are yet to be filed by you.
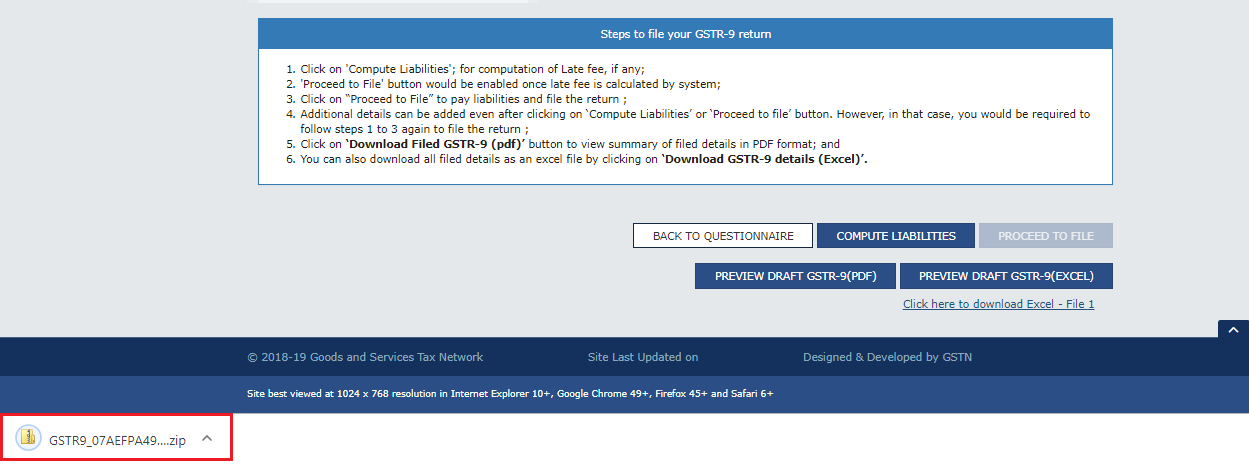
- Once you click the “preview draft GSTR-9 (excel)” button, a link, “click here to download excel file” will be created below the button. On clicking it, the zip file will be downloaded. You will then have to extract the zip file in order to open the excel file to view Form GSTR-9.
- You can make changes to Form GSTR-9 if needed after reviewing and before you file GSTR-9. The changes can be made to Form GSTR-9 online on the GST Portal.
Step 9: Compute Liabilities and Pay Late Fees (If Any)
- Click on the “compute liabilities” button for computation of late fees (if any).
- A message is displayed on the top page of the screen that “compute liabilities request has been received. Please check the status after sometime”
- Then, click the “Refresh” button.
- Once the status of Form GSTR-9 is “ready to file” and liabilities are calculated, “late fee payable and paid” tile gets enabled.
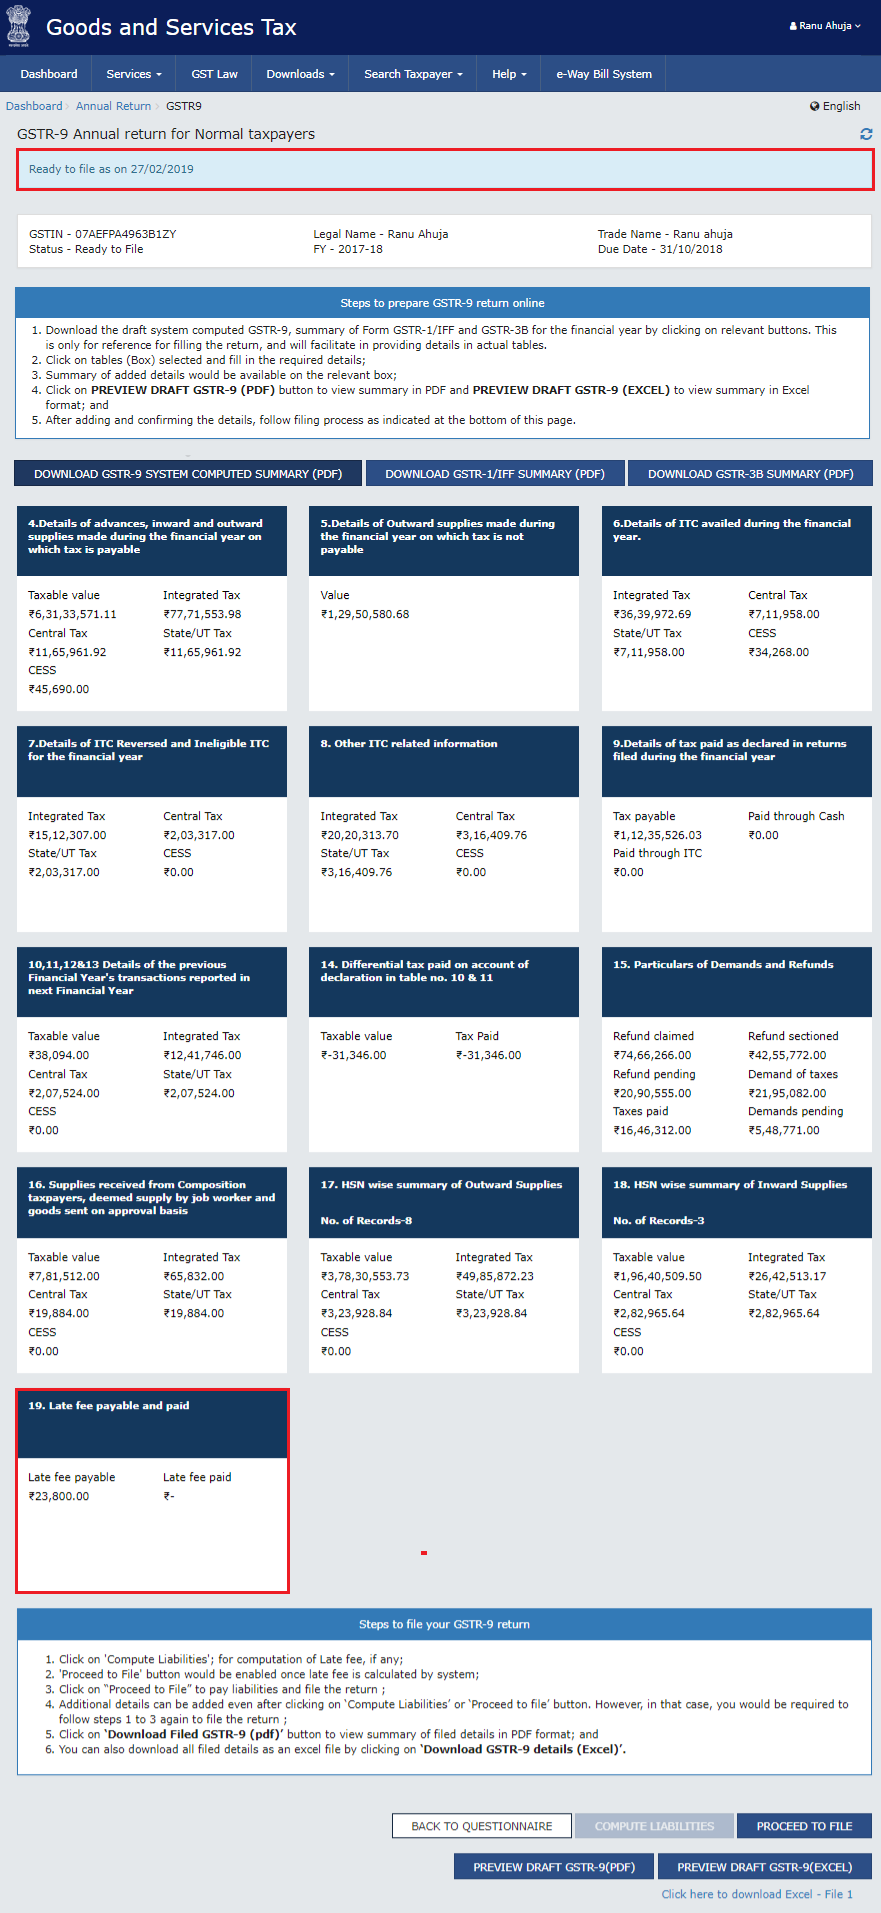
- Click on the “late fee payable and paid” tile or on the “proceed to file” button.
- Available cash balance as on date in Electronic Cash Ledger is shown to the taxpayer in “cash ledger balance” table.
Scenario 1- If Available Cash Balance in Electronic Cash Ledger is Less Than the Amount Required to Offset the Liabilities
- If this is the case, then additional cash required to be paid by you will be shown in the “additional cash required” column.
- You may create challan for the additional cash directly by clicking on the “create challan” button.
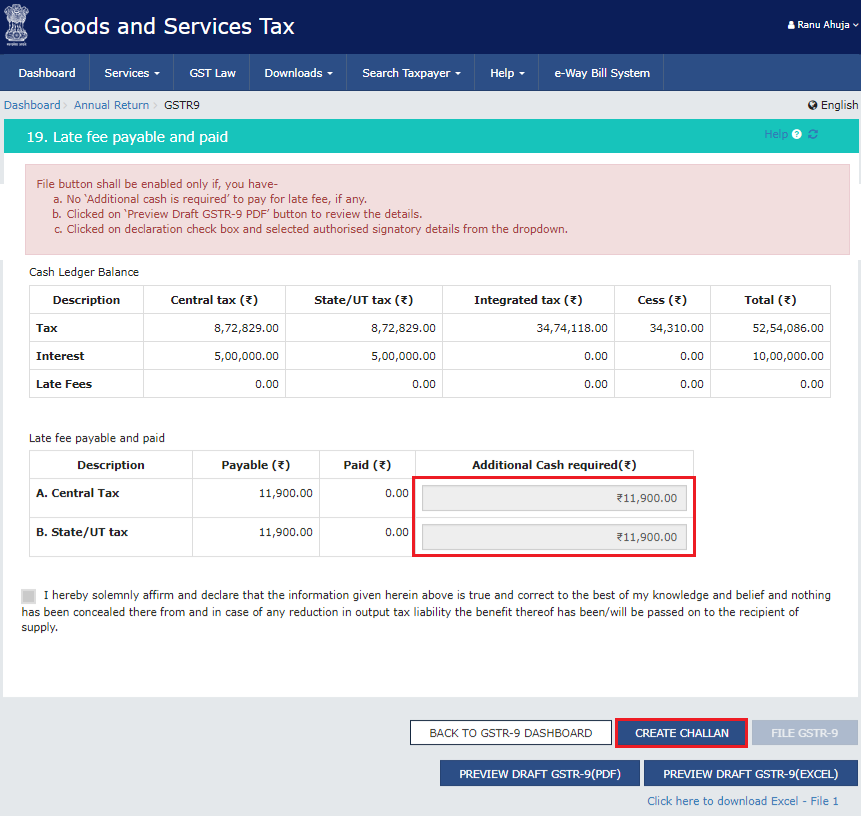
- Select the “payment modes” as E-Payment/Over the Counter/NEFT/RTGS
- Click the “generate challan” button
Scenario 2- If Available Cash Balance in Electronic Cash Ledger is More Than the Amount Required to Offset the Liabilities
- If the available cash balance in the Electronic Cash ledger is more than the amount required to offset the liabilities, no additional cash is required for paying liability.
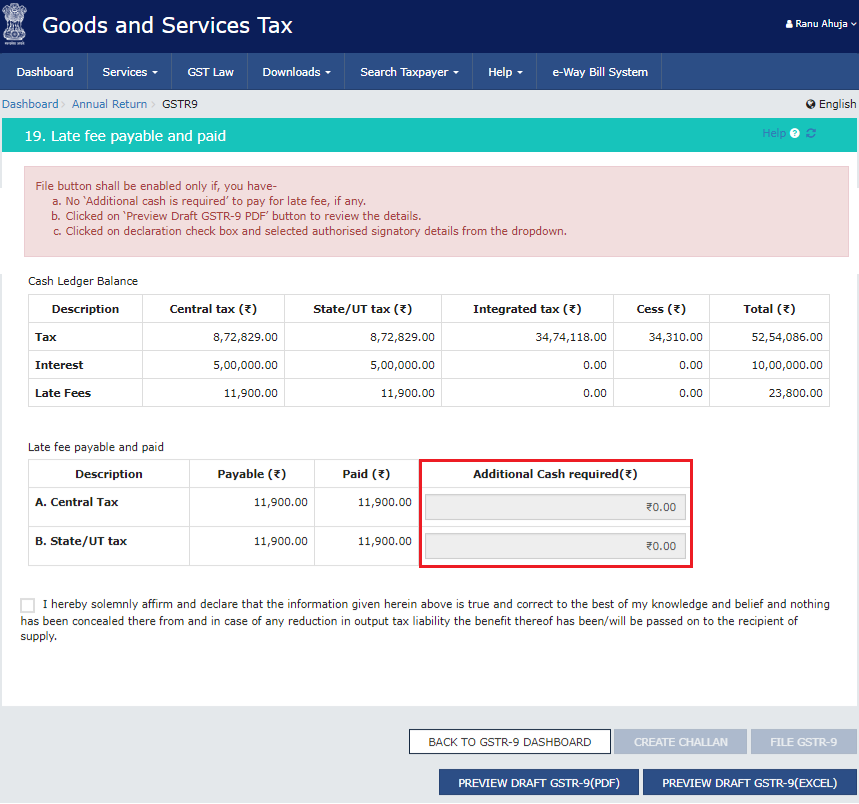
- You will then also be able to preview and then file GSTR-9.
Note:
- After the “compute liabilities” button is clicked, details provided in various tables are processed on the GST Portal at the back end and late fee liabilities, if any, are computed. Late fee is calculated if there is delay in filing GSTR-9 annual return beyond the due date.
- In case, records (or data as submitted while filing GSTR-9) are processed with error or are under processing at the back end, a warning message is displayed. If the records are still under processing, wait for the processing to be completed at the back end. For the records which are processed with an error, go back and take action on those records for making corrections.
- In the Tax Liability Details grid, the “total challan amount” field and “total challan amount (in words)” fields are auto-populated with the total amount of payment to be made. You cannot edit this amount.
- In case of Net Banking, you will be directed to the net banking page of the selected bank. The payment amount is shown at the bank’s website. After successful payment, you will be redirected to the GST portal where the transaction status will be displayed.
- In case of over the counter payment mode, you will have to take a printout of the challan and visit the selected bank. You will then have to pay using cash/cheque/demand draft within the challan’s validity period. Status of the payment will be updated on the GST portal after confirmation from the bank.
- In case of NEFT/RTGS payment mode, you will again have to print your challan and visit the selected bank. You will have to pay using a cheque through your account with the selected bank/branch. You can also pay using the account debit facility. The transaction will be processed by the Bank and confirmed by the RBI within 2 hours. Status of the payment will be updated on the GST Portal after getting the confirmation from the Bank.
Step 10: File Form GSTR-9 with DSC/EVC
- Select the “declaration” checkbox.
- Select the “authorized signatory” from the drop-down list.
- Click the “file GSTR-9” button.
- Click the “yes” button.
- The “submit application” page is displayed. Click the “File with DSC” or “File with EVC” button.
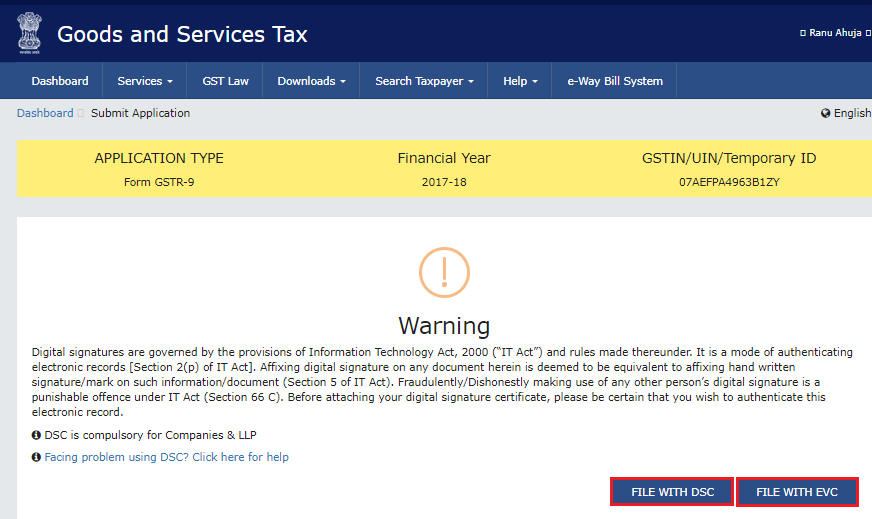
File with DSC:
- Select the certificate and click the “sign” button.
File with EVC:
- Enter the OTP sent on the email and mobile number of the Authorized Signatory registered at the GST Portal and click the “validate OTP” button.
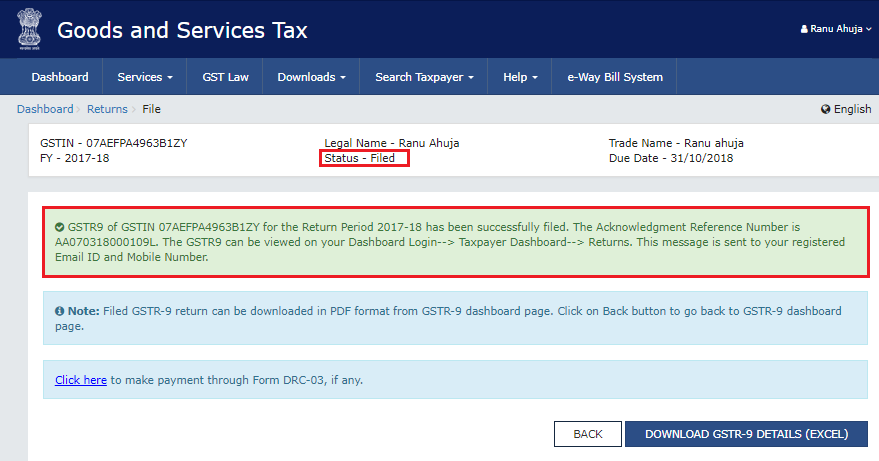
- The success message is displayed and ARN is displayed.
- Status of the Form GSTR-9 return changes to “filed.”
- Message will be displayed to directly navigate to Form DRC-03, to pay additional liabilities, if any declared in Form GSTR-9.
Note:
- File button gets enabled only if you have:
- No “additional cash (which)) is required” to pay for late fees, if any.
- Clicked on the “preview draft GSTR-9 PDF” button to review the details entered.
- Clicked on the declaration checkbox and have selected authorized signatory details from the drop-down list.
- Once Form GSTR-9 is filed, you cannot make any changes.
Step 11: After Form GSTR-9 is Filed
- ARN is generated on successful filing of the return in Form GSTR-9
- AN SMS and an email is sent to the taxpayer on his registered mobile and email id.
- Electronic Cash Ledger and Electronic Liability Register Part-I will get updated on successful set-off of liabilities (late fee only).
- Filed GSTR-9 will be available for view/download in PDF and Excel format.
How Can Deskera Help Your Business with Accounting?
Deskera is that all-in-one software that aims to attend to all your business needs. When it comes to accounting for your business, it is Deskera Books that you want to rely upon. Be it tracking your financial KPIs, marketing KPIs or getting insights for optimizing your landing pages, the dashboard of Deskera Books is maintained in real-time, with the analytics provided helping you to take future decisions.
Hence, trends observed will help in improving the ratio of operating income as against operating expenses and that of account receivables as against the account payables.

Deskera Books will help you with invoice creation and sending, making financial statements, analyzing the balance sheets, income statement, cash flow statement, bank reconciliation statement and profit and loss statement.
Additionally, the insights gained from the dashboard will also help in improving cash flow, customer retention and customer loyalty while encouraging more returning customers. Another of the main key functionality of Deskera Books is that it makes it easier to comply with your country’s taxation regimes.
This video will show you how to set up GST of India in Deskera Books:
So, what are you waiting for? Try Deskera Books Now!
Key Takeaways
The GST tax regime of India is found to be complex and mind-wrecking all across. It is because of this that the Government of India have allowed for certified GST practitioners who act as the bridge between you (taxpayer) and the government (regulator of tax compliance).
While the Government of India has done its part in making the process of adapting to GST much simpler and easier, this guide will help you understand all the steps to file GSTR-9. Form GSTR-9 is a mixture of manual details and auto-populated details and hence has a mixture of editable and non-editable details up till the final submission of the form for filing.
Lastly, with your accounting handled by Deskera Books, tax compliance an dfiling returns just became a whole lot easier.
Related Articles