
GSTR 11 is a return form where every person who has been issued a Unique Identity Number (UIN) must furnish the details of inward supplies to obtain refunds under GST.

Hence, the goods and services tax return 11 is a document/statement that has to be filed by every registered organization/person who is given a Unique Identification Number (UIN) only during the months they purchase items for their own consumption while also getting tax credit/refund on their purchases.
Such organizations/people are claiming a refund of the taxes paid on their inward supplies. The purchase of the goods and services as inward supplies must be done from India.
Who are Unique Identity Number (UIN) holders under the GST Act (i.e. Eligibility for GSTR 11) ?
Unique Identity Number is a special classification made for foreign diplomatic missions and embassies who are not liable to taxes in Indian territory. The organizations that can apply for a UIN are as follows:
- A specialized agency of the United Nations Organization
- A multilateral financial institution and Organization notified under the United Nations (Privileges and Immunities) Act, 1947
- Consulate or Embassy of foreign countries
- Any other person or class of persons as notified by the Commissioner
The above-mentioned organizations/persons can apply for UIN using Form GST REG - 13.
Note: The main purpose of issuing UIN is that any amount of tax collected from the bodies/person holding UIN is refunded back to them. However, to claim the refund of GST paid, they will have to file GSTR 11.
Due Date of GSTR 11
GSTR 11 needs to be filed by the 28th of the month following the month in which the inward supply is received by the UIN holders.
For example, if the US embassy paid GST of Rs. 45,000 on food, hotel, etc during their stay in India for the month of September 2021, then they would have to file GSTR 11 by 28th October 2021 to claim the refund on the above-paid taxes.
Hence, GSTR 11 filing is not a monthly process, but a case-to-case basis filing depending on the supplies made.
Format of GSTR 11
Compared to other GST Returns, GSTR 11 is shorter as well as a simpler form. The main objective of this form is to capture all the inward supplies made by the UIN holders, such that the GST refunds can be appropriately calculated and processed.
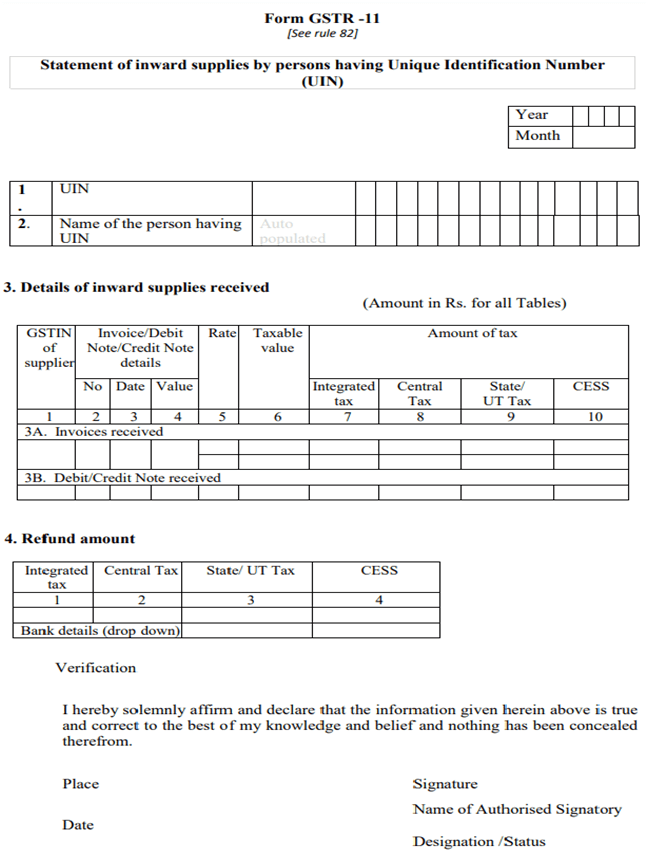
GSTR 11 has the following 4 sections, plus one concluding step. They are:
UIN
UIN is a special identification number assigned to notified bodies by the GST administration as explained above. It needs to be filled here.
Name of the Person Having UIN
The space beneath this head will get auto-populated at the time of filing the return GSTR 11.

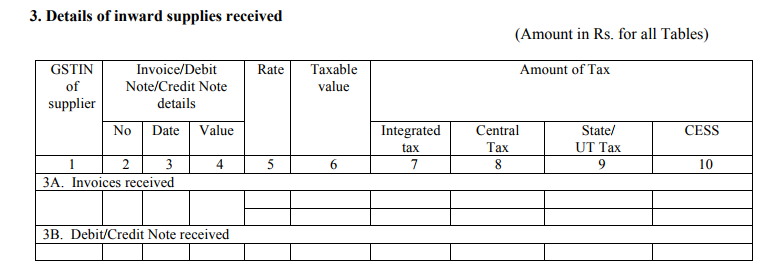
Detailes of Inward Supplies Received
Here, you will have to provide the GSTIN number of your suppliers. Once you fill in the GSTIN number, the details will get auto-populated from the GSTR-1 return form. Here, the UIN holders cannot add or modify the details.
Refund Amount
The refund amount will get auto-calculated in this section of GSTR 11. You will be required to provide your bank details for the credit of the calculated refund into your bank account.

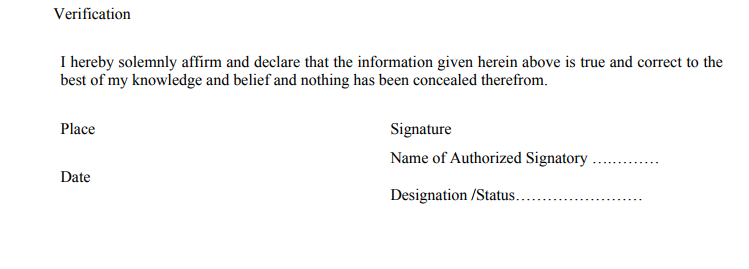
Authorized Signatory
Once all of the particulars are furnished correctly, as a taxpayer, you will be required to sign digitally either through a digital signature certificate (DSC) or Aadhar based signature verification to authenticate the return.
Step-by-Step Guide for Filing GSTR 11 Return on the GST Portal?
In this section of the article, I will be discussing the steps for filing GSTR 11 returns on the GST portal. They are as follows:
Step 1: You will have to visit the GST Portal to apply for Form GSTR-11 to claim refunds under GST.
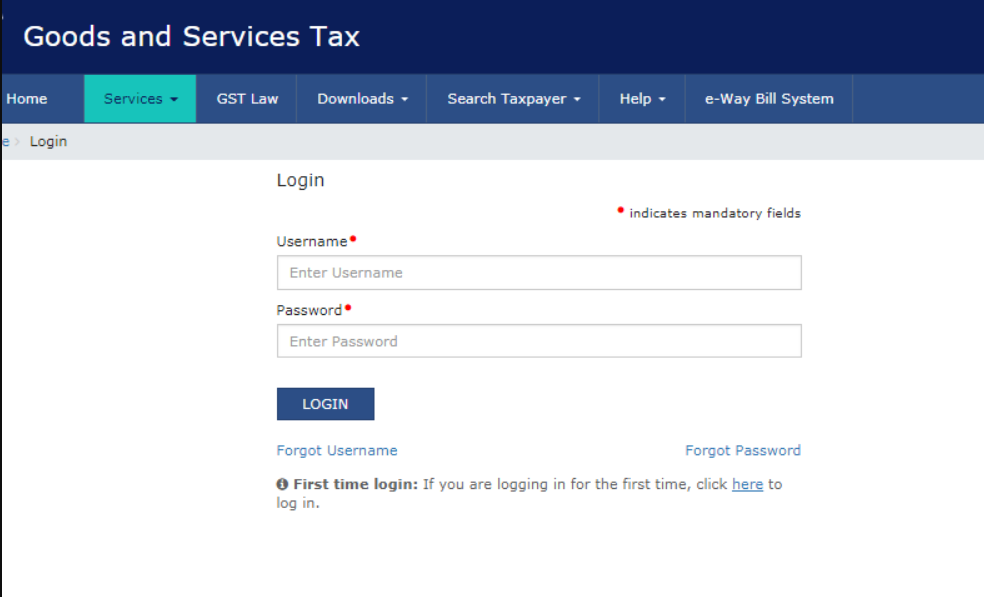
Step 2: Click on the “login” button to access the username and password page.
Step 3: Enter the correct “username” and “password” credentials along with the captcha in the required field and click on “login.”
Step 4: Select the “returns dashboard” command from the Returns Menu under the service tab that is visible on the home page.

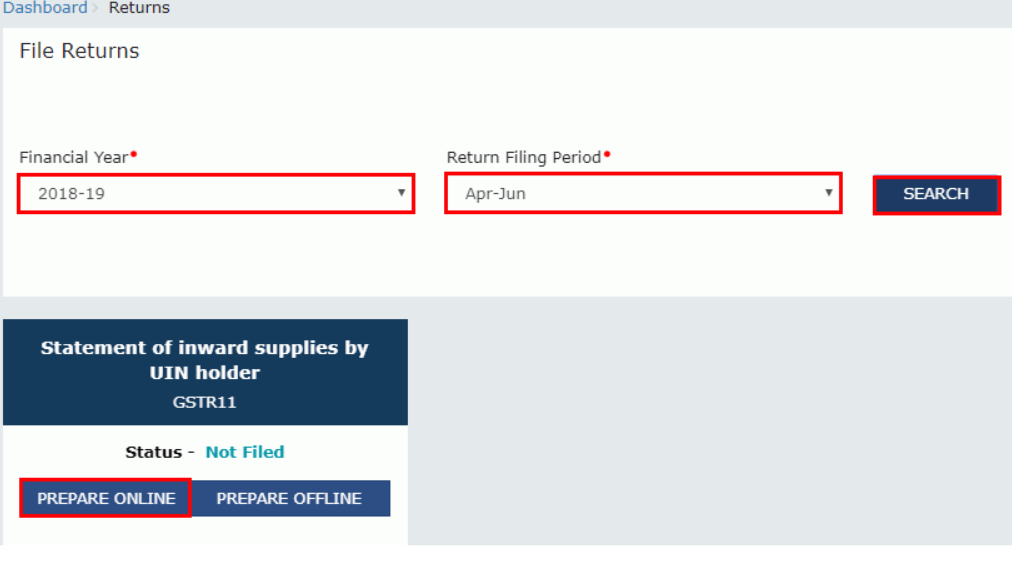
Step 5: Upon clicking on the “returns dashboard” link, the page of “file returns” will be displayed.
Step 6: Select the Financial Year and Return Filing Period (Month) for which it is required to file the return from the drop-down list.
Step 7: Click on the “Search” button.
Step 8: In the GSTR-11 box, click on the “prepare online” button if you want to prepare the returns by making entries on the GST Portal.
Step 9: The GSTR-11 Quarterly Return page will be displayed.
Step 10: Click on the following tiles, to know and enter the related details:
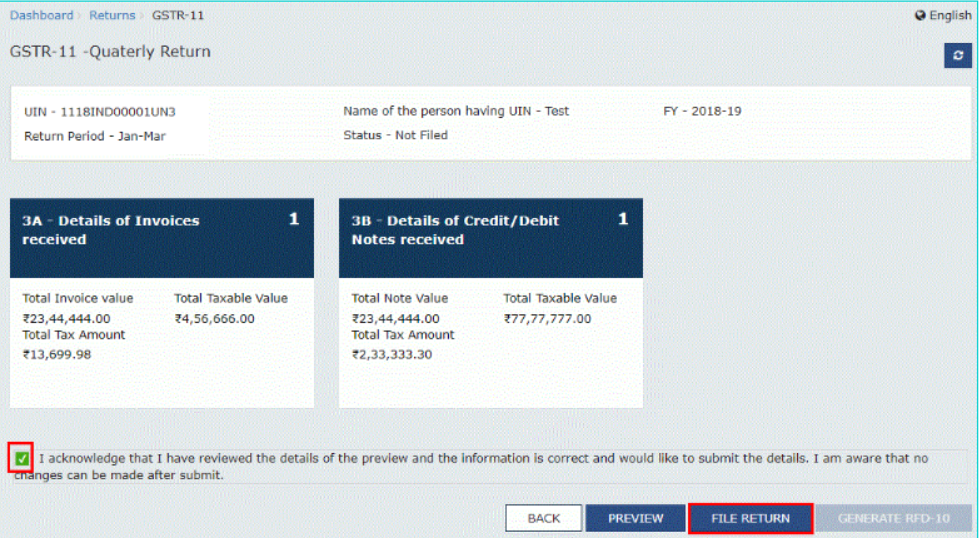
- Details of Invoices received
- Details of Credit/Debit Notes received
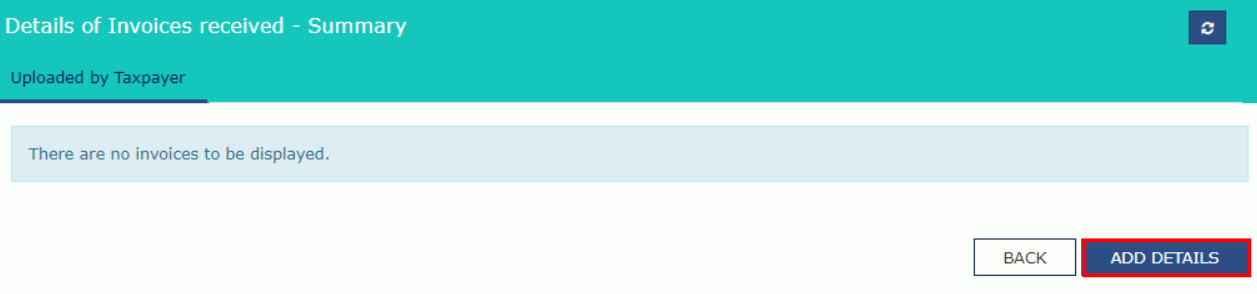
Step 11: Click on the Details of Invoices received tile to enter details of taxable inward supplies received from the registered taxpayers.
Step 12: The Details of Invoices received- a summary page will be displayed. Now click on the “Add Details” button.
Step 13: After clicking on the “add details” button, the details of invoices received- add invoice page will be displayed.
Note:
- The field will only accept the GSTIN of the normal taxpayer or non-resident taxpayer.
Step 14: Enter the GSTIN of the supplier, in the Supplier GSTIN field.
Step 15: Enter the Invoice number, date of the invoice and value of the total invoice in the Invoice fields.
Step 16: In case the POS (place of supply) of the goods and services is the same state as that of the supplier, you will follow steps 17 and step 18.
Step 17: Enter the taxable value of the goods or services and the cess amount.
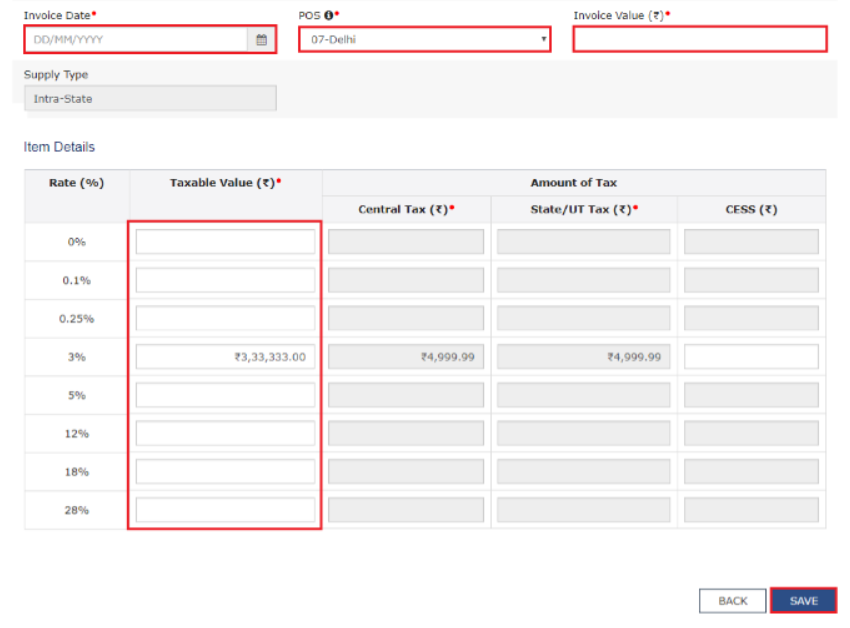
Step 18: To save the invoice details, click on the “save” button.
Note:
- Based on the values entered in the tax rates and taxable values, the values of tax fields are auto-populated. The cess field is not auto-populated and has to be entered by the taxpayer.
Step 19: In case the POS (place of supply) is different from the state of the supplier, the transaction becomes an inter-state transaction. In that case, follow steps 20 and step 21.
Step 20: Now enter the taxable value of the goods or services and the cess amount in the respective fields.
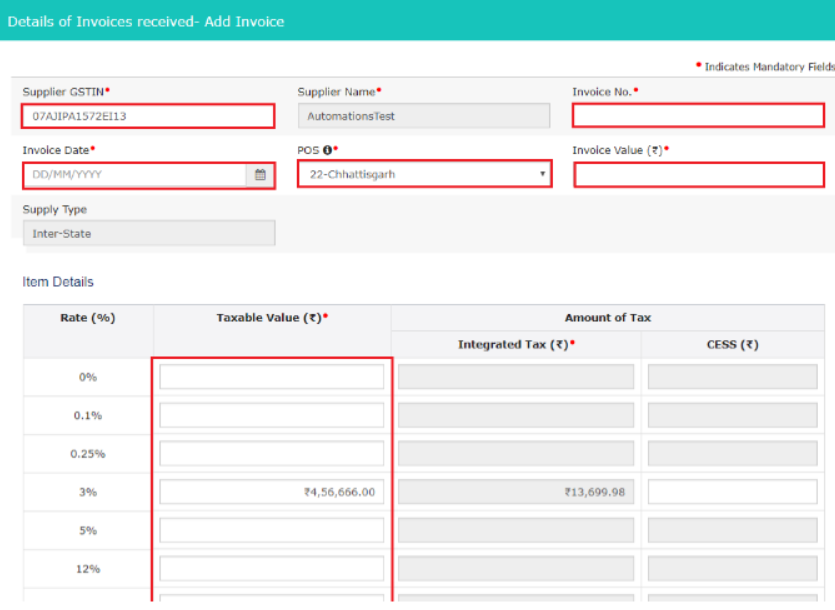
Step 21: To save the invoice details, click on the “Save” button.
Note:
- Based on the values entered in the tax rates and taxable values, the values of tax fields are auto-populated. The cess field is not auto-populated and has to be entered by the taxpayer.
Step 22: It directs to the previous page where a message will be displayed saying that the request has been accepted successfully.
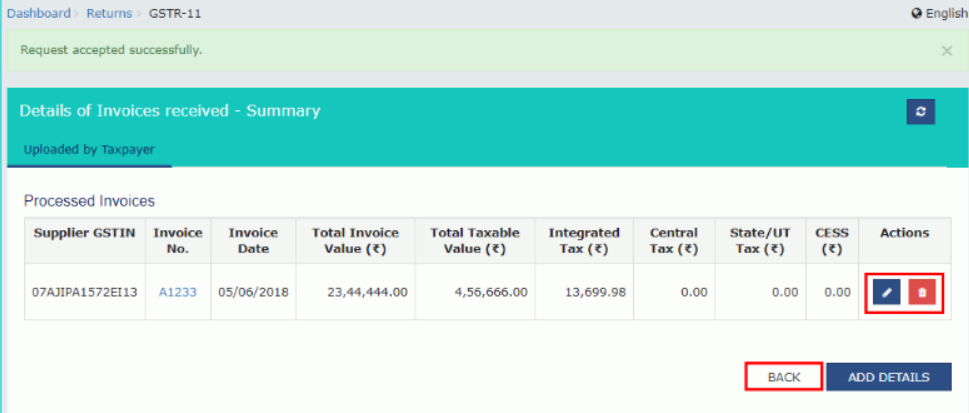
Step 23: If needed, edit/delete the added invoices (under Actions).
Step 24: Click on the “back” button to go back to the GSTR 11 page.
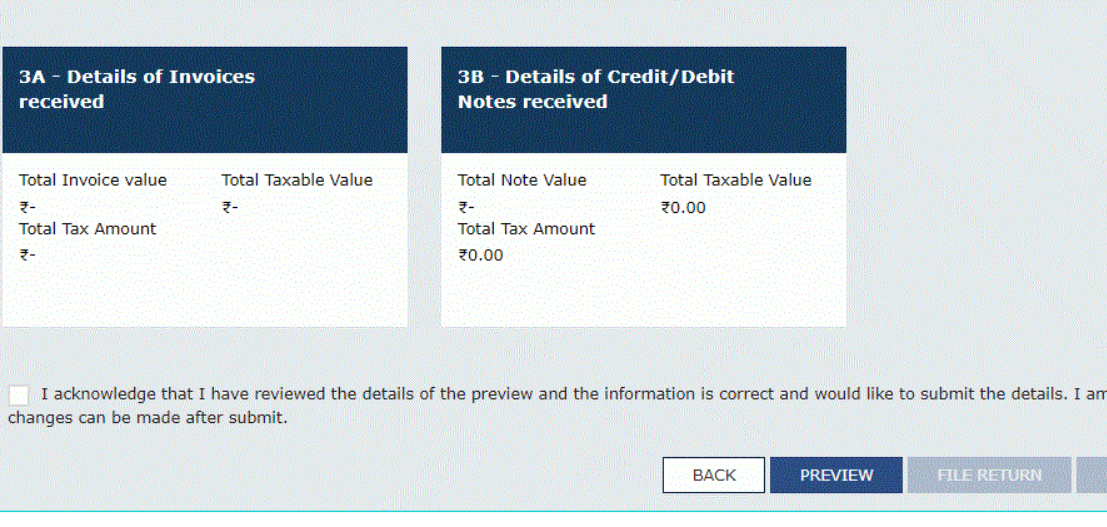
Step 25: The page is to be directed to the GSTR 11 landing page and the details of credit or debit notes received tile will reflect in the number of notes added along with the total note value, tax amount and taxable value. The total taxable value and tax value are the net value of debit and credit notes.
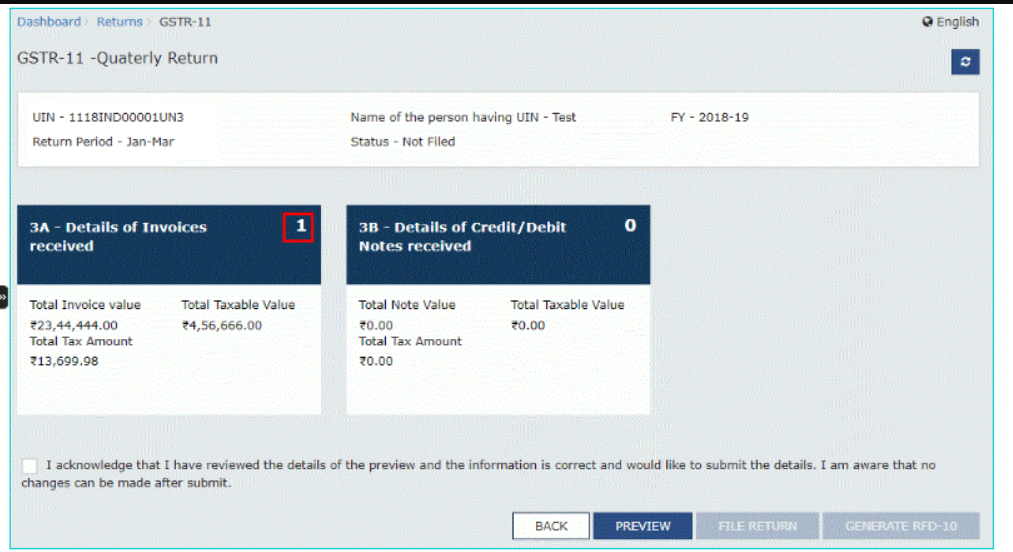
Step 26: Once all the details are added, click on the “preview” button to download a draft summary page.
Step 27: The generated PDF file will have a watermark of the “draft” as the details are yet to be submitted and hence filed.
Step 28: Select the Declaration checkbox and click on the “file return” button.
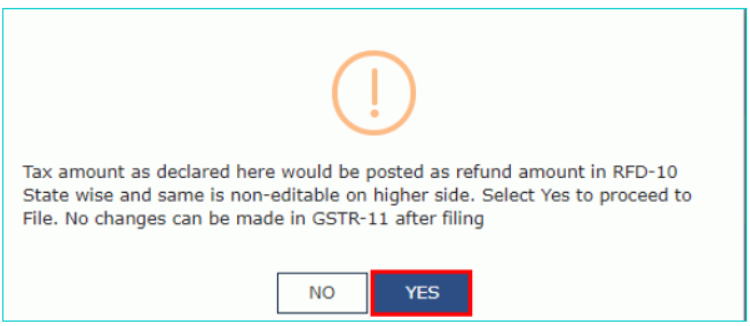
Step 29: The following message would be displayed- “tax amount as declared there would be posted as refund amount in RFD-10 State-wise and the same is non-editable on the higher side. Now select yes to proceed to file. After filing GSTR-11, no changes can be made” and then click on the “yes” button.
Step 30: The returns filing for GSTR 11 page will be displayed. You will have to select the declaration checkbox again.
Step 31: Select the authorised signatory from the authorised signatory drop-down list. This will enable 2 buttons- “file with DSC” or “file with EVC.”
Step 32: Click on the “file with DSC” or “file with EVC” button to file GSTR-11.
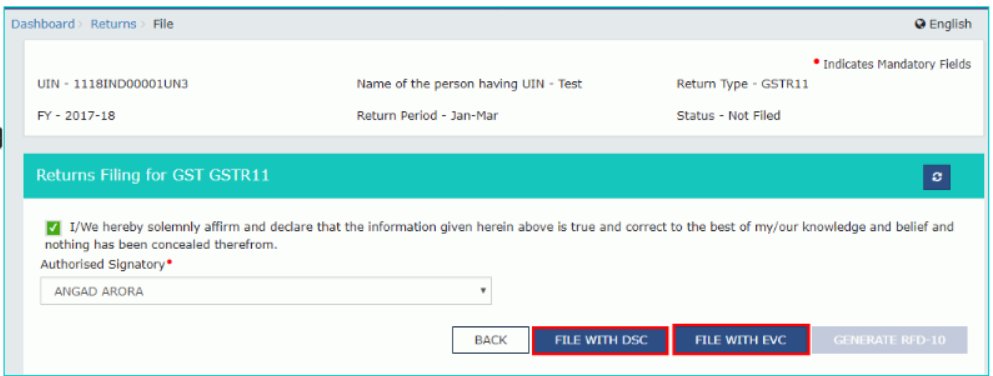
Step 33: If using a DSC, you will be required to select the registered DSC from the emSigner pop-up screen and then proceed from there accordingly.
Step 34: Enter the OTP that you would have received and then click on the “validate OTP” button.
Step 35: It displays a prompt to confirm the action, click on “proceed” to move forward.
Step 36: On successfully filing the application for cancellation of registration, the system will generate ARN and display a confirmation message.
Step 37: The status of the GSTR 11 return changes to “filed.”
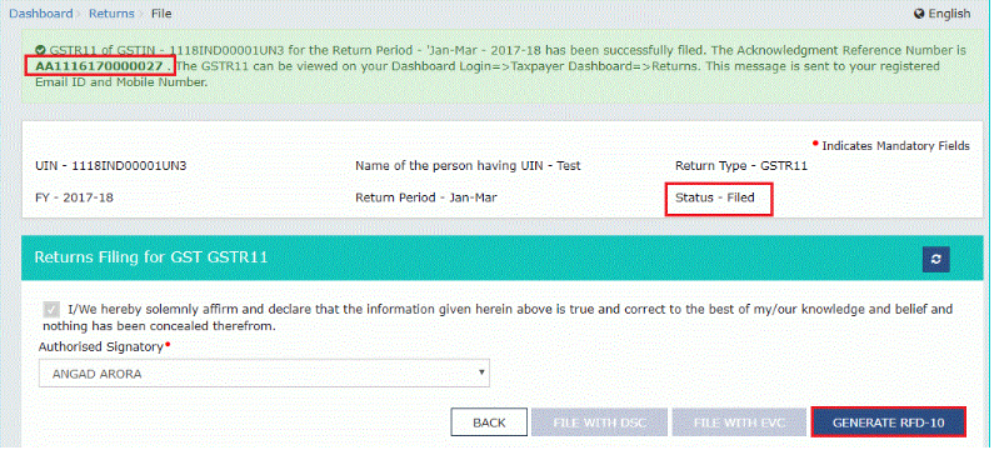
Step 38: To generate a GST RFD-10 application form of the same quarter for which Form GSTR 11 is filed, click on the “generate RFD-10” button.
How Can Deskera Help Your Business with Accounting?
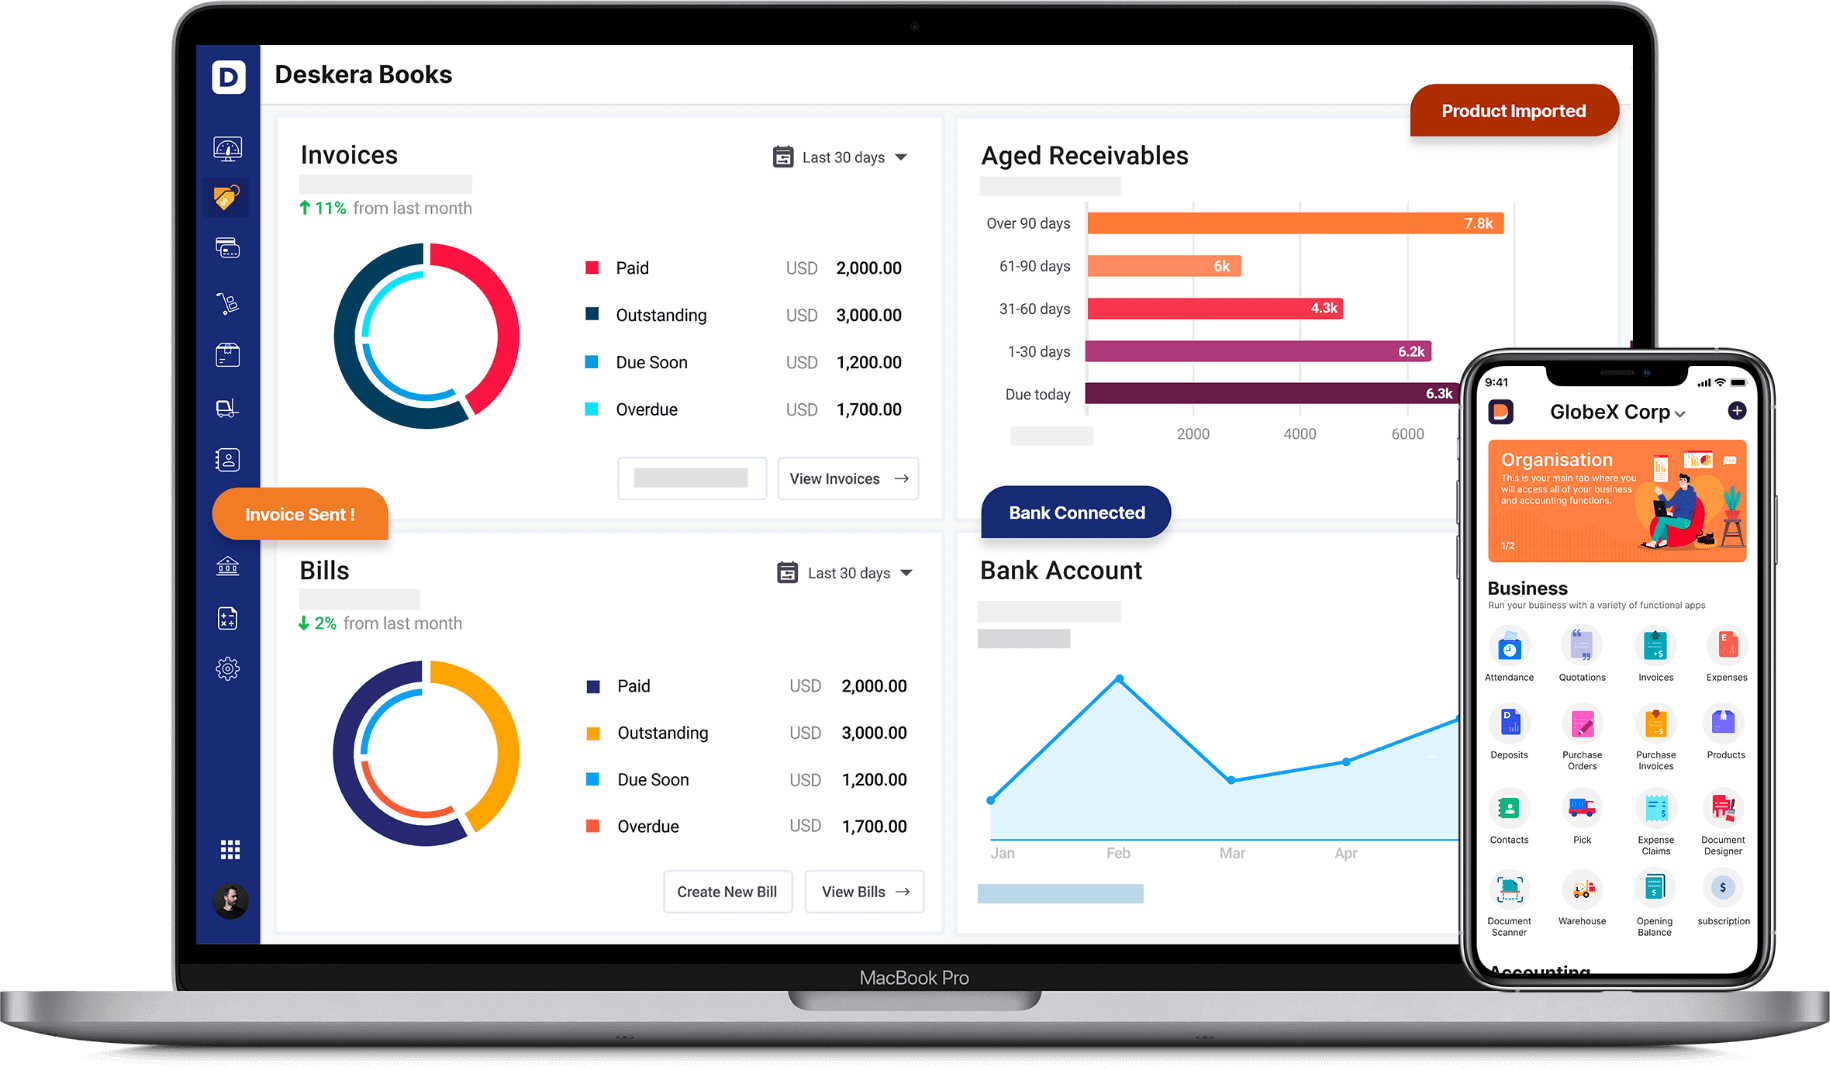
Deskera Books is a user-friendly accounting system developed by Deskera. It comes equipped with a plethora of features whose sole purpose is to make your life easier by handling your business’s accounting for you. Deskera books is a software that does it all from maintaining your financial statements in real time, to tracking and analyzing your financial KPIs and marketing KPIs to keeping a track of your account receivables, account payables, operating expenses and operating incomes.
It also helps in managing your inventory, journal entries, invoices and your bank reconciliation statement. Through its insights, you would be able to design your strategies in a manner that has the highest net sales, gross profits and maximum customer loyalty as well as customer retention.
In addition to all this, it also makes it easier for you to comply with the taxation regimes of the country you are based in. If you have to comply with the Indian GST system, this video will take you through the basics of setting it up in Deskera Books:
So, what are you waiting for, click below to avail your free trial now!
Key Takeaways
GSTR 11 returns are solely for those organizations/people who have a UIN and hence comply with the eligibility criteria of GSTR 11. These are not monthly returns, but rather those that need to be filed before the 28th of the month, the previous one of which had supplies bought and hence tax returns to be taken.
India’s GST is that taxation regime which is made easier by certified GST practitioners, who also help the taxpayers in understanding the benefits of GST. While several aspects of it still continue to remain complex, with your accounting efficiently handled by Deskera Books, life does get easier for you in this regard.
Related Articles