
Once you’ve done your work and clients are happy with their purchases, it’s finally time to get paid!
To request payment, and eventually receive it, you have to correctly fill out an invoice with all of the appropriate details of the order.
If this invoicing step isn’t done right, clients can delay their payments or even refuse to pay the business altogether.
In this guide, we will discuss in detail how to create a professional invoice that is more likely to get paid on time.
Read along to learn about:
- What Is an Invoice?
- How to Fill Out an Invoice: Step-by-Step
- Word and Excel Invoice Templates
- Create a Professional Invoice with Accounting Software
- 7 Tips for Creating Invoices
- Filling Out an Invoice FAQ
What Is an Invoice?
An invoice, or sales invoice, is a document created by the buyer to request payment for the purchase of a good or service.
Invoices are typically issued after the delivery of the purchase unless for some reason the buyer needs an advance deposit and sends out a proforma invoice.
If you want to learn more about the various invoices you can send, head over to our guide on the different types of invoices for small businesses.
How to Fill Out an Invoice: Step-by-Step
For an invoice to be considered a legally binding document, it needs to include some important details related to the purchase, such as contact information, a detailed list of products, prices, and payment terms.
Follow these 8 steps to correctly fill out an invoice for your small business accounting:
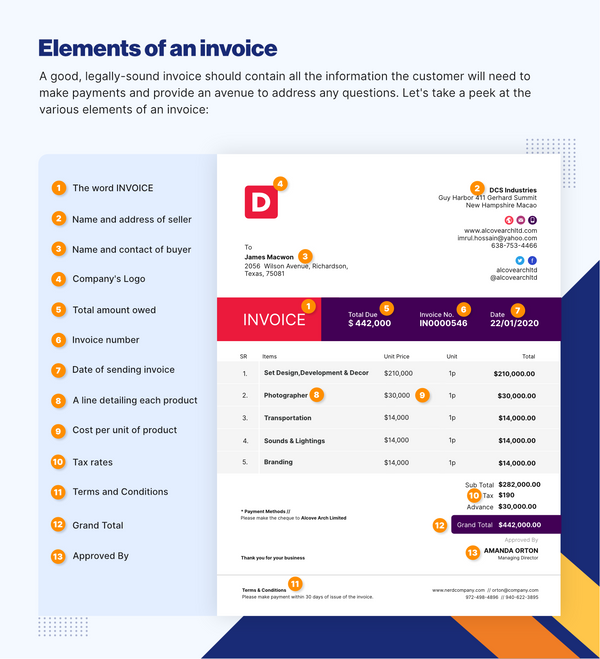
Step #1. List Business Contact Information
The header of an invoice contains the word “invoice” and your business contact details.
These details include:
- Business name
- Logo
- Business address
- Phone number
- Email address
Step #2. Write the Client’s Contact Details
After entering your business details include the client’s contact information directly below them. Write down your customer’s business name, and their shipping and billing addresses.
You can add their email and phone number as well, but those are optional.
Step #3. Generate a Unique Invoice Number
An invoice number (also referred to as invoice ID or reference number) is a unique number you have to assign to each invoice. This code serves as an identifier for your invoices, as well as to avoid possible accounting errors such as the duplication of payments.
You can generate an invoice number through four main methods:
- Sequential,
- Chronological,
- By customer number, and
- Based on the project number
The most common one of the above is sequential, which moves up your invoice number by one with every new invoice. For instance, if your latest invoice is recorded as 000010, then the next one would be identified as 000011.
If you want to learn how to generate your reference numbers using the other numbering systems, check out our guide on what is an invoice number and how to generate it.
Step #4. Clearly Display the Dates
An invoice typically contains two important dates: the billing date and the payment due date.
The billing date is self-explanatory, it’s the date you issue the invoice to the client.
Whereas the due date depends largely on the previous discussions you had with your customer regarding credit terms.
In case you haven’t talked about the due date with them, then just go for the standard billing period of your business.
Step #5. Enter Your Itemized List of Goods and Services
Enter every line of product or service that the client purchased, in a separate row of a table. Include a short description and the quantity for each.
If your business deals in services and charges by the hour, add the number of hours you’re charging the customer, instead.
Step #6: Display Pricing
On the same table where you listed the goods and services and their quantities, add:
- A column for unit price per product
- A column for the total cost for each line of product (unit price × qty)
- A row in the end with the subtotal, which is the sum of all invoice lines.
Step #7. Add Sales Tax
Lastly, the Sales Tax, or VAT in the EU, is added. That makes up the total amount owed for the invoice, aka the TOTAL.
Note that you have the option to also offer a discounted total if the customer pays on time.
Whether or not you want to offer discounts as an incentive for early payment is up to you.
If your business is based in the US you know that taxes vary from state to state, so it’s best to contact your local IRS office for more information. Alternatively, you can use Deskera, the ultimate cloud accounting solution which makes tax calculation a breeze.
Once you’ve calculated the sales tax that the customer owes, add it to the subtotal, write down the total amount due and place your stamp and signature.
Step #8: Write Down Payment Terms and Any Additional Notes
At the very end of your invoice, you have to include your payment terms and any other extra notes you want the client to know.
Payment terms provide clear details on:
- When payment is due. For example: “Payment due in 20 days”
- Accepted payment methods which could be cash, check, credit card, mobile payments, or any other means the business accepts.
- Late fee charges
- Early payment discounts such as 2/10 Net 30 payment term (which means that there’s a 2% discount if you pay in the first ten days, for an invoice due in thirty days).
Word and Excel Invoice Templates
Here is a selection of some free and downloadable invoice templates you can fill out to create invoices for your business:
Excel Service Invoice Template
If you’re a service-based business that bills clients by the hour, this clean and professional Excel invoice template has everything you need. The template is part of the Microsoft Templates Gallery and can be customized to your preferred border colors and font.
It comes with a table for your itemized list of services where you can enter the hours, amount, and rate you charge. And to help you easily calculate totals, the document has an in-built SUM function that allows you to easily add up the subtotal, and total amount.

Want to learn how to use Excel to make an invoice from scratch? Head over to our invoice in Excel guide.
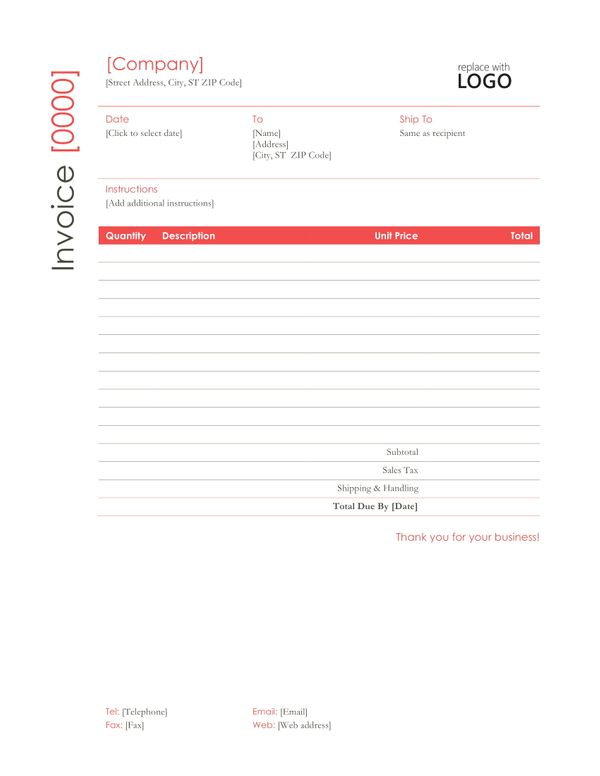
Professional Word Invoice Template in Red
If you want to create an invoice in Word and own a business that provides products rather than services, consider this simple red-accented Microsoft Templates template.
The format is modern and professional, with bright highlighted headers that make it stand out.
And if red doesn’t fit your business’ brand, colors (along with font) are easily customizable to your preference.
Create a Professional Invoice with Accounting Software
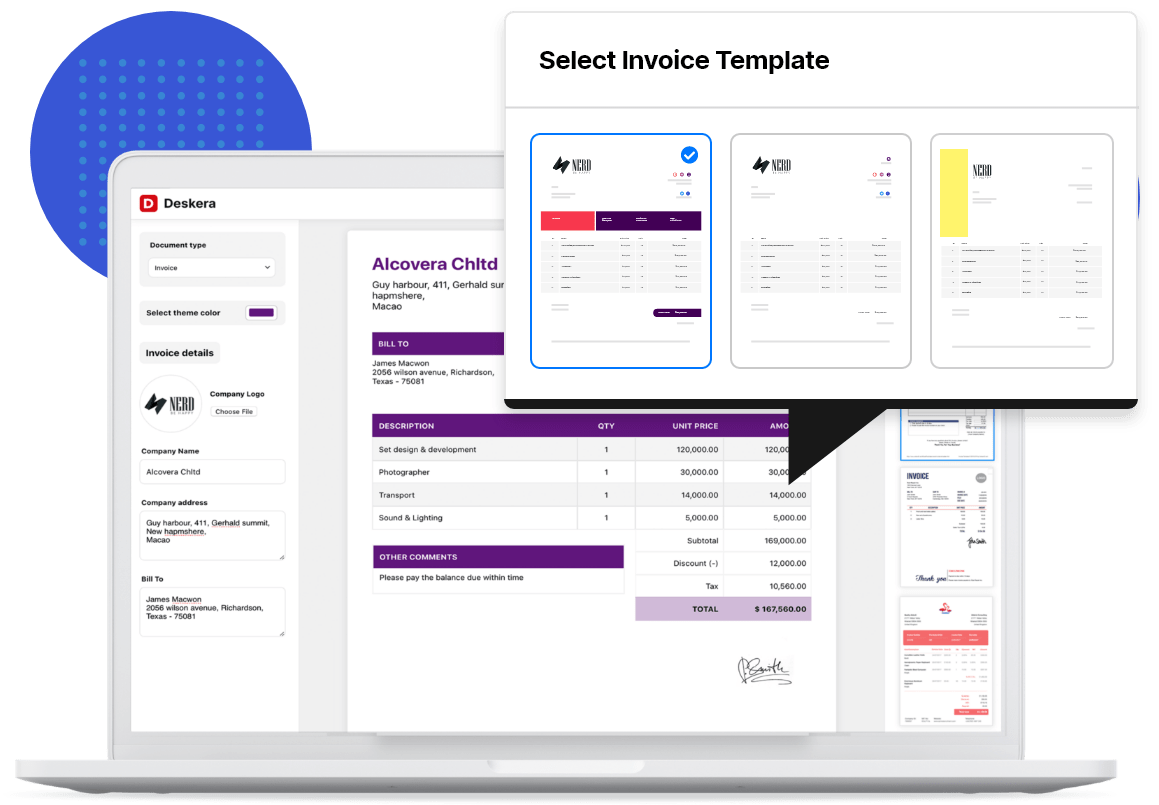
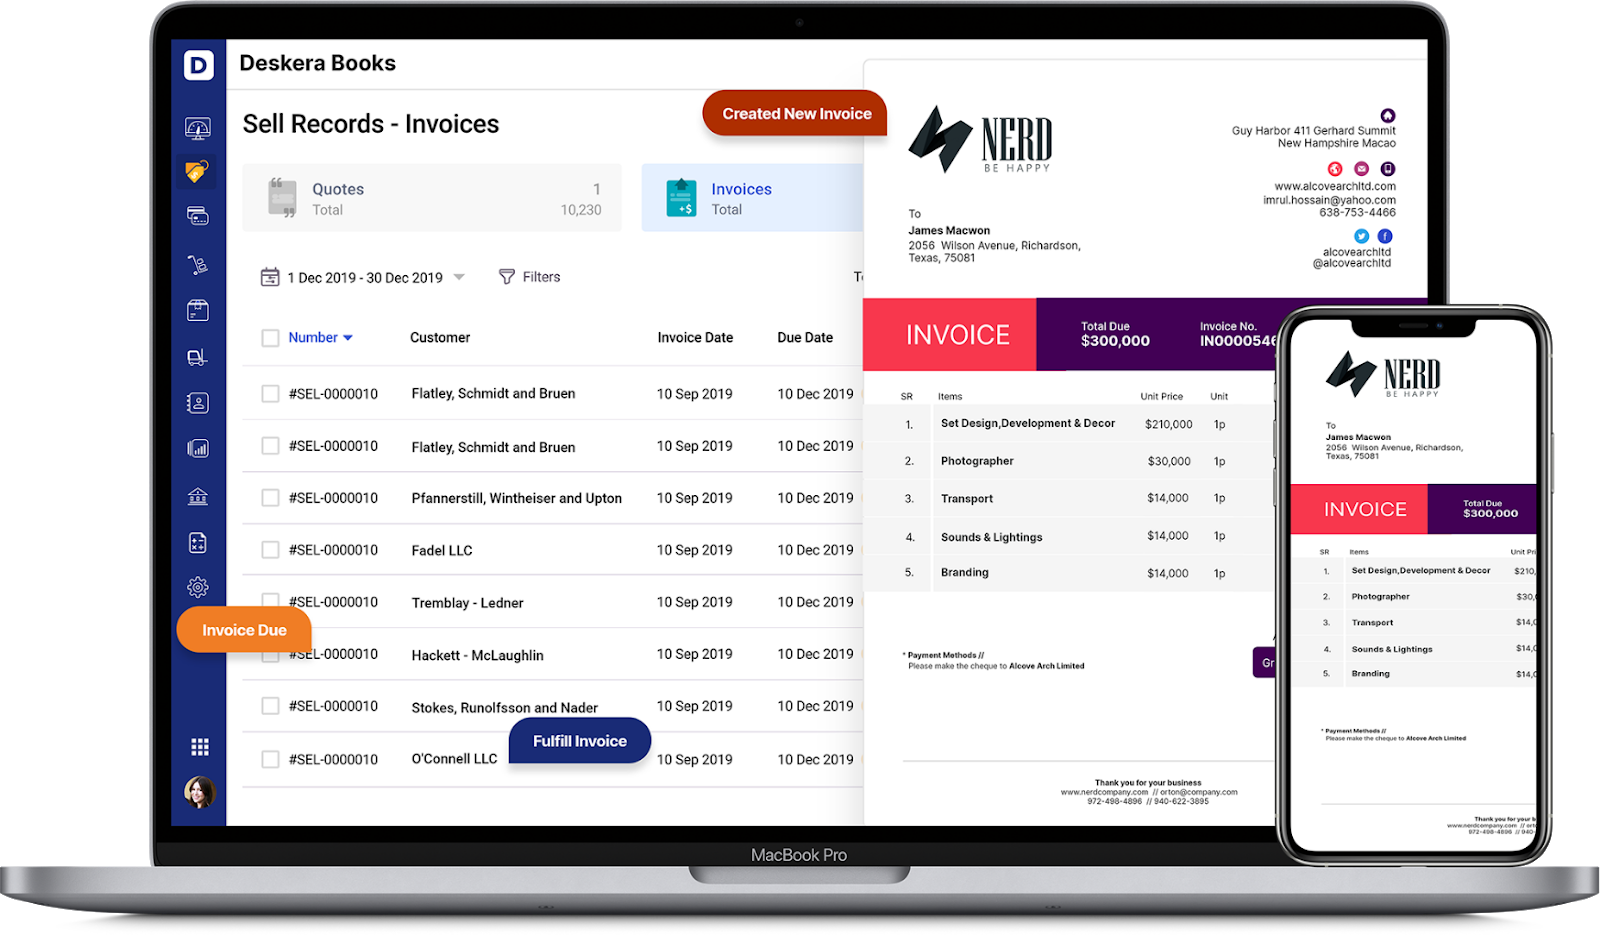
Filling out an invoice with invoice management software like Deskera, is a breeze.
The software has a dedicated invoice generator, where you can pick from over 100 professional invoice templates, and personalize them with your logo, brand colors, preferred font, and more.
Once you’re done with design and branding, just fill in the appropriate invoice elements, and you’re done!
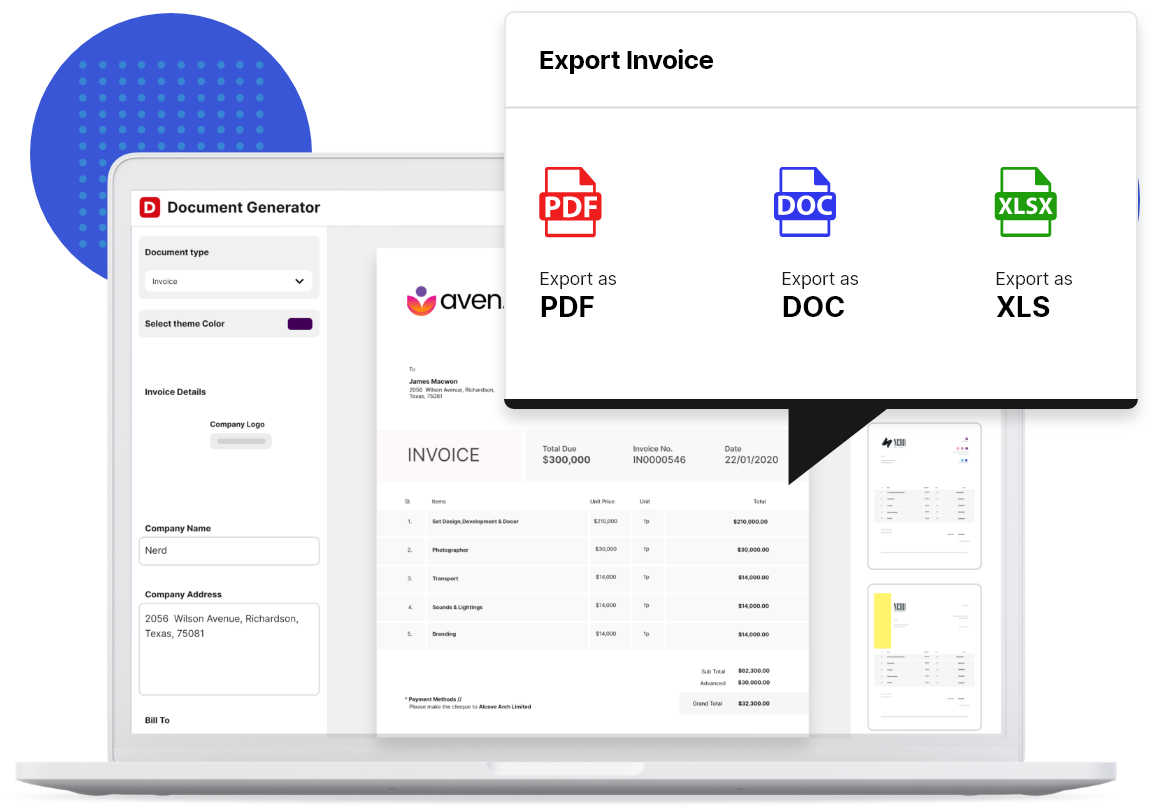
Press Share to download, print, or email the invoice to your client. You can also export it to file formats PDF, DOC, or XLS.
And done!
Deskera allows you to easily automate many other accounting tasks with features such as recurring invoices, advance deposits, multi-currency support, tax compliance, and more.
Access the platform anywhere, mobile, template, or desktop, by downloading the Deskera mobile app.
Experience the future of accounting today with our free trial. No credit card details required.
7 Tips for Creating Invoices
- Once you’ve provided a good or a service, don’t wait more than two days to create and send the corresponding invoice.
- Offer as many payment methods as you can, so every client is able to pay you through a channel they are comfortable and familiar with.
- Add early payment discounts and charge late fees to create incentives for timely payment.
- Be polite when communicating with clients, and always say “please” and “thank you” when asking them for anything payment-related.
- Experiment by setting more accommodating or restrictive payment terms for specific clients.
- Be direct and clear with the information you include, and try to limit the invoice to one page.
- Use accounting software to create professional invoices within seconds, and streamline your invoice management.
Filling Out an Invoice FAQ
#1. Are Handwritten Invoices Acceptable?
In theory, yes, handwritten invoices can be used. In practice, it’s ultimately up to the client to recognize it as valid.
That’s why we’d recommend using only digitally-created invoices as they usually present no extra challenge to read and understand correctly.
If you’ve decided on sending a handwritten invoice, make sure it’s in clear writing and contains all of the necessary invoice elements.
#2. Are Invoices and Bills the Same Thing?
Invoices and bills convey the same information, but they’re not the same thing.
The term invoice is usually used by the supplier and refers to the request for payment. Then, the buyer receives this invoice as a bill they have to pay.
#3. How Do I Make an Invoice Payment?
First, double-check the invoice details to make sure everything is accurate. Then, send the bill to accounts payable for processing.
Once the due date is nearby and you’re ready to pay, just choose your preferred payment method (could be by cash, check, credit card, bank transfer, digital wallet, etc).
For more tips on accurately making invoice payments, head over to our invoice payments guide.
#4. Is a Payment Term and the Due Date the Same Thing?
Although they both convey information regarding the time in which payment is due, the due date and payment terms aren’t the same.
Payment terms describe any and all additional information related to the payment, such as early discounts. While the due date is simply the last date the buyer can pay before the invoice becomes past due.
Key Takeaways
And that’s a wrap!
To recap, let’s briefly walk through the main steps you need to take when filling out an invoice:
- At the very top of the document, write the word “invoice” and your business’ contact details. Follow with the customer contact information which includes their name, and their billing and shipping addresses.
- After deciding on an invoice numbering system that suits the business (if you hadn’t already), write down the invoice number.
- Add the billing date and due date for payment.
- Create a table with the itemized list of products and/or services, along with their quantity, unit price, the total amount per item, and subtotal.
- Then, apply any discounts and add the Sales Tax or VAT owed to get the total balance due.
- Finally, add the payment terms: when payment is due, late fees, discount terms, and payment methods.
Related Articles