

Creating an invoice in Microsoft Word is fairly simple.
There are generally two ways you can go about creating an invoice in Word.
The most common way is by choosing an invoice template from their template gallery.
The other way is by using Word to create the invoice layout and template from scratch. Which of course is a lot more time-consuming.
In this guide, we will explain how to use both of these methods to make an invoice in Word, along with its advantages and disadvantages.
For businesses looking to scale efficiently, solutions like ERP.AI take invoicing a step further by automating the entire process—ensuring accuracy, faster payments, and seamless integration with accounting systems.
How to Make an Invoice from a Word Template
The easiest way to create any type of invoice in Word is through their premade invoice template gallery. These invoice templates save you the trouble of having to manually create the format from scratch, and can also be personalized to fit your business needs. If you're sending these invoices in bulk, Word also allows you to tailor each one through the mail merge process.
Here’s the step-by-step guide on how to make an invoice from a Word template:
Step 1: Pick Your Invoice Template
When opening Microsoft Word, the software usually redirects you to the word document gallery automatically.
If that doesn’t happen and Word opens a blank document instead, you can find the template gallery by clicking on File at the top navbar and then clicking on New From Template.
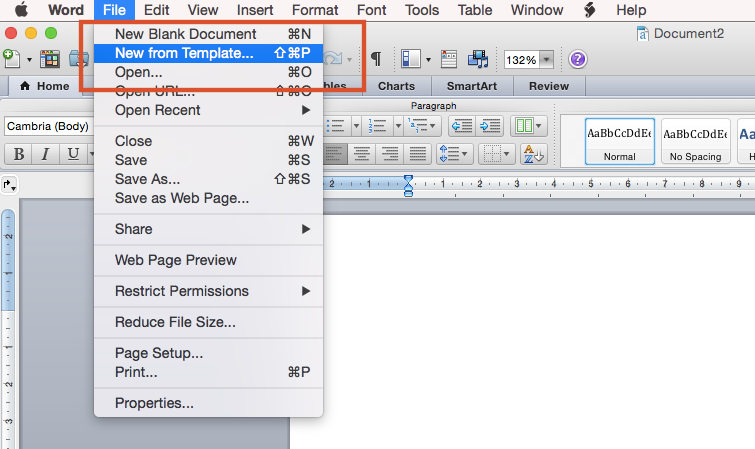
The Word document gallery should pop up.
Now that you’re at the document gallery, locate the search bar (which is typically on the top right of the page) and type the word invoice. A list of invoice templates will appear. There you can scroll through the options until you find a template that you want to use.
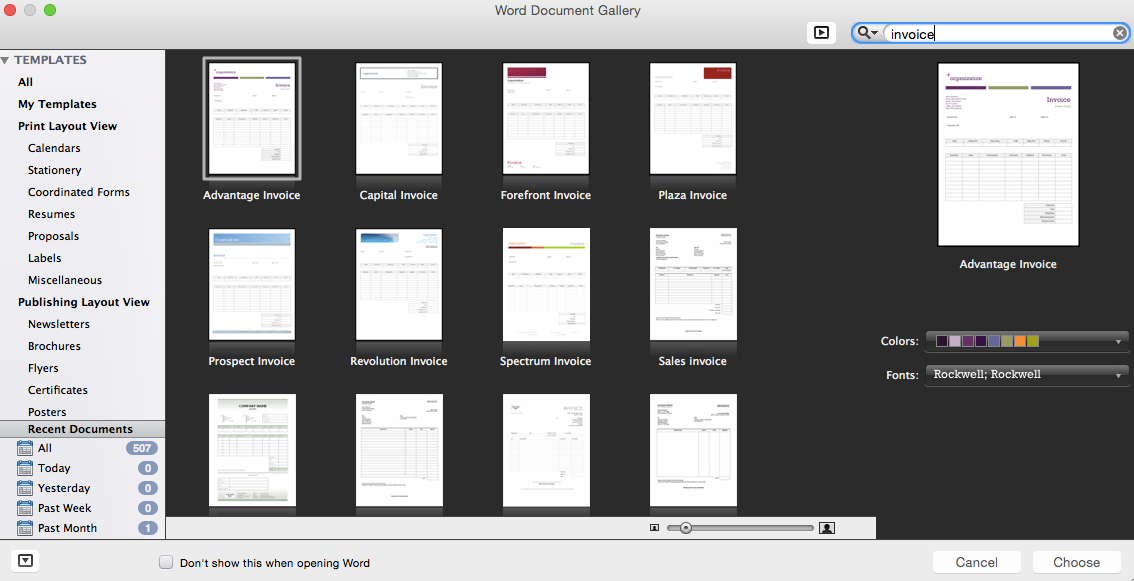
Once you’ve decided on a template, press on it and then click the Choose button at the bottom right of the page to select it.
Step 2: Customize the Invoice Template
Once you’ve chosen an invoice template, you should decide on the elements you’ll want to include.
Usually, Word invoice templates have pre-existing placeholder text that guides you through what information you have to add to each section, as shown below.
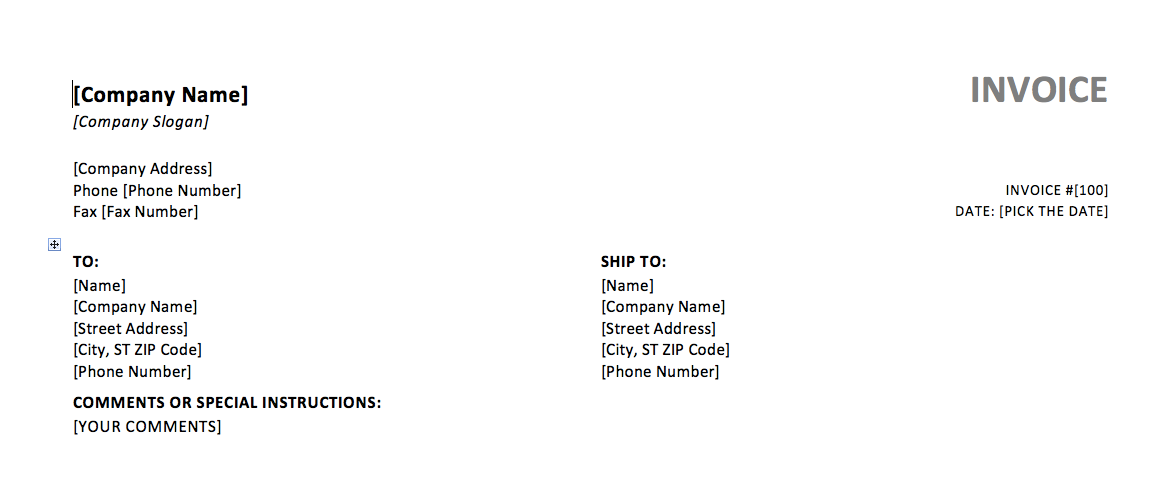
However, before you start editing, make sure that the template matches all of the necessary information of an invoice.
Typically, the essential elements of an invoice include:
- The word “invoice” in the header
- Company name and contact details
- Client contact information
- Payment due date and billing date
- Unique invoice number
- Itemized list of products and services with a brief description
- Subtotal for every product or service
- Payment terms
- Taxes and discounts
- The total amount of the invoice
Now, these elements may vary from your industry, clients, and products or services you’re billing, so you might need to include more details than the above.
Head over to our guide on invoice types for more information on the different elements every invoice type includes.
It’s finally time to start customizing and editing your invoice. Fill in all of the invoice details on the appropriate sections, and change the font and document colors to your preference. If there’s anything that doesn’t work for your business, Word allows you to easily remove, resize, or adjust the size of elements.
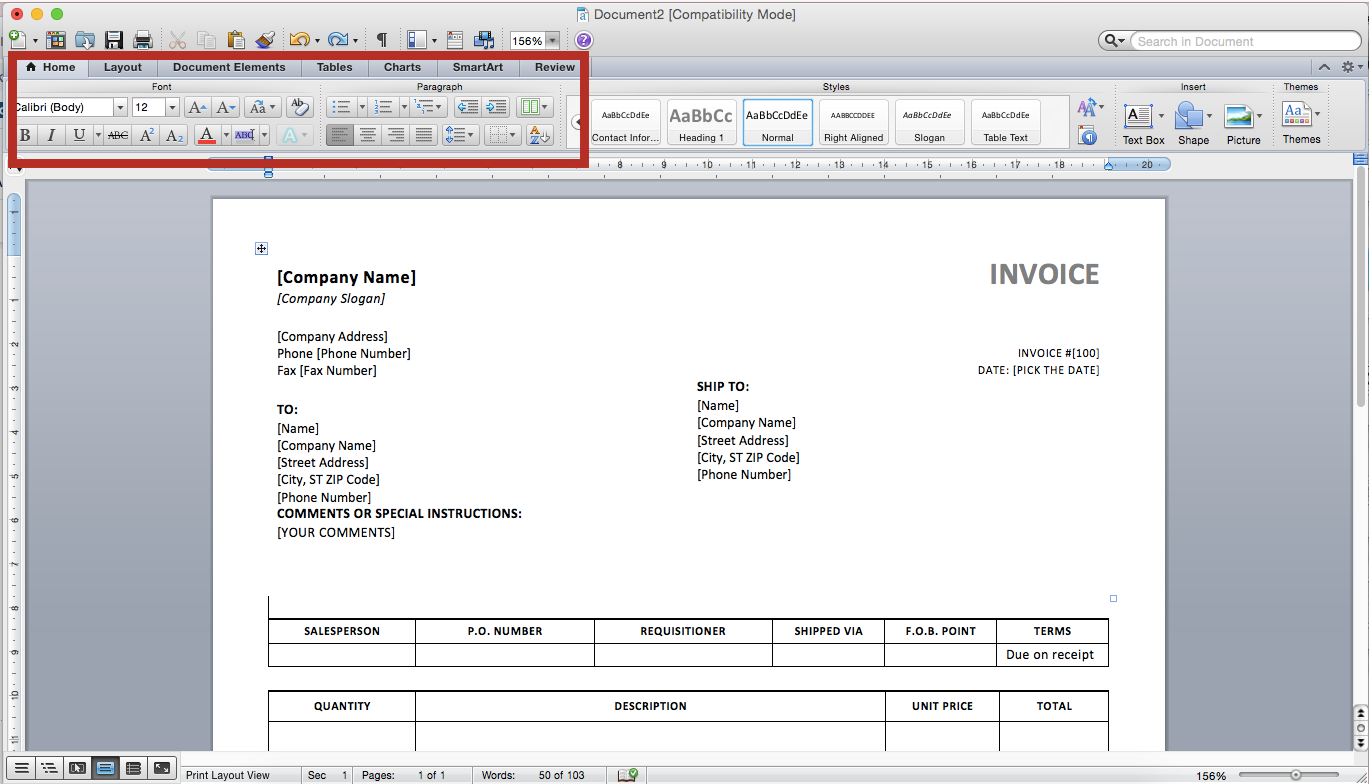
If you want to add more style to the template, consider attaching the business logo on the header, next to the company name. Do this by either directly sliding the logo picture onto the document or by choosing the photo from the Insert menu as shown below.
And you’re done! All that’s left to do now is save, download, send the invoice, and get paid!
Pro-Tip
Are you tired of manually editing templates in Word? Or maybe you’re looking for a more professional tool to create your invoices with?
If that’s the case, give invoicing software a try.
Invoicing software offers hundreds of pre-made professional templates, which can be created and customized in a matter of seconds. All you have to do is fill in the built-in forms the system provides with your invoice details, press Send, and you’re done!
Step 3: Save your Completed Invoice
To save your finished invoice, click on File and then Save As.
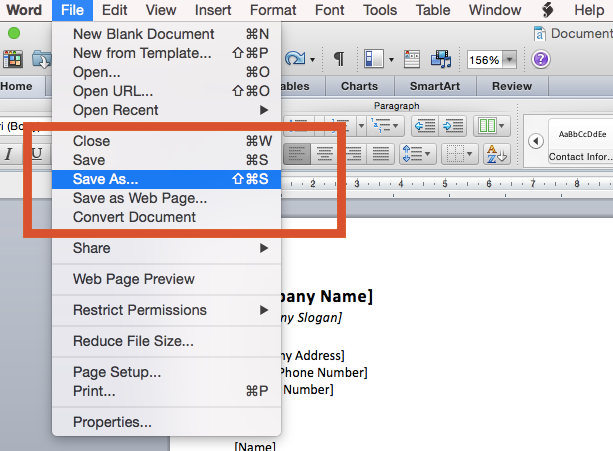
A save pop-up menu should appear, that allows you to name the template and save it to your preferred format, and folder. You can save it as an editable .docx or as a PDF file. The best format to go for is PDF, so that the invoice format doesn’t get scrambled along the way.
Once you’re done with all of the above, press Save at the bottom right of the save pop-up menu to finish.
Step 4: Send the Invoice
Send the invoice with whatever method is most convenient to your business, either by fax, email, or invoicing software.
If you want to learn the easiest way to send an invoice and get paid on time, check out our guide on how to send an invoice.
How to Create an Invoice in Word from Scratch
If you don’t like any of the available Word invoice templates and want to create your own from scratch, here’s the step-by-step guide on how to do it:
Step 1: Open a New Blank Document
To open a new empty document on Word, click on File and then New Blank Document.
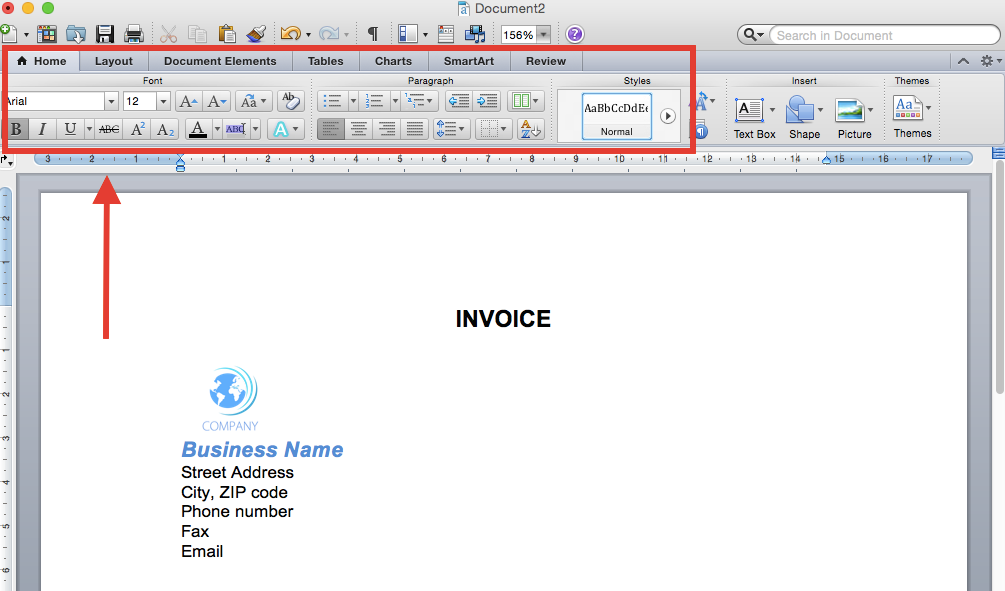
Step 2: Create a Header
An invoice header needs to include:
- The word “invoice”
- Business name
- Business contact information, such as the street address, city, phone number, fax, and email.
- Your business logo (optional)
Design and stylize this information with the colors, font, and sizes that fit your business best. Remember to keep the design simple and professional, though.
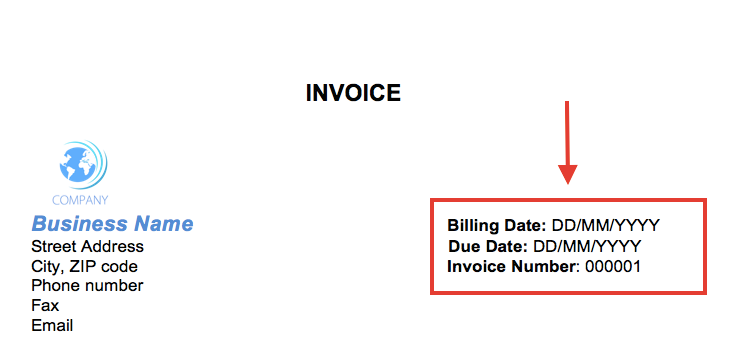
Step 3: Add Invoice Payment Due Date & Invoice Number
On the right side of the business information, insert the billing date, payment due date, and a unique invoice number.
The billing date is the date when the invoice gets issued in, while the due date refers to the deadline for paying the invoice. As for the invoice number, it serves as an identifier, and it’s unique for every invoice.
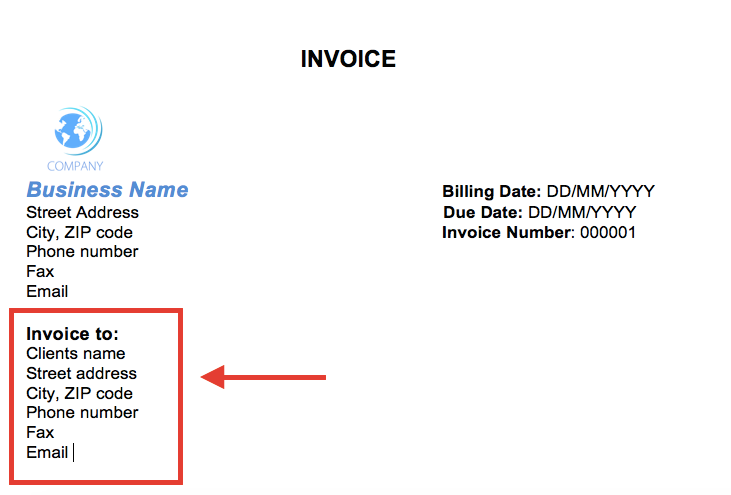
Step 4: Enter the Client’s Contact Information
Client contact information includes their name, street address, city, phone number, fax, and email. Preface this section with the word “to”, to make it clear who is being charged. For example, “invoice to” or “bill to”.
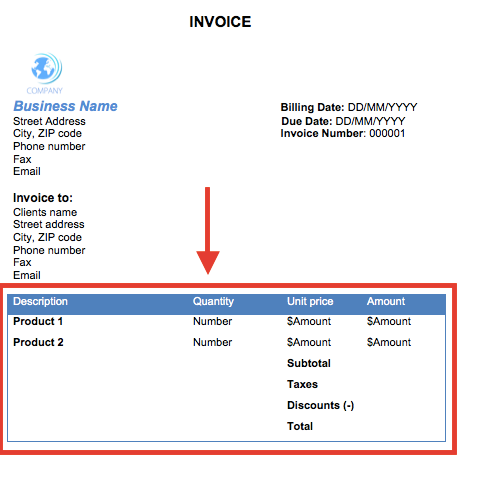
Step 5: Create an Itemized List of Services and Products
The easiest way to add an itemized list of services and products in Word is by creating a table with several rows and columns.
Usually, you’ll need to create four columns for:
- The name and description of the products or services. On the table, label this row as “Description” or “Product Description”.
- Quantity of products. For short, name the row “Quantity” or “QTY”.
- Unit price
- The price for each product, that is usually referred to as “Amount”.
Then, below the headers row, you have to make a separate row for every line of product or service you’ve provided to the client.
Once you’ve filled in all of these invoice details, add three new rows for:
- Subtotal - the sum of all of the totals of the Amount column.
- Any taxes or discounts
- The total - the final amount the customer has to pay, after applying taxes and discounts to the subtotal.
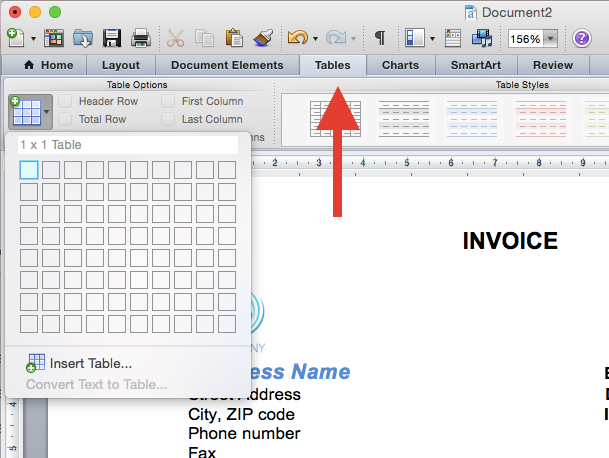
Now, to create a table in Word, you have to go to the Table menu. There you can access the diagram that allows you to select the number of rows and columns you want for your table. You can also pick a table style that best fits your business brand.
After choosing the table design, fill it in with all of the appropriate information along with any taxes or discounts applicable to the purchase, as we previously explained.
In the end, your itemized list of products and services should look like this:
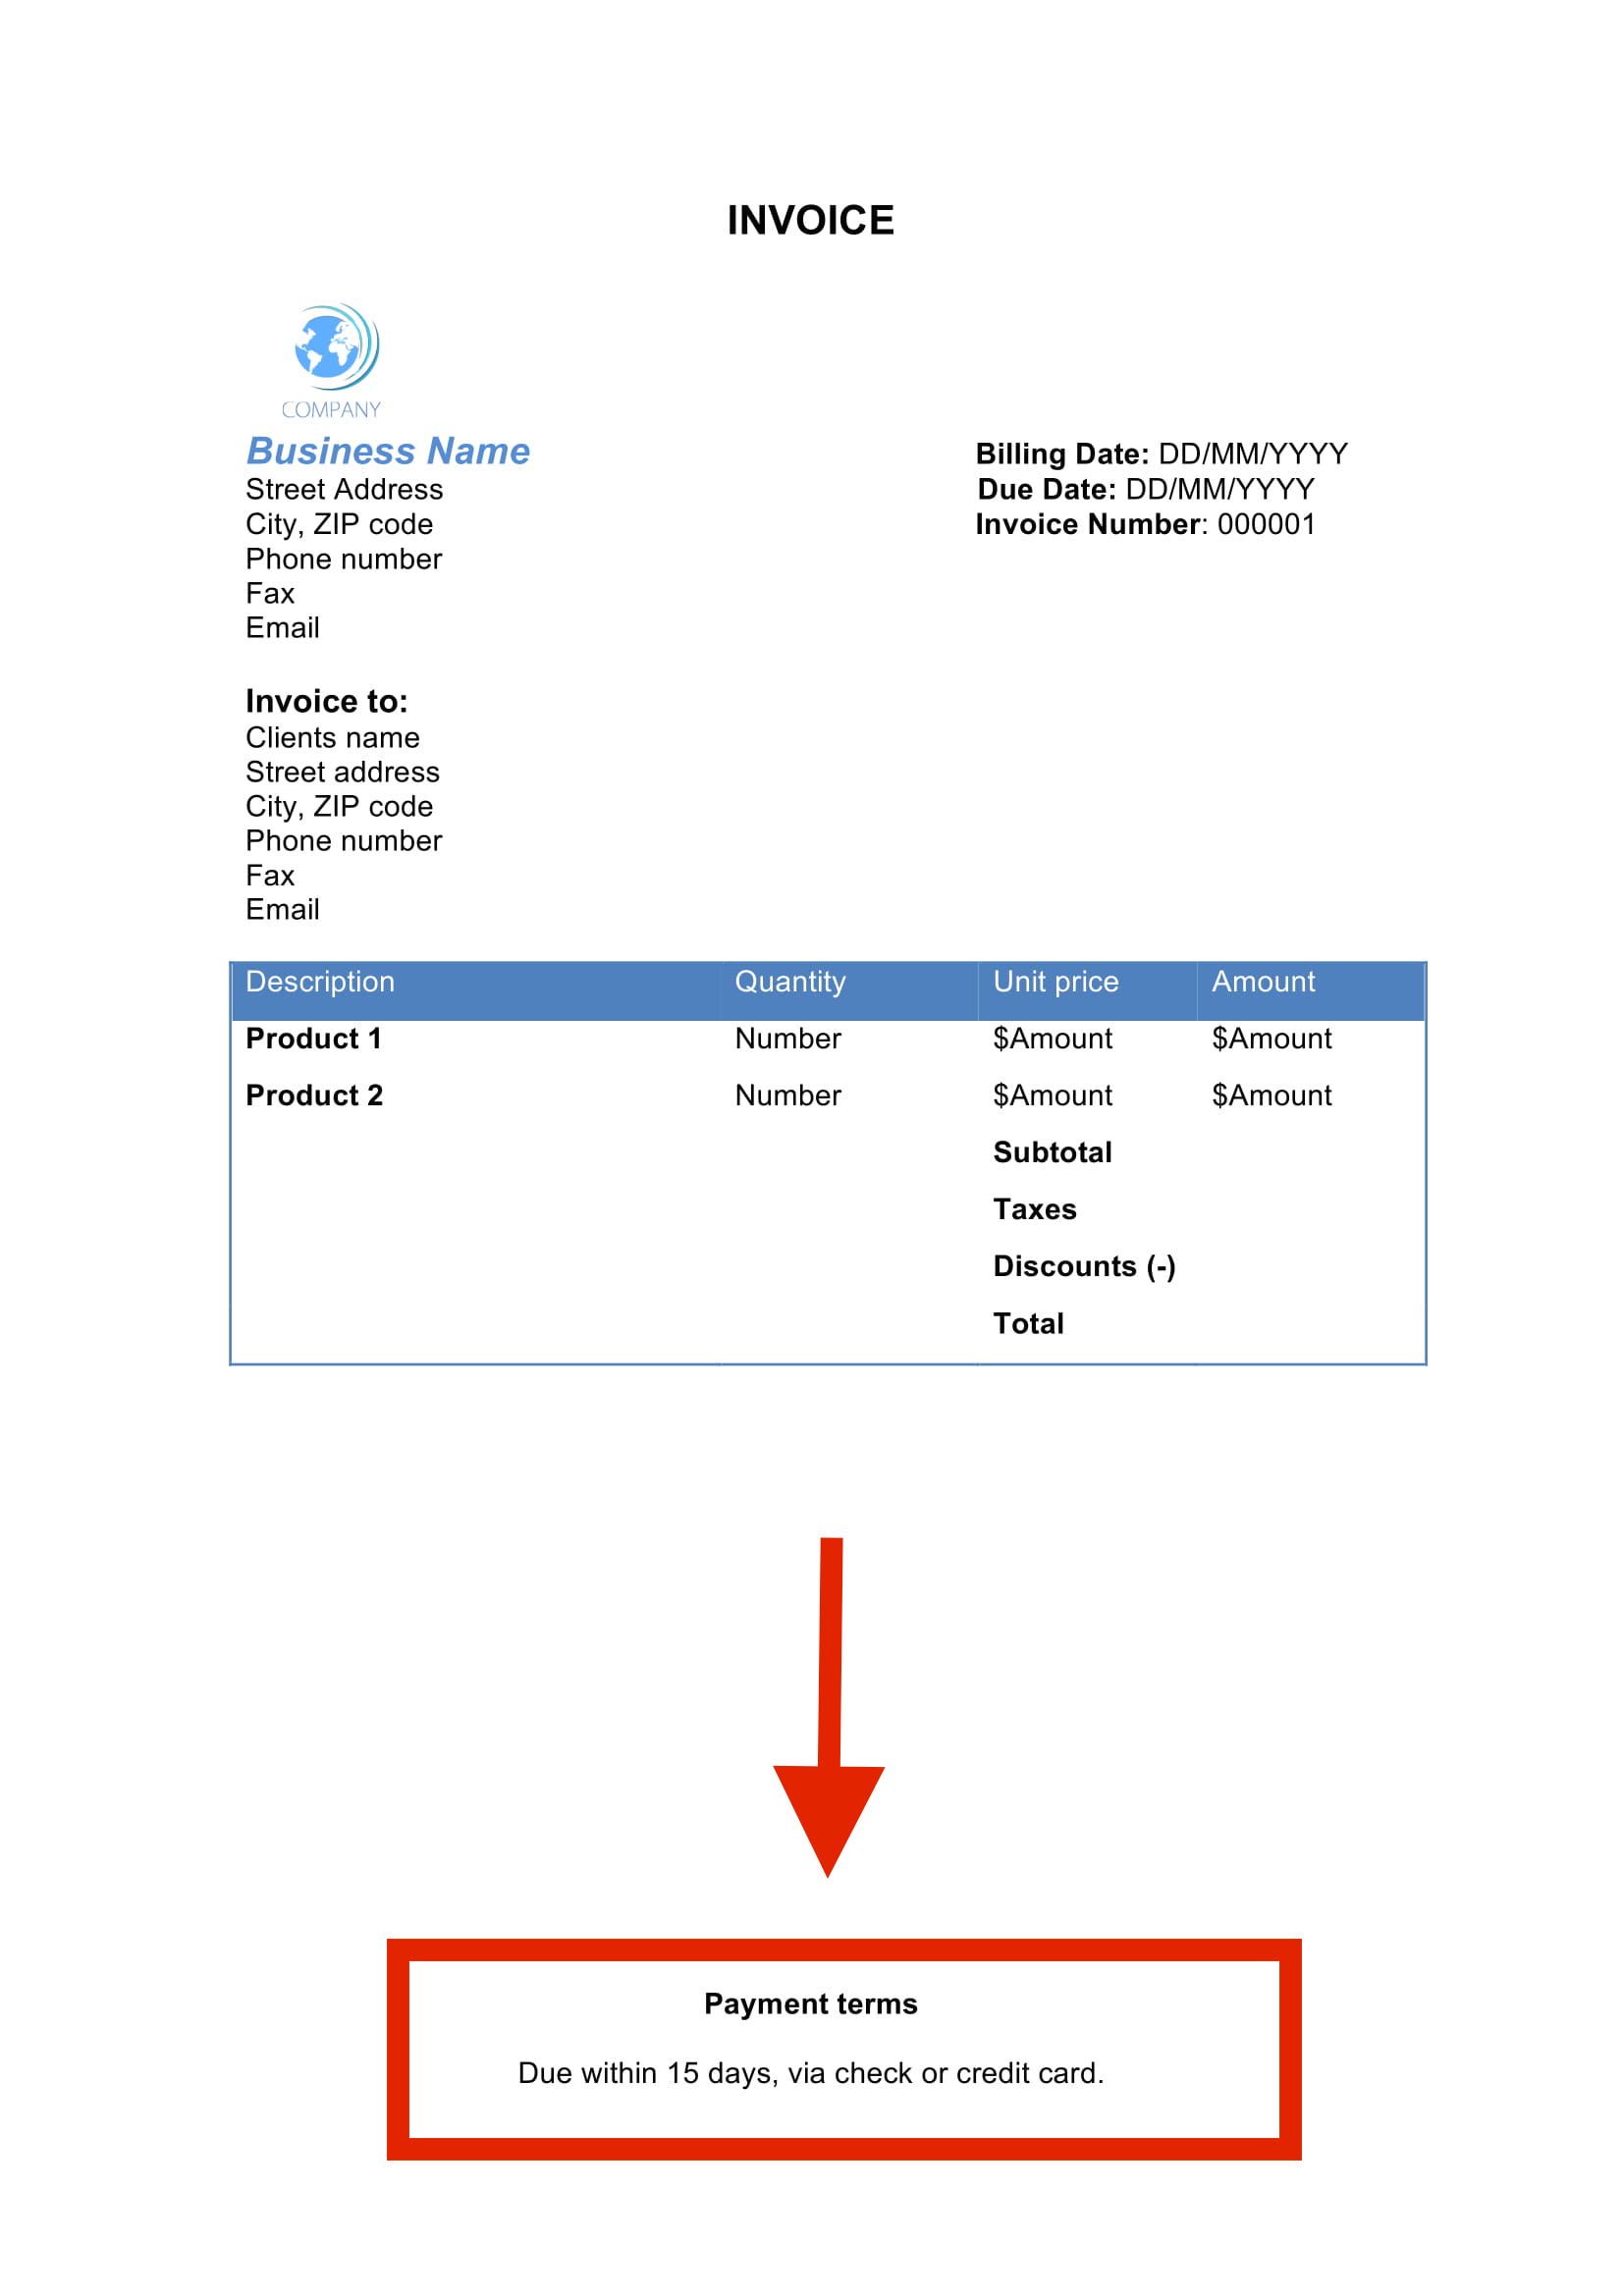
Step 6: Include Additional Payment Terms or Notes
At the very bottom of the invoice add the payment terms, such as “payment due in 30 days via credit card”, as well as any additional notes you might have regarding the invoice.
Step 7: Save and Send Your Finished Invoice
All that’s left to do now is save the finished invoice as a PDF and send it out to your customer. This step is the same as we explained in the previous section.
And you’re done! That’s how you create an invoice template in Word from beginning to end.
What Are the Advantages and Disadvantages of Creating an Invoice in Word
So far we’ve discussed how to create an invoice in Word, but how convenient is this method for your small business accounting?
Let’s find out by going through the main advantages and disadvantages of Word invoicing.
Advantages of Using a Word Invoice
Advantages of using a Word invoice include:
- Easily accessible templates
- Free of charge
- A variety of invoice templates to choose from
- Flexibility in making custom changes in design like color, font, business logo, etc.
Disadvantages of Using a Word Invoice
Microsoft Word might be a budget-friendly program to create invoices with, but its disadvantages actually outweigh the benefits.
First, using the same templates as thousands of other companies may make your business appear cheap and unprofessional to the client.
But even if you create a unique template from scratch, the manual process requires a lot of effort and accounting knowledge, which becomes time-consuming and tedious very fast.
And whenever you need to make changes to a Word invoice, its format gets easily scrambled, making it hard to work with. If you encounter similar challenges with PDF documents, learning how to edit a pdf in word can help simplify adjustments and maintain proper formatting
At the same time, you can’t insert any formulas to calculate the sum total of the purchase, applicable taxes, or discounts. Everything has to be determined manually, which leaves plenty of room for accounting errors.
These errors take time to fix and may cost your business extra fees, delayed payments, and leave customers unsatisfied.
That’s why it’s important that your business has an automated invoice management system put in place, that streamlines the entire invoicing process, and eliminates any errors.
Blank Word Invoice Templates for Business
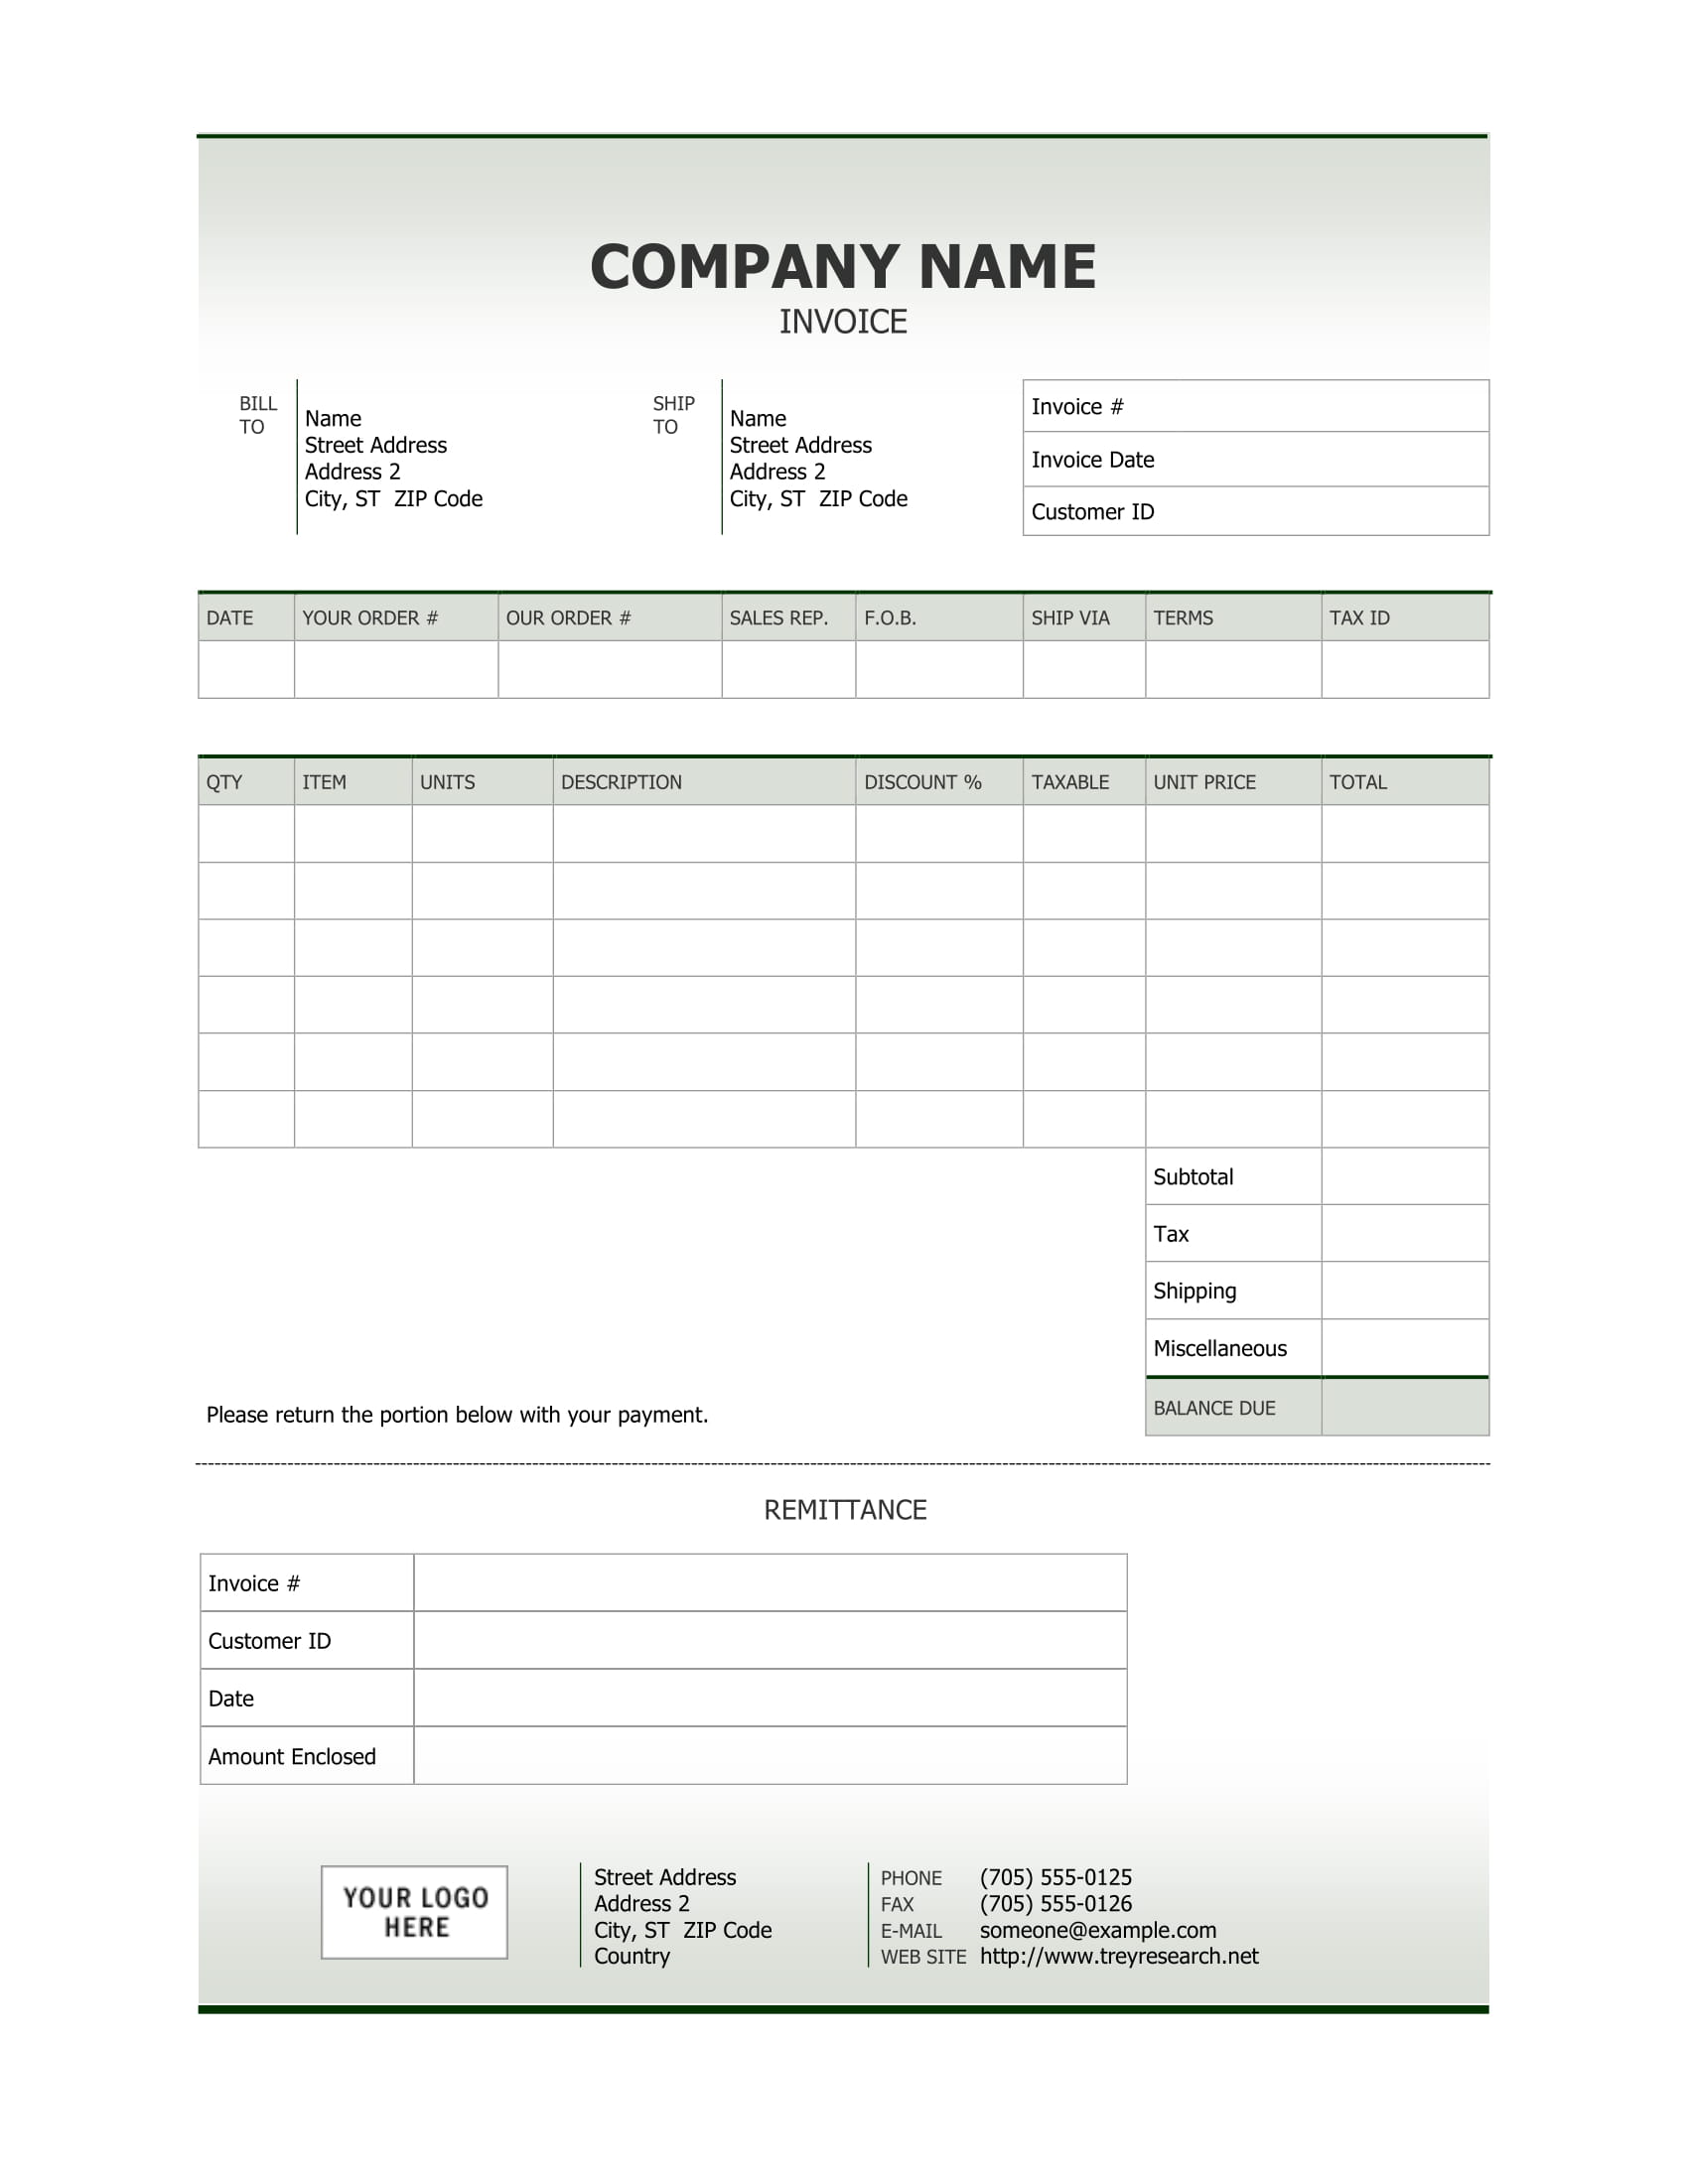
Clean Sales Invoice Template
This simple and professional Word sales invoice template features all of the appropriate elements of an invoice, along with an extra remittance section for returning a payment.
Where to find it: Microsoft Templates Gallery
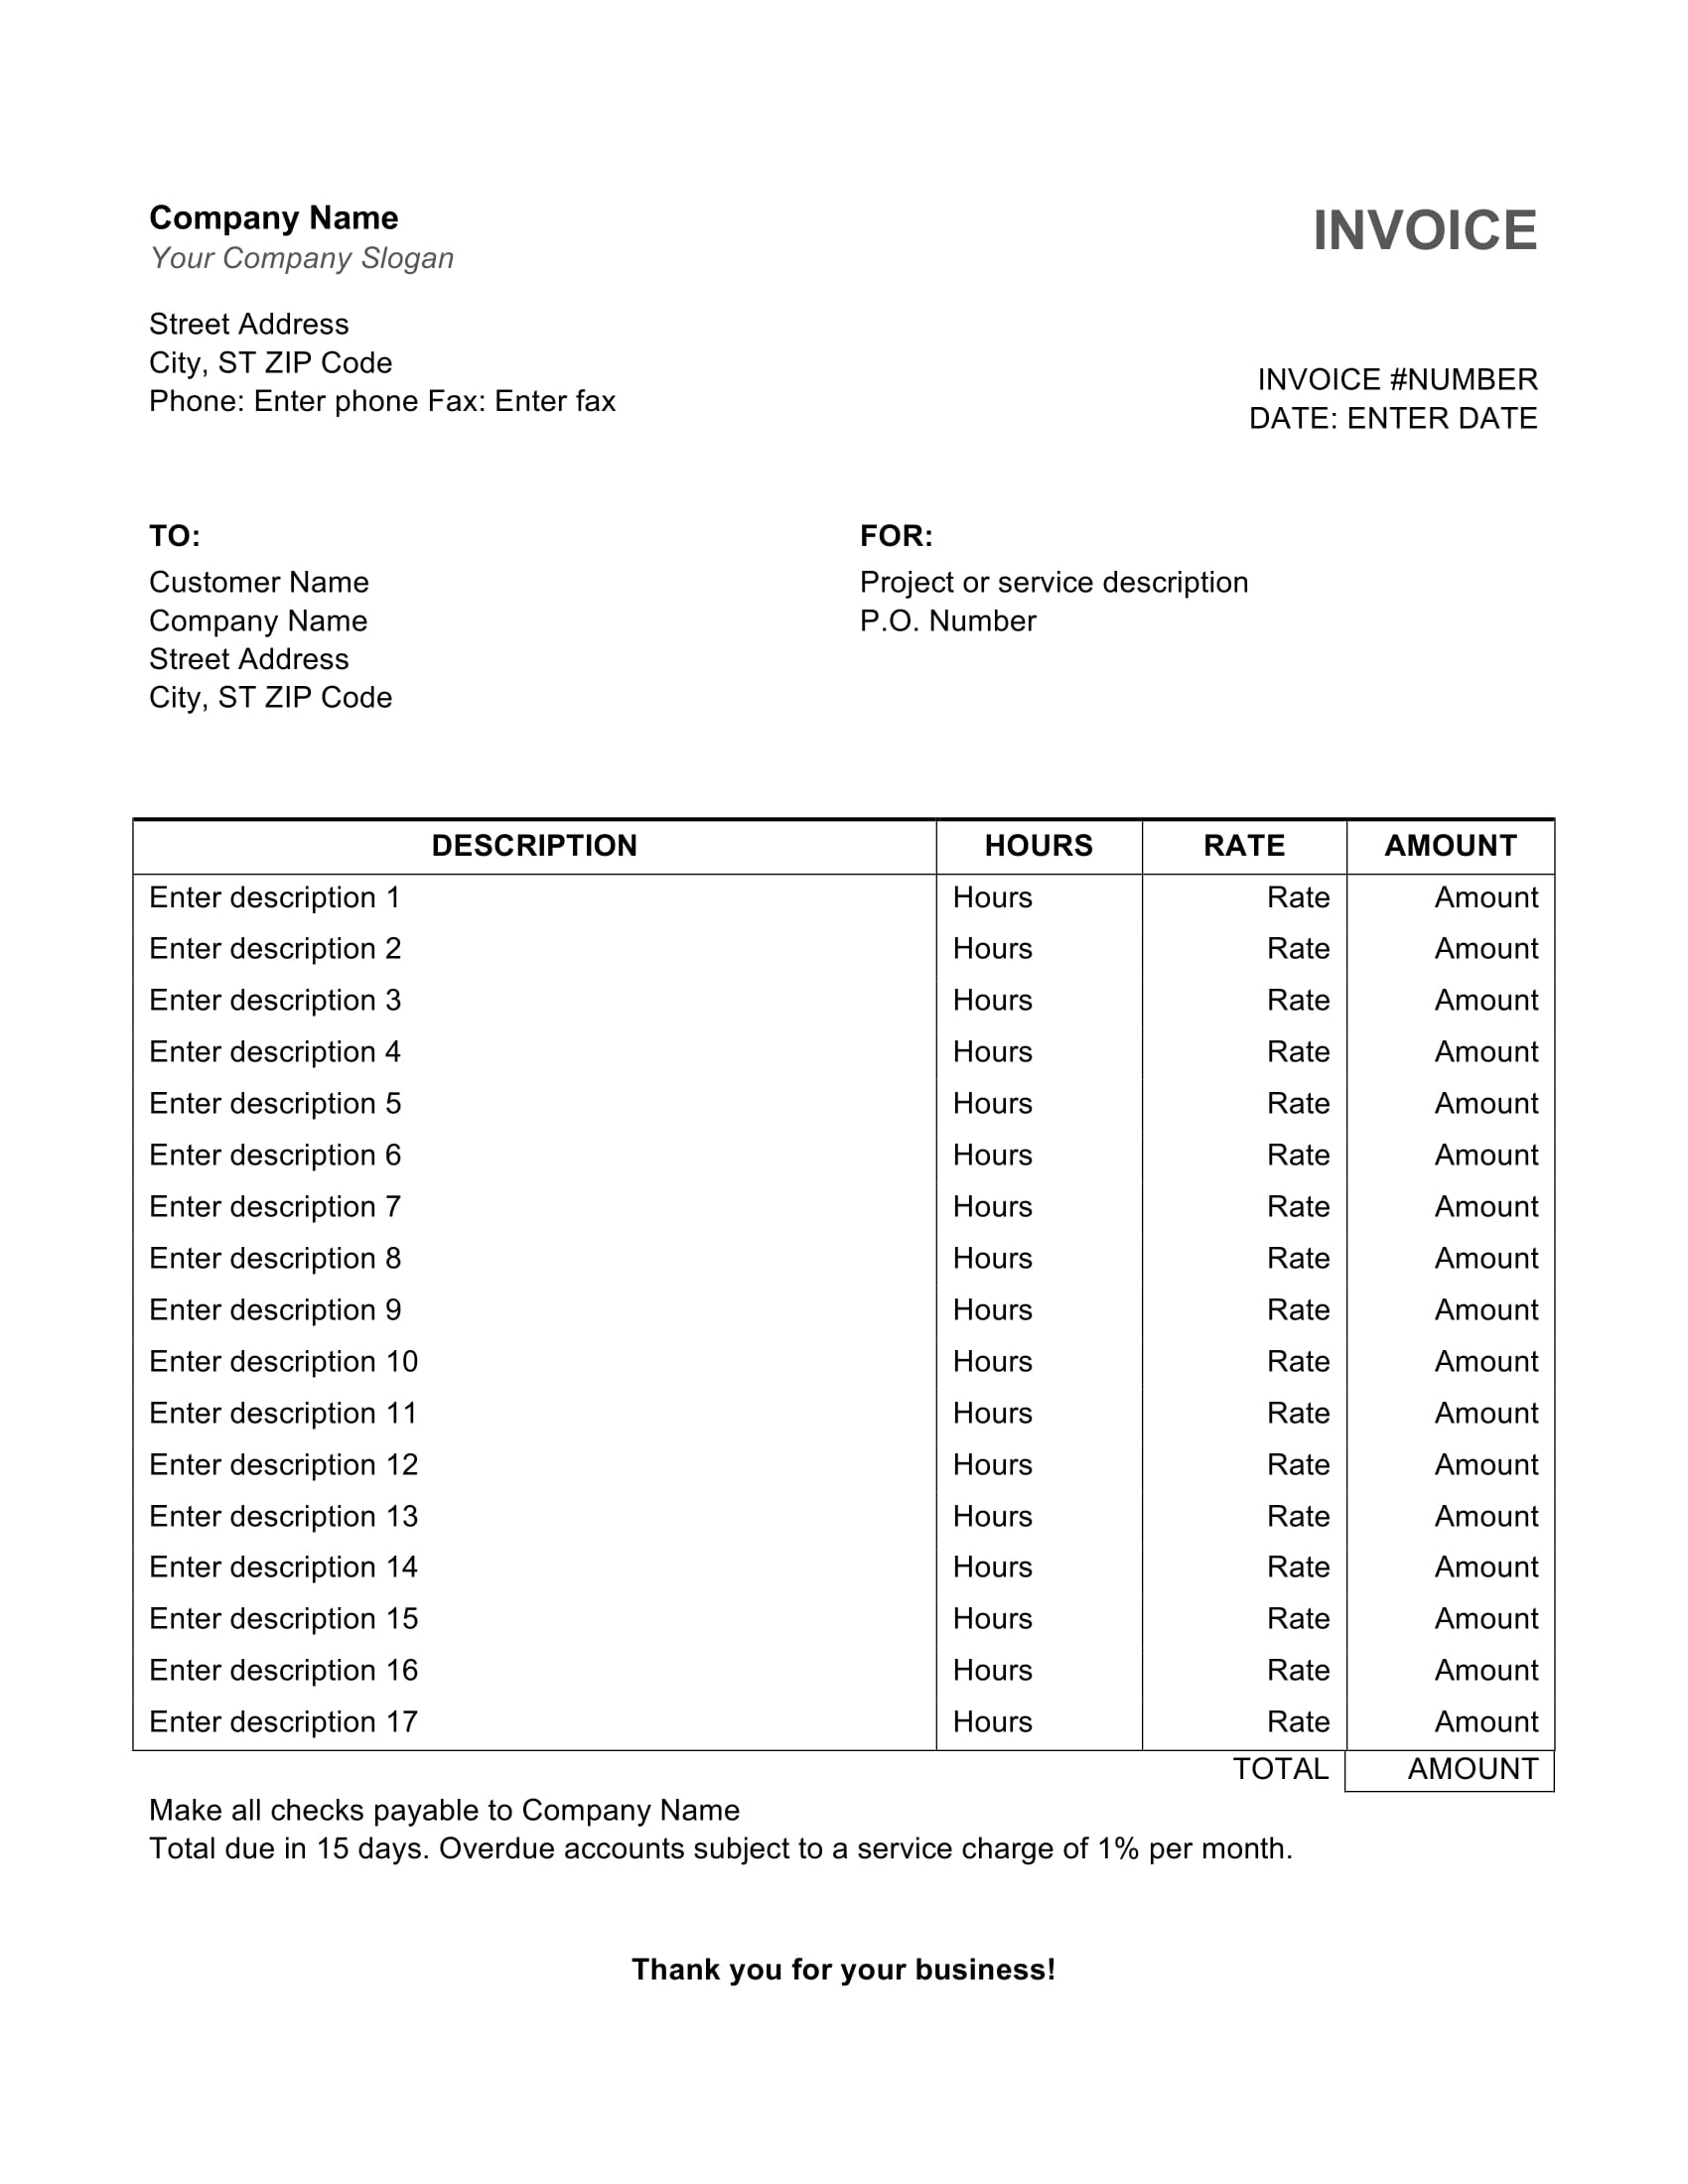
Simple Service Invoice Template
If your business bills customers by the hour, this Word service invoice template is the right choice for you. It allows you to easily include the service description, the rate you charge, and the total hours worked, just by filling in the premade itemized table.
Where to find it: Microsoft Templates Gallery
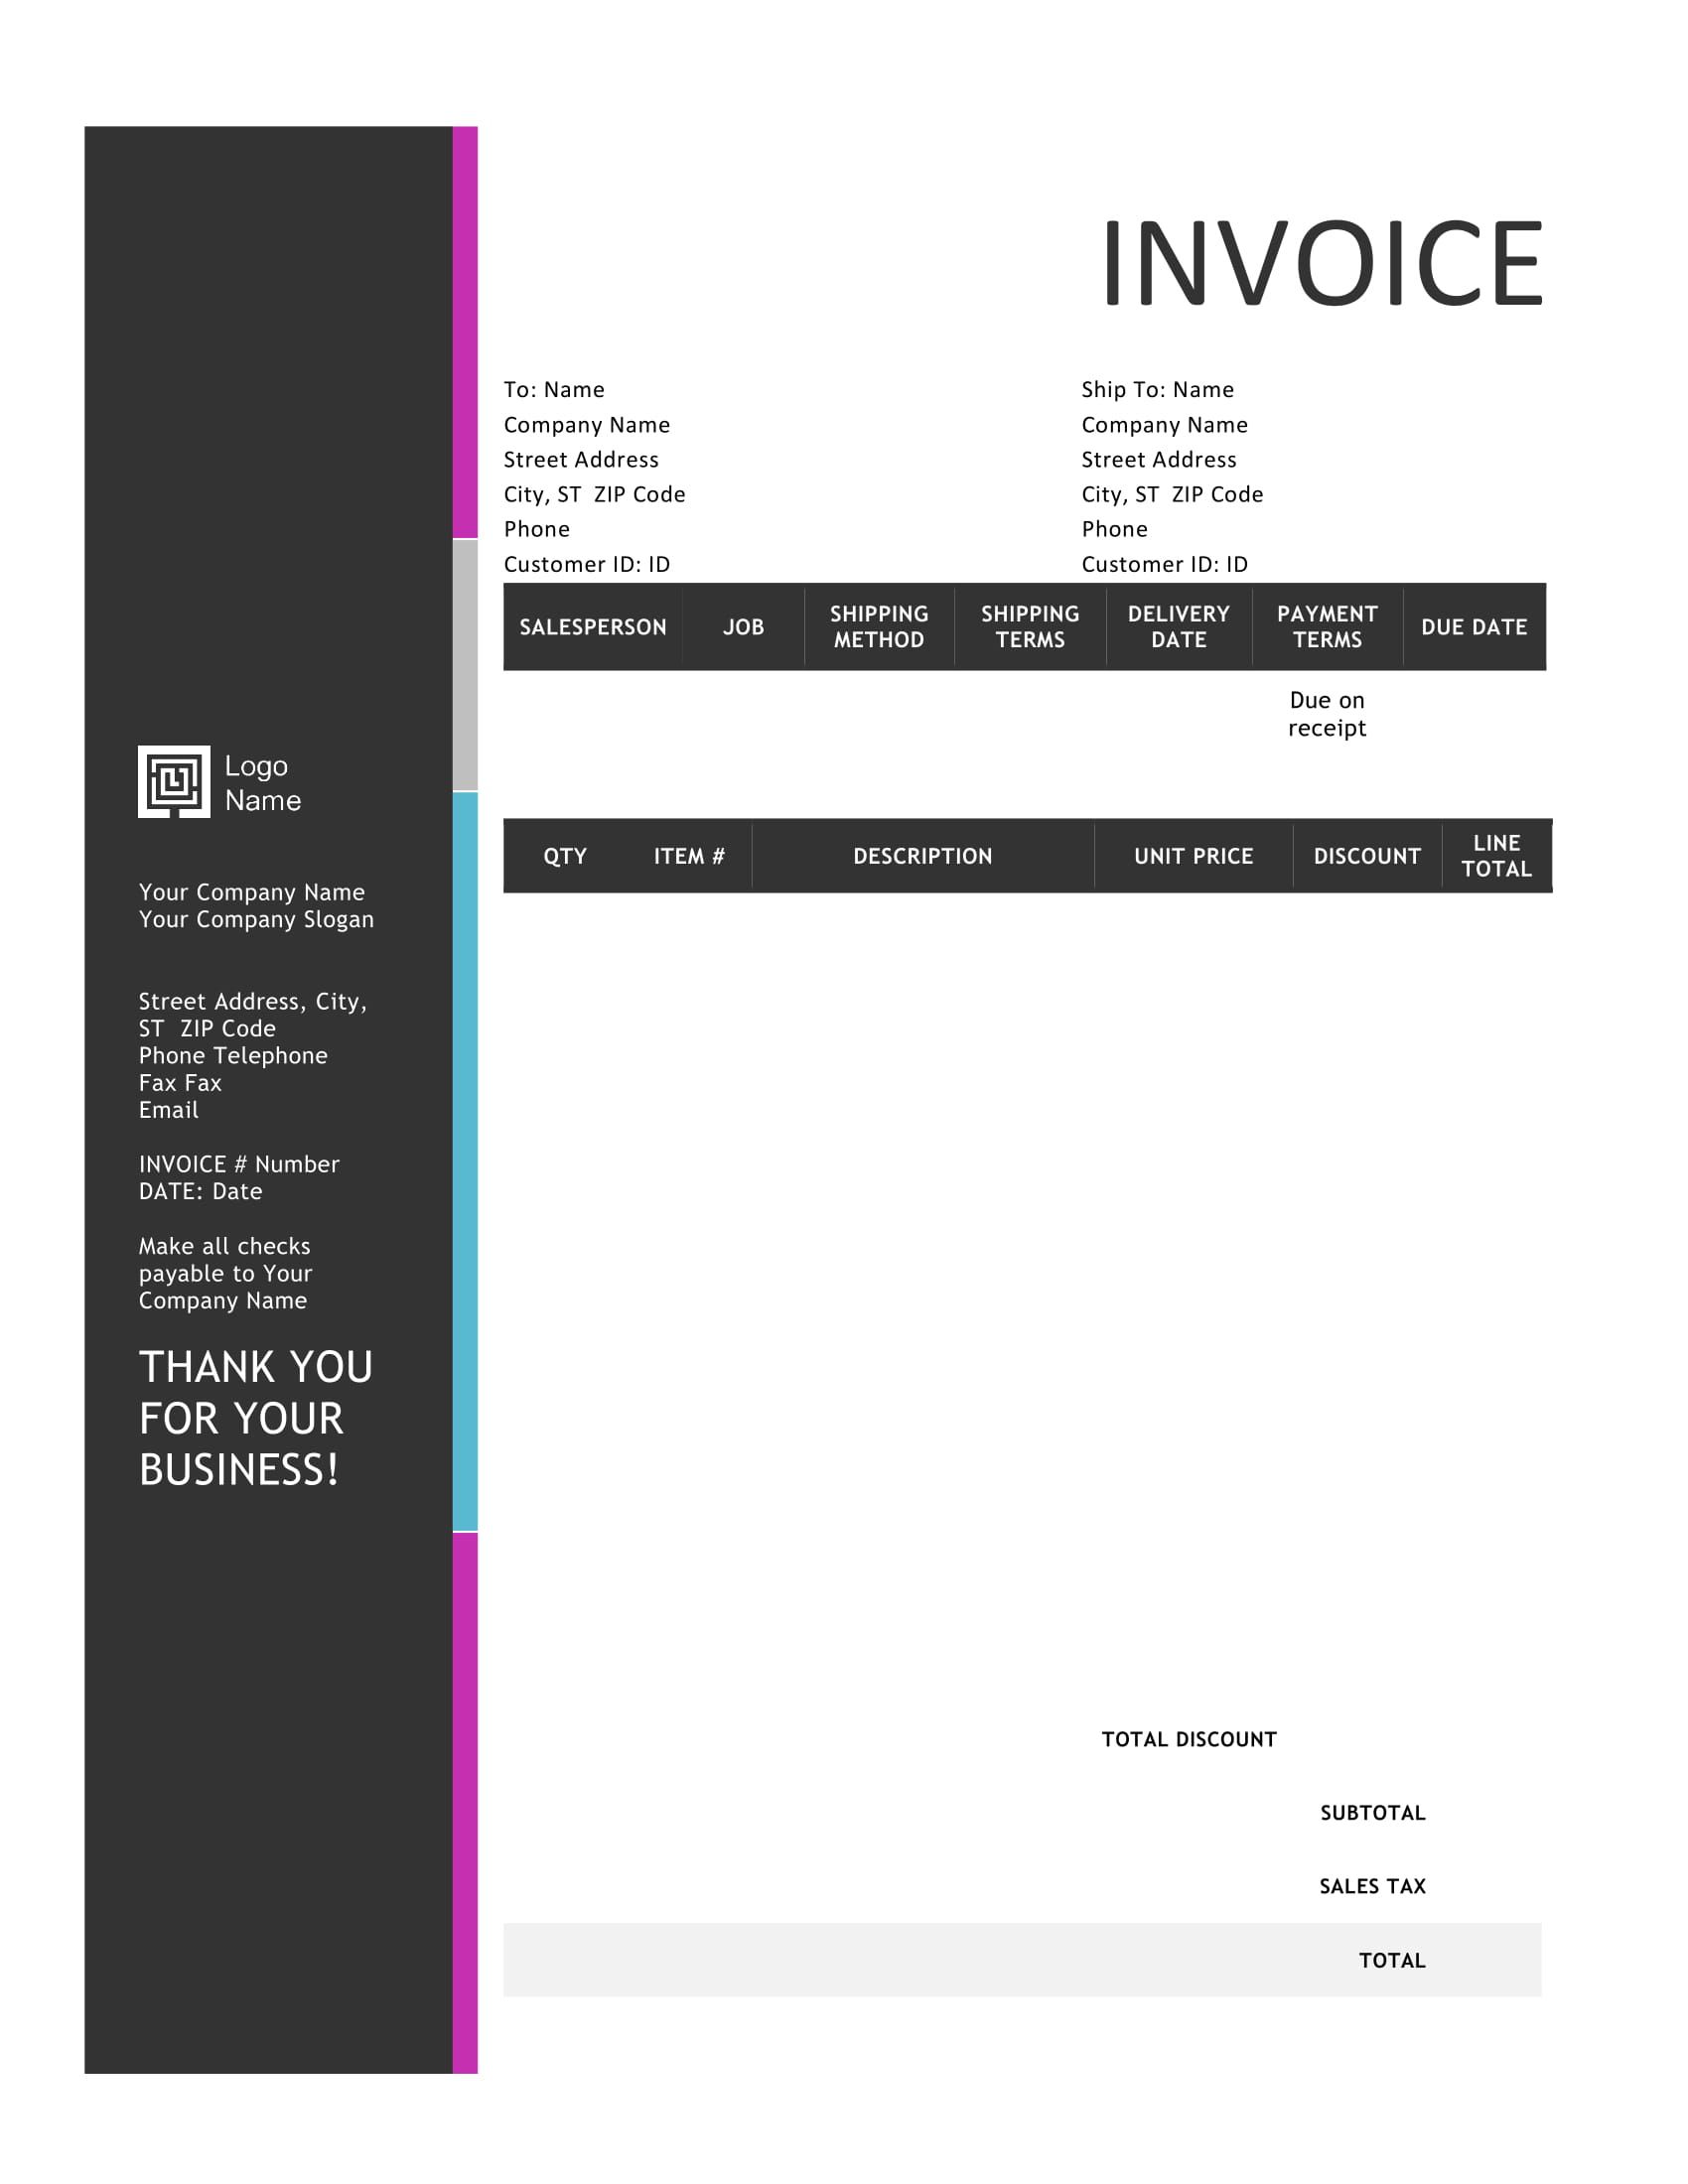
Bold Stylish Sales Word Invoice
Is your business part of a creative industry, such as design, publishing, or architecture?
Do you want to add a bit more color and style to the invoices you issue?
Then consider this bold, modern Word invoice template as an alternative. The template switches up the traditional format of an invoice by highlighting your business information in a big bright sidebar on the left of the page.
Where to find it: Microsoft Templates Gallery
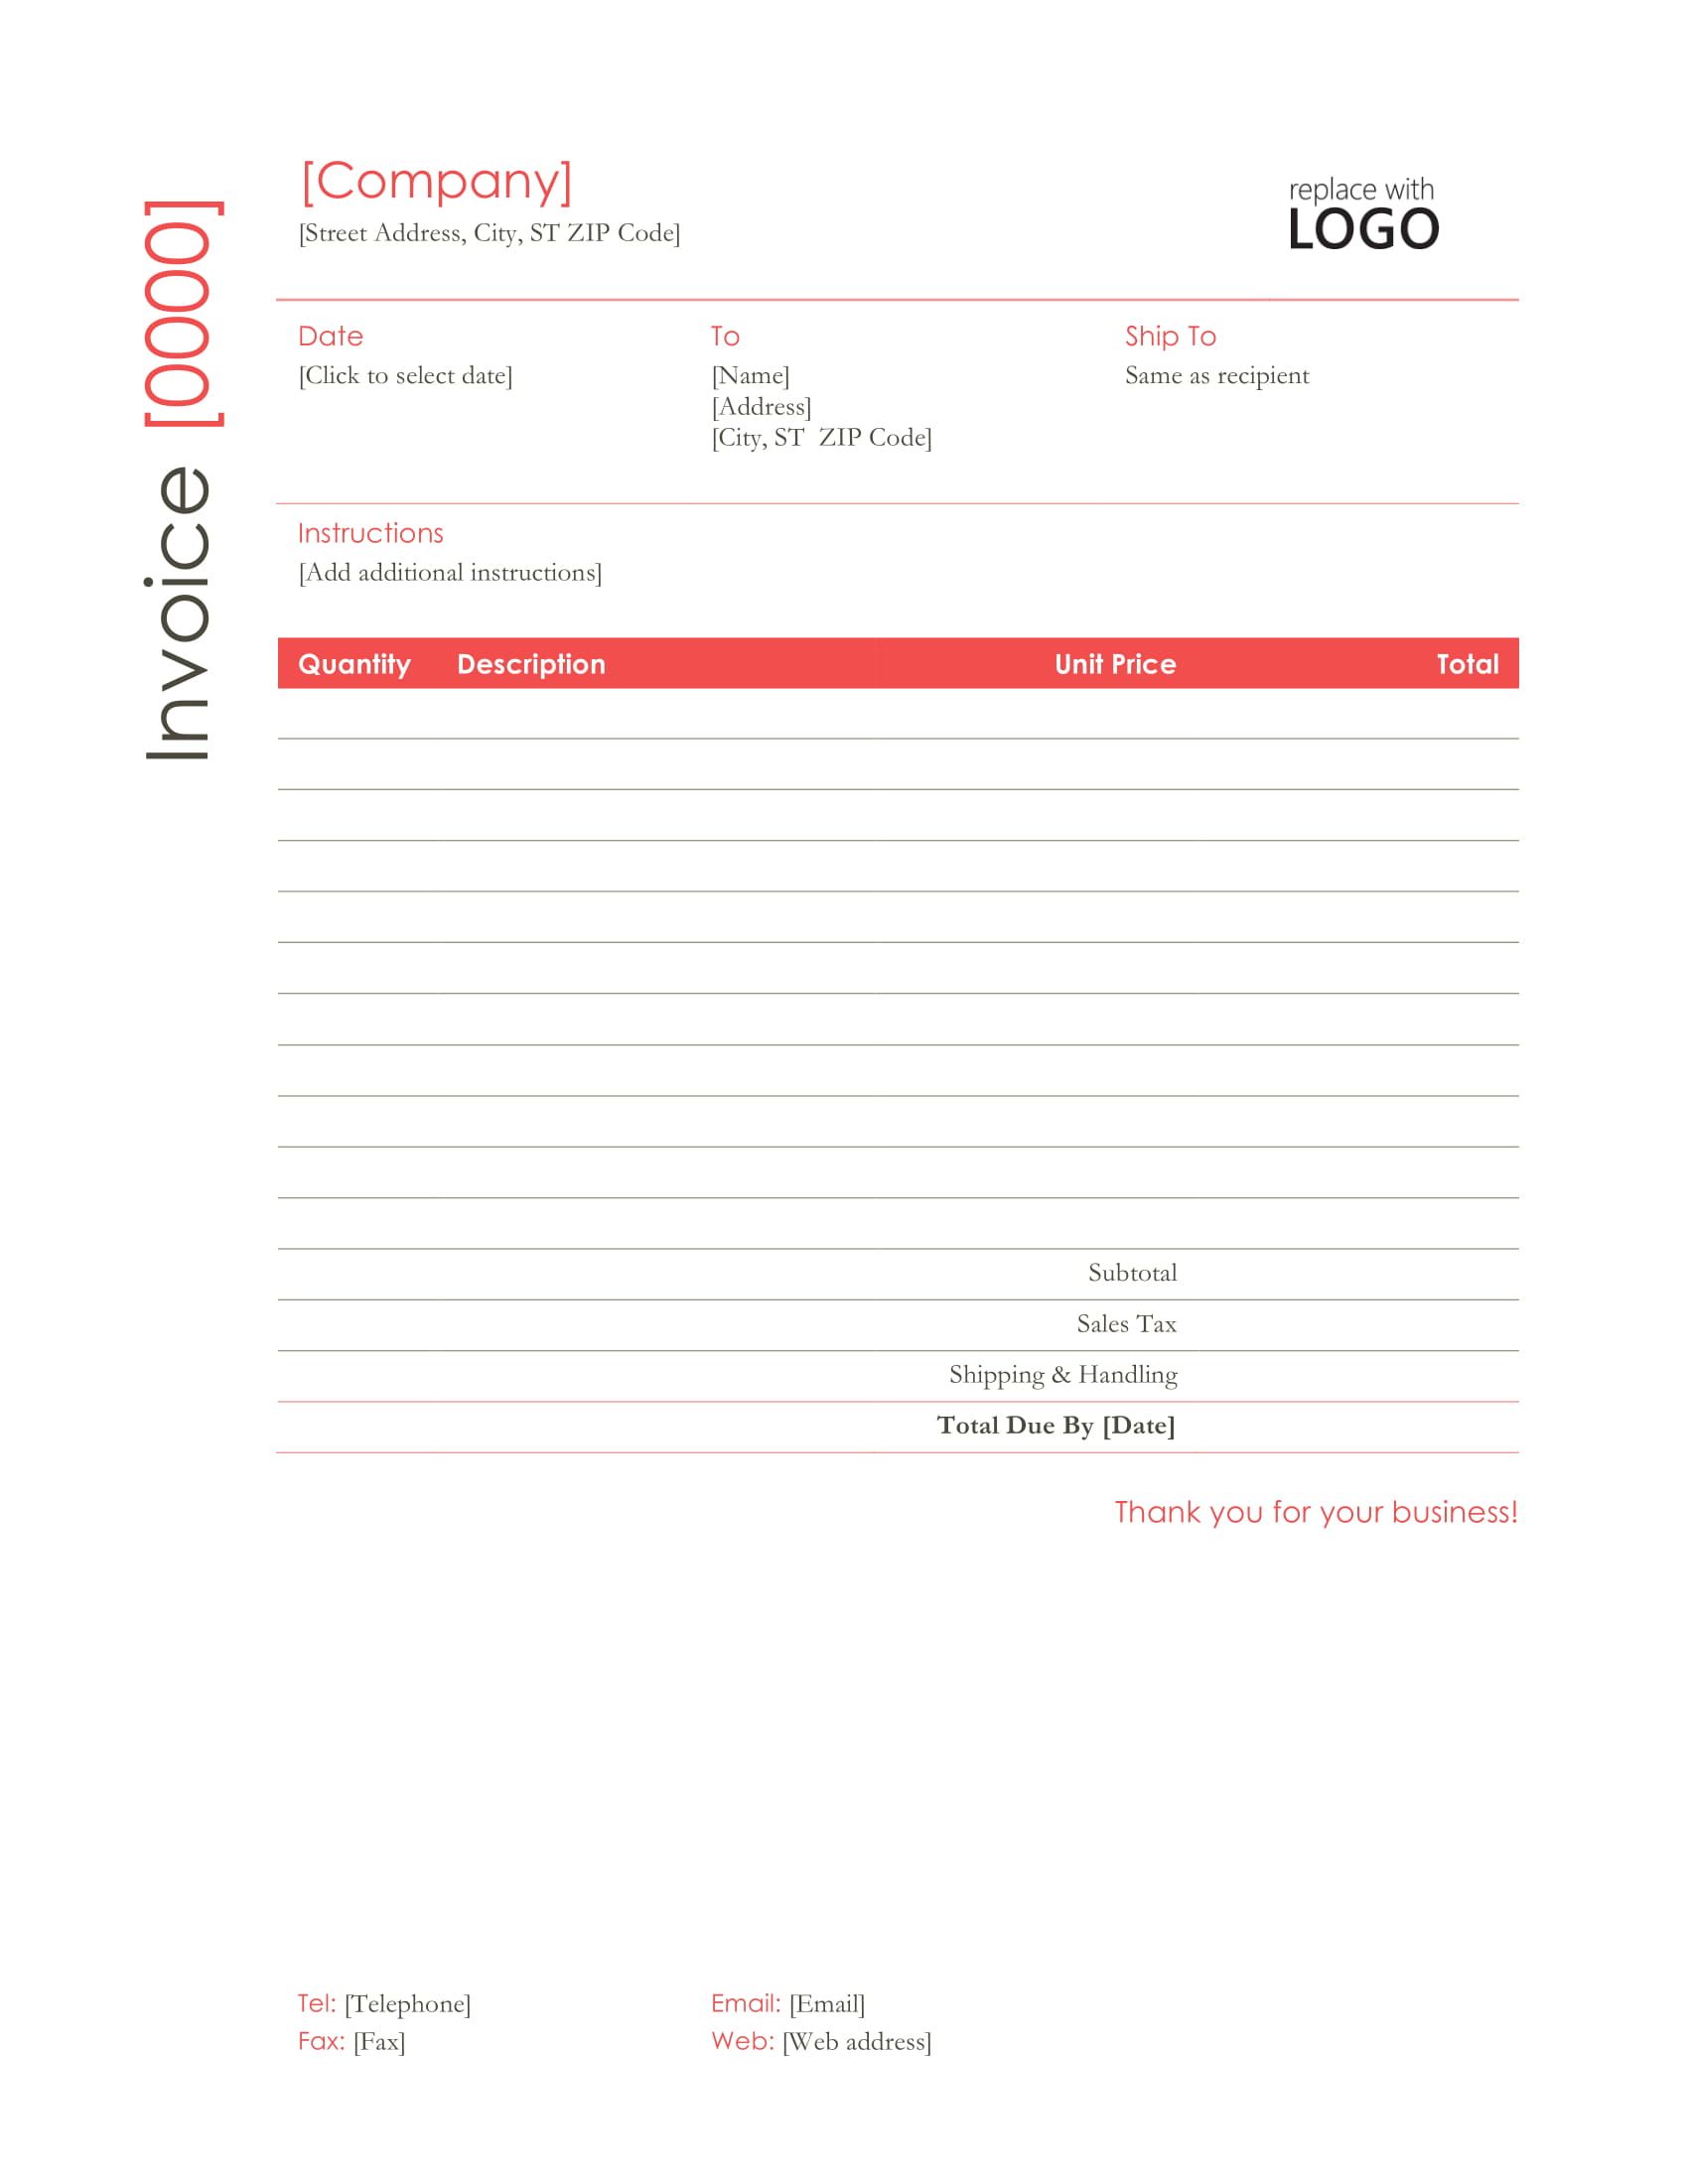
Red Professional Invoice Template
If you’re looking for a modest invoice with a sparkle of color, give this red invoice template a try.
The format is polished and professional, but the bright highlighted headers make it stand out.
If red doesn’t suit your business’ brand, you can always edit and personalize the colors in Word.
Where to find it: Microsoft Templates Gallery
How AI Simplifies Financial Management
With AI tools, businesses can streamline tasks such as budgeting, invoicing, expense tracking, and financial reporting. AI reduces manual data entry errors by auto-populating financial fields and reconciling accounts with minimal oversight.
Intelligent dashboards give finance teams a clear view of financial health, allowing for better planning and faster decision-making. Whether you're managing payroll, accounts receivable, or compliance, AI empowers businesses to maintain accuracy, save time, and focus on strategic growth.
Creating an Invoice with Invoicing Software
With invoicing software like Deskera, you can create professional invoices within seconds.
Deskera offers over 100+ free premade templates, you can tailor to your business brand with your preferred colors, font, business logo, signature, and so much more.
All you have to do is head over to the Deskera invoice generator, choose your favorite template, and customize it by filling in the appropriate details at the sidebar on the left of the page.
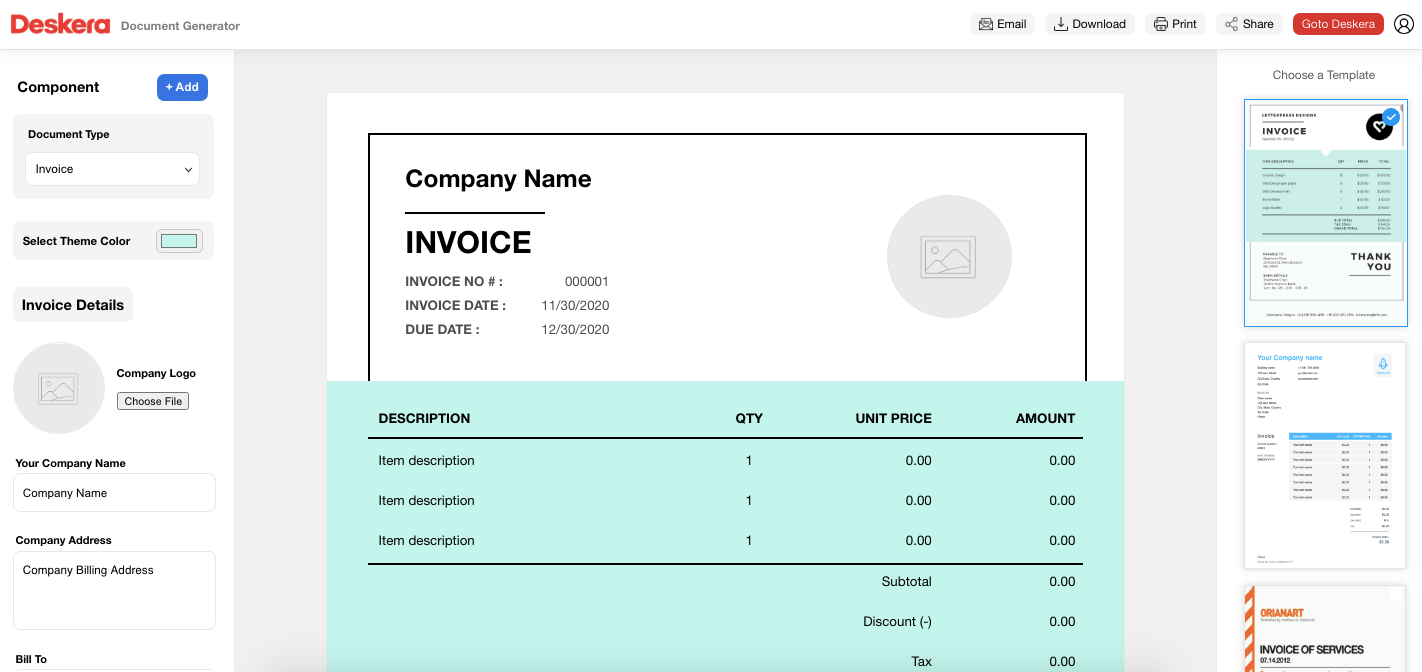
Once you’ve finished with personalizing the design and adding all your invoice elements, just press Share at the top right of the page, to download, print, or email the invoice to your client.
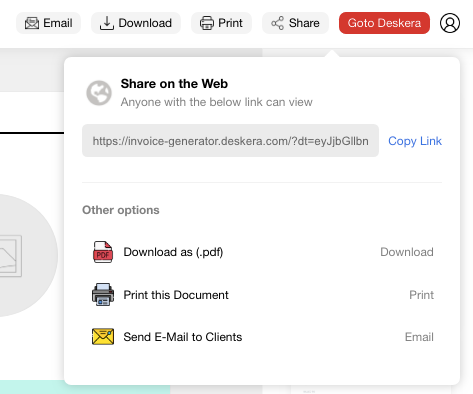
And just like that, you’ve automated invoice creation with Deskera!
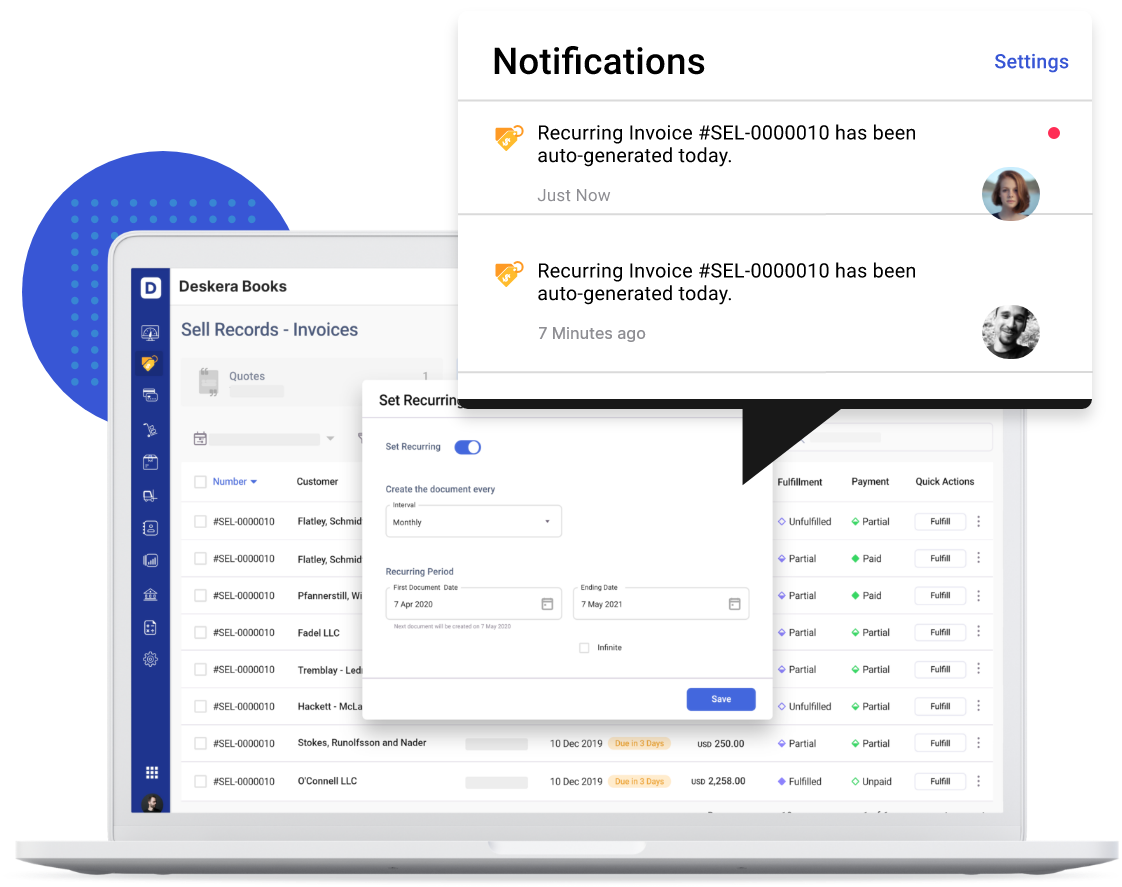
That's not the end of it, though.
With Deskera you can automate almost every part of your invoicing process, with features such as recurring payments, reminders for outstanding invoices, automatic tax compliance, and so much more.
The best part: you can access the software anytime, anywhere, from your mobile phone, tablet, or desktop, for just $9 per month.

You can even try it out right away, with our completely free trial! No credit card details required.
Key Takeaways
And that’s a wrap! We hope you found our guide on how to create an invoice in word helpful.
To recap, here are some of the main points we’ve covered:
- To make an invoice from a Word Invoice template you have to:
- Select your invoice template from the Word document gallery
- Customize the template with your brand colors, logo, and preferred font.
- Save your completed invoice in PDF
- Send the invoice via fax, email, or an invoicing software
- The steps to making an invoice from scratch include:
- Open a blank Word document
- Create a header with the business information
- Add the invoice billing date, due date, and invoice number
- Enter the client contact information
- Include an itemized list of products and services with their totals
- Finish with payment terms and additional notes
- Save and send the document
- Save time and money with Deskera, by automating your entire invoicing process.
Related Articles